Olá amigos, satisfação em escrever novamente para vocês.
Hoje veremos de maneira simples a instalação da ferramenta Open-AudIT no Linux.
O Open-AudIT também é suportado no Windows, porem não chegaremos a entrar neste método de instalação devido a performance da aplicação que ao ser executada no linux é superior ao Windows nesta situação.
Sistemas linux suportados: RedHat,Centos,Debian e Ubuntu.
Funcionalidades da Ferramenta
Open-AudIT é uma ferramenta de código livre que permite os administradores realizarem inventários de sua infraestrutura.
A propagação do agente pode ser realizado através de GPO para todos os computadores e servidor do domínio, assim a gestão de todos os ativos da sua rede podem ser controladas pela ferramenta.
Iniciando a instalação
Primeiramente se você tiver uma instalação mínima do Centos ou RedHat, provavelmente será necessário instalar o pacote perl-core para poder executar o instalador.
SELinux
Caso o SELinux estiver rodando e ativo é necessário desativá-lo.
Parando a execução
Para que não seja iniciado após uma reinicialização, edite o arquivo /etc/sysconfig/config e altere a linha:
alterar para:
Firewall
Para desativar firewall completamente, execute os seguintes comandos:
Evitar a inicialização com SO:
Instalando o Apache
Agora, inicie o serviço Apache e ativá-lo na inicialização:
systemctl start httpd.service
systemctl enable httpd.service
Instalando o MySQL (MariaDB)
yum install mariadb-server mariadb -y
Quando a instalação for concluída, inicie o MariaDB e ative-a no boot:
systemctl start mariadb
systemctl enable mariadb
Depois de iniciar o MariaDB, execute o script de segurança inicial para remover alguns padrões arriscados:
mysql_secure_installation
Instalando o PHP
yum install php php-mysql -y
Para que o Apache reconheça o mecanismo PHP, reinicie-o:
systemctl restart httpd.service
Instalando o OpeAudIT
Realizando o Download do instalador:
wget http://dl-openaudit.opmantek.com/OAE-Linux-x86_64-release_2.1.1.run
Tornando o arquivo executável.
chmod +x "nome do arquivo"
Iniciando a instalação:
Resumo do log da instalação:
++++++++++++++++++++++++++++++++++++++++++++++++++++++
Open-AudIT (1.4.0) Installation script
++++++++++++++++++++++++++++++++++++++++++++++++++++++
This installer will install Open-AudIT into /usr/local/omk.
To select a different installation location please rerun the installer with the -t option.
Ok to proceed with installation?
Type 'y' or hit <Enter> to accept, any other key for 'no': y
++++++++++++++++++++++++++++++++++++++++++++++++++++++
performing pre-installation steps
++++++++++++++++++++++++++++++++++++++++++++++++++++++
++++++++++++++++++++++++++++++++++++++++++++++++++++++
Opmantek daemon init scripts detected
++++++++++++++++++++++++++++++++++++++++++++++++++++++
Ok to shut down running Opmantek daemons for the duration of the installation?
Type 'y' or hit <Enter> to accept, any other key for 'no': y
Looking for old installations...
++++++++++++++++++++++++++++++++++++++++++++++++++++++
An old legacy installation was detected.
++++++++++++++++++++++++++++++++++++++++++++++++++++++
The installer has found a pre-existing installation of one or more
Opmantek products in /usr/local/omk.
The installation can proceed but may cause disruptions to installed legacy products other than Open-AudIT.
If you agree to continue, the installer will take a backup snapshot of your complete previous installation and then prepare the installation environment for Open-AudIT.
Do you want to continue the installation?
Type 'y' or hit <Enter> to accept, any other key for 'no': y
Creating legacy snapshot, please wait...
Snapshot created, file name: /root/omk-legacy-2014-08-20.tgz
The installer has created a full snapshot of your previous installion in /root/omk-legacy-2014-08-20.tgz. The installation of Open-AudIT will now proceed.
Should you need to revert to your previous installation status, simply remove all contents of /usr/local/omk and unpack the snapshot:
rm -rf /usr/local/omk/* && tar -C / -xzvf /root/omk-legacy-2014-08-20.tgz
Hit <Enter> when ready to continue:
++++++++++++++++++++++++++++++++++++++++++++++++++++++
Checking the Open-AudIT dependencies
++++++++++++++++++++++++++++++++++++++++++++++++++++++
Required package mysql-server is installed.
Required package apache2 is installed.
++++++++++++++++++++++++++++++++++++++++++++++++++++++
Required packge apache2-utils is not installed.
++++++++++++++++++++++++++++++++++++++++++++++++++++++
Open-AudIT requires package apache2-utils to be installed and configured.
Do you want to install this package now?
Type 'y' or hit <Enter> to accept, any other key for 'no': y
Using apt-get to install apache2-utils
Required package libapache2-mod-proxy-html is installed.
Required package libapache2-mod-php5 is installed.
Required package openssh-client is installed.
Required package php5 is installed.
Required package php5-ldap is installed.
Required package php5-mcrypt is installed.
Required package php5-mysql is installed.
Required package php5-snmp is installed.
Required package nmap is installed.
Required package zip is installed.
Required package wget is installed.
Required package curl is installed.
Required package sshpass is installed.
Required package screen is installed.
Required package smbclient is installed.
Required package logrotate is installed.
++++++++++++++++++++++++++++++++++++++++++++++++++++++
Required packge libtime-parsedate-perl is not installed.
++++++++++++++++++++++++++++++++++++++++++++++++++++++
Open-AudIT requires package libtime-parsedate-perl to be installed and configured.
Do you want to install this package now?
Type 'y' or hit <Enter> to accept, any other key for 'no': y
Using apt-get to install libtime-parsedate-perl
-------COMMAND RETURNED EXIT CODE 100--------
apt-get -yq install libtime-parsedate-perl Reading package lists... Building dependency tree... Reading state information... E: Unable to locate package libtime-parsedate-perl
----------------------------------------
Looking for an existing Open-AudIT Community installation...
Do you want to perform a backup of your Open-AudIT installation?
Type 'y' or hit <Enter> to accept, any other key for 'no': y
Backing up database openaudit
Open-AudIT Backup created successfully, file name: /root/open-audit-backup-2014-08-20.tgz
++++++++++++++++++++++++++++++++++++++++++++++++++++++
copying files
++++++++++++++++++++++++++++++++++++++++++++++++++++++
........................................................................................................................................................................................................................................................................
++++++++++++++++++++++++++++++++++++++++++++++++++++++
done copying files
++++++++++++++++++++++++++++++++++++++++++++++++++++++
++++++++++++++++++++++++++++++++++++++++++++++++++++++
performing post-installation operations
++++++++++++++++++++++++++++++++++++++++++++++++++++++
Open-AudIT needs the live configuration files in /usr/local/omk/conf/, and ships the defaults in /usr/local/omk/install/. If you agree, the installer will copy all missing files to the live configuration directory - it will not overwrite any files that are already present.
Ok to copy new or missing config files into the live configuration directory?
Type 'y' or hit <Enter> to accept, any other key for 'no': y
Init script for Opmantek daemon already present.
Installing conveniece symlinks
++++++++++++++++++++++++++++++++++++++++++++++++++++++
Updated logrotation config file omk-rotate.conf available
++++++++++++++++++++++++++++++++++++++++++++++++++++++
Ok to install the updated logrotation config file omk-rotate.conf?
Type 'y' or hit <Enter> to accept, any other key for 'no': y
++++++++++++++++++++++++++++++++++++++++++++++++++++++
Updated logrotation config file open-audit-rotate.conf available
++++++++++++++++++++++++++++++++++++++++++++++++++++++
Ok to install the updated logrotation config file open-audit-rotate.conf?
Type 'y' or hit <Enter> to accept, any other key for 'no': y
Upgrading Opmantek Modules file
++++++++++++++++++++++++++++++++++++++++++++++++++++++
Adjusting users, ownerships and permissions
++++++++++++++++++++++++++++++++++++++++++++++++++++++
Priming remaining directories
++++++++++++++++++++++++++++++++++++++++++++++++++++++
Configuration Updates
++++++++++++++++++++++++++++++++++++++++++++++++++++++
The new version of Open-AudIT may have introduced new configuration items, which can be added automatically (with their default settings).
Do you want to import any new configuration settings now?
Type 'y' or hit <Enter> to accept, any other key for 'no': y
Updating common config with new defaults.
Apache config directory unknown or non-existent, cannot install proxy config file!
Please note that the GUI for your Open-AudIT installation will only be available
at the URL http://localhost:8042/ until you configure Apache, and enable the Apache proxy with the config file ./install/04omk-proxy.conf or equivalent.
Hit <Enter> when ready to continue.
++++++++++++++++++++++++++++++++++++++++++++++++++++++
Installing Open-AudIT files
++++++++++++++++++++++++++++++++++++++++++++++++++++++
++++++++++++++++++++++++++++++++++++++++++++++++++++++
Copying Open-AudIT Web files
++++++++++++++++++++++++++++++++++++++++++++++++++++++
Upgrade of existing Open-AudIT installation, no database initialisation required.
++++++++++++++++++++++++++++++++++++++++++++++++++++++
performing final update operations
++++++++++++++++++++++++++++++++++++++++++++++++++++++
++++++++++++++++++++++++++++++++++++++++++++++++++++++
Adjusting Open-AudIT for standalone operation
++++++++++++++++++++++++++++++++++++++++++++++++++++++
Adjusting Login Banner
++++++++++++++++++++++++++++++++++++++++++++++++++++++
Detecting Configuration Changes
++++++++++++++++++++++++++++++++++++++++++++++++++++++
Would you like to see an overview of all changed configuration items?
Type 'y' or hit <Enter> to accept, any other key for 'no': y
Performing config diff check, please wait...
Can't locate Time/ParseDate.pm in @INC (you may need to install the Time::ParseDate module) (@INC contains: /usr/local/omk/bin/../lib /etc/perl /usr/local/lib/perl/5.18.2 /usr/local/share/perl/5.18.2 /usr/lib/perl5 /usr/share/perl5 /usr/lib/perl/5.18 /usr/share/perl/5.18 /usr/local/lib/site_perl .) at /usr/local/omk/bin/../lib/OMK/Common.pm line 74.
BEGIN failed--compilation aborted at /usr/local/omk/bin/../lib/OMK/Common.pm line 74.
Compilation failed in require at /usr/local/omk/bin/opdiffconfigs.pl line 40.
BEGIN failed--compilation aborted at /usr/local/omk/bin/opdiffconfigs.pl line 40.
The configuration comparison tool has detected some differences between the shipped defaults (in /usr/local/omk/install) and the active settings (in /usr/local/omk/conf).
The affected files are:  opModules.nmis opCommon.nmis
A detailed listing of these differences has been saved in /tmp/Open-AudIT-config-diffs-2014-08-20.
You should review those differences (using less or an editor like nano, vi or emacs) and adjust your configuration settings accordingly.
Hit <Enter> when ready to continue:
++++++++++++++++++++++++++++++++++++++++++++++++++++++
Opmantek Daemon Startup
++++++++++++++++++++++++++++++++++++++++++++++++++++++
The Opmantek daemon can now be started. It needs to be active to provide the Open-AudIT GUI, but you might want to delay that operation until you have adjusted the configuration files.
Do you want to start the Opmantek daemon now?
Type 'y' or hit <Enter> to accept, any other key for 'no': y
Starting OMKD
opEvents not installed or opEvents daemon init script not installed as /etc/init.d/opeventsd.
opConfig not installed or opConfig daemon init script not installed as /etc/init.d/opconfigd.
++++++++++++++++++++++++++++++++++++++++++++++++++++++
Open-AudIT is Ready for Configuration
++++++++++++++++++++++++++++++++++++++++++++++++++++++
This initial installation of Open-AudIT is now complete.
However, to configure and fine-tune the application suitably for your environment you will need to make certain configuration adjustments.
We highly recommend that you visit the documentation site for Open-AudIT at https://community.opmantek.com/display/OA/Home which will help you to determine what configuration changes may be required for your environment.
If you have started the Opmantek daemon, then your new Open-AudIT dashboard should now be accessible at http://<HOSTNAME_OR_IP>/omk/oae/
If your browser is running on the same machine as Open-AudIT was installed onto, this would be http://localhost/omk/oae/
++++++++++++++++++++++++++++++++++++++++++++++++++++++
installation complete.
++++++++++++++++++++++++++++++++++++++++++++++++++++++
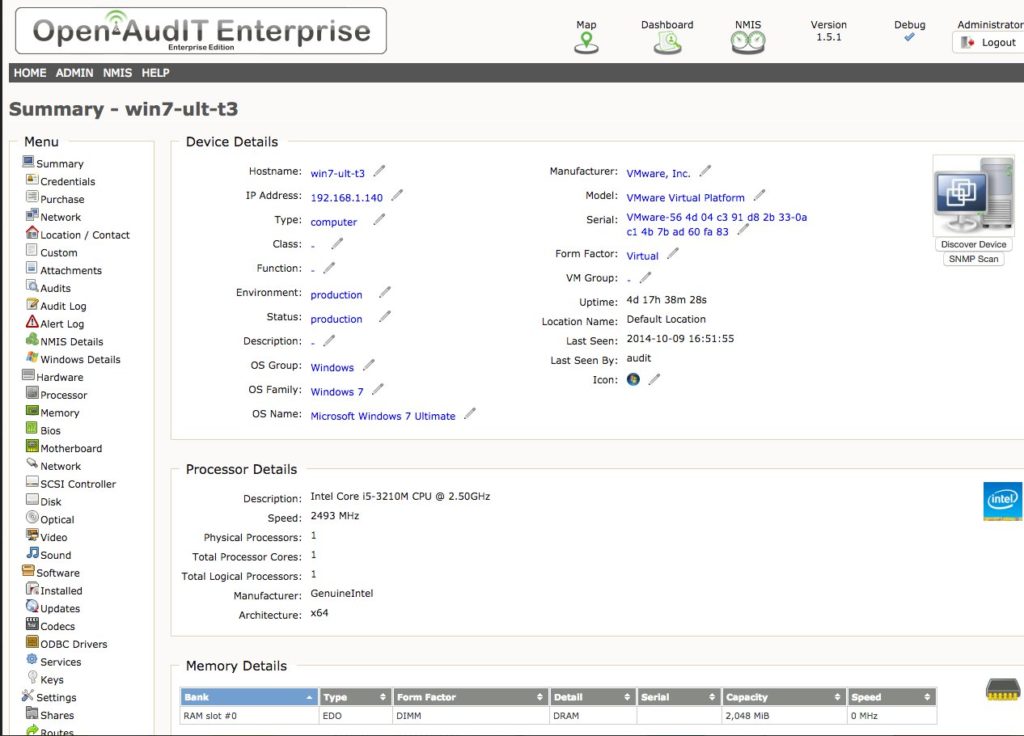
Acessando a interface WEB
http://IP>/omk/oae/
Conclusão
A interface WEB tem varias funcionalidades que é bacana ser estudadas.
Para gestão de grandes ambientes você pode realizar seperação por grupos e criar varias visões customizadas.
Espero que todos gostem e qualquer duvida estou a disposição. Abraços