Estender volume básico no Windows Server

Olá amigos, tudo bem?

Vejo muitos usuários com dificuldade em realizar o processo de expansão de disco em um servidor Windows Server, principalmente por usarem o Windows Server em algum provedor de cloud na qual o simples processo de realizar o upgrade de disco na vm não acaba realizando a expansão do disco dentro do SO.

O processo é bem simples, se você já realizou o upgrade do disco na maquina virtual você pode abrir o Server Manager conforme imagem abaixo que é encontrado no menu iniciar e no Windows Server o mesmo também está presente na barra de tarefas:

Com o server Manager aberto precisamos acessar o Computer Management aonde vamos ter acesso aos discos conforme a imagem abaixo:

No Computer Management você consegue encontrar o Disk Management aonde vai encontrar o disco na qual você pretende extender:

O disco deve aparecer como “Unallocated” pois o mesmo não está alocando ainda, ou caso a quantidade de disco adicionada não apareça você pode rodar um scan nos discos para validar:

Bem simples o processo até o momento né? Agora basta selecionar o seu disco e escolher a opção de “Extend Volume”

O processo vai abrir um Wizard conforme abaixo:

Dando sequencia nesse Wizard vamos ver que o disco que adicionamos vai estar como disponível , e você pode selecionar mesmo para realizar a expanção:


Prontinho, processo realizado e o disco foi expandido:

Simples não é, futuramente colocarei como realizar esse processo via PowerShell que tambem é simples.

Abraços

Continue Reading

Como configurar replicação DFSR com PowerShell

Olá amigos, tudo bem?

Recentemente me deparei com um problema na replicação do Windows Server 2012 R2 aonde no momento de criar um grupo de replicação ocorria o erro: “Value does not fall within the expected range”.  Este erro ocoria  no momento de selecionar os servidores que seriam utilizados na replicação.

Mas esse erro não será o tema abordado desta postagem, mas sim como foi feito para contornar esse problema de forma rápida para recriar a replicação.

Sempre é bom ter um diagrama bem definido de como sua replicação está configurada, segue um exemplo:


Configurar um grupo de replicação:

Conforme abaixo estamos primeiramente criando o grupo techpoligroup, informando que o nome da pasta a ser replicada será a pasta publico, e por ultimo informaremos o nome dos servidores que vao fazer parte da replicação,srv01 e srv02.

New-DfsReplicationGroup -GroupName techpoligroup | New-DfsReplicatedFolder -FolderName publico | Add-DfsrMember -ComputerName srv01,srv02

Definir conexões e associação:

Neste exemplo, vou configurar a replicação bidirecional entre os dois servidores de arquivos do grupo. Será criado uma parceria lógica entre os computadores de origem e de destino. As parcerias são sempre bidirecionais, a menos que o parâmetro -CreateOneWay seja especificado.

Add-DfsrConnection -GroupName techpoligroup -SourceComputerName srv01 -DestinationComputerName srv02

Definir diretórios da replicação:

Finalmente, ativarei a replicação para as pastas em ambos os servidores usando o cmdlet Set-DfsrMembership, definindo o parâmetro -PrimaryMember como $ true para srv01. Um servidor deve ser designado como o membro primário para cada grupo.

Set-DfsrMembership -GroupName techpoligroup -FolderName accounts -ComputerName srv01 -ContentPath ’C:\shares\publico’ –PrimaryMember $true
Set-DfsrMembership -GroupName techpoligroup -FolderName accounts -ComputerName srv02 -ContentPath ’C:\shares\publico’

Bom amigos, qualquer problema estou a disposição.

Continue Reading

Como determinar o tamanho mínimo de Quota para o Staging DFSR

Olá amigos, gostaria de compartilhar uma dica importante que acabei me deparando enquanto realizava a configuração de alguns servidores de arquivo. Durante a configuração de um ambiente de alta disponibilidade foi necessária a configuração do DFSR: (Distributed File System Replication), e tive vários problemas de replicação desde lentidão e até mesmo a não sincronização de diretórios. Pesquisando um pouco mais vi que a configuração de quota do staging deve estar bem configurada, caso contrario pode ocasionar problemas de performance na replicação.

Encontrei este artigo que trás a fórmula para o cálculo da quota do staging:

How to Determine the Minimum Staging Area DFSR Needs for a Replicated Folder

O artigo mostra que, somamos o tamanho dos maiores arquivos da pasta que será replicada e dividimos o resultado por 1 gigabyte. Porem a quantidade de arquivos a serem somados varia de acordo com a versão do Windows Server

  • Windows Server 2003 R2: 9 arquivos
  • Windows Server 2008 e 2008 R2: 32 arquivos

O artigo apenas fala das versões acima, porem durante minhas pesquisas não encontrei diferença para as versões abaixo:

  • Windows Server 2012 R2: 32 arquivos
  • Windows Server 2016: 32 arquivos

Nota: A replicação que configurei foi realizada entre 3 sites diferentes ambos com Windows Server 2012 R2 Standard somando o total de 4TB, levando em consideração a recomendação de calculo de 32 arquivos .
Os comandos a abaixo, devem ser executados dentro do ambiente do PowerShell com privilegio elevado.

Para somar o tamanho dos maiores arquivos, utilizamos o seguinte comando:

$big32 = Get-ChildItem c:\temp -recurse | Sort-Object length -descending | select-object -first 32 | measure-object -property length –sum

Mudamos a pasta c:\temp pela sua pasta de replicação. Note que foi passado o parâmetro -first 32 que indica que este comando está sendo executado em um computador rodando o Windows Server 2008 ou superior.

Será necessário aguardar a execução do comando que depende do tamanho da pasta cauculada. Então, divida o valor obtido por 1 gigabyte com o seguinte comando:

$big32.sum / 1gb

Do valor obtido, arredonde a parte fracionada para cima.Exemplo, se o valor obtido foi 19,8 arredonde para 20.

Basta agora multiplicar o valor obtido por 1024 e digitar o resultado no campo Quota da guia Staging na janela de Propriedades.

Qualquer duvida ou problema só avisar.

Abraços

Continue Reading

Scalability and availability of archives using the DFS – Windows 2008 R2

1

Scalability and availability of files using the DFS – Windows 2008 R2.


Scaling, consolidation, scalability, availability, dynamism and transparency are common challenges when dealing with files. Imagine you have multiple folders scattered across multiple servers. You would have to go to your user exactly which server is his folder and when a search was needed you would have to leave entering all servers. This decreases scalability, dynamism and transparency as to put more servers you need to possibly notify users that new files are on a different server.
The dynamism and transparency are compromised because if you need to take a folder on a server and put it in another, there would be the need to redo all mappings and also notify affected users. Imagine if you have N folders Z servers for each mapping you have to access the form \\ servidorZ \ Pastan
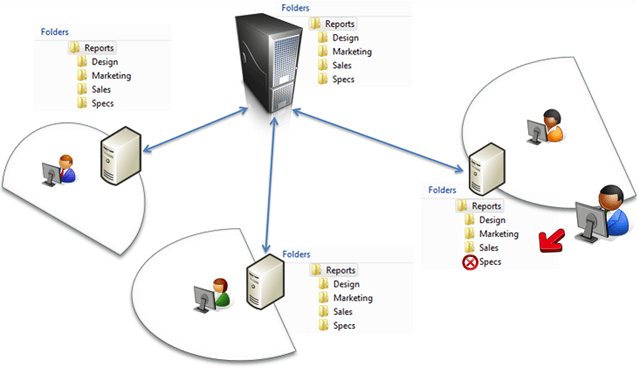
With DFS (Distributed File System) that can be resolved. This because it makes use of a feature called namespace, which is nothing more than create a name where contains links to folders on any server. So to access the N folders now you only have one namespace can access the form \\ namespace \ Filesystem \ graze for example.
How they are created only links, when you want to add a new server, just create a new link. If you want to change a folder from one server to another, only return to the link destination, and the users do not learn that this happened. In fact for users is so transparent that even though you have N servers they will see how just one.
Solved the scalability issues, transparency and dynamism, is the largest, availability. This is where you enter the DFS-R (Distributed File System Replication), DFS replication can not only keep several folders synchronized as to let them be accessed through the same link in the namespace, so that even if a server that hosts one of the copies will died, others are still accessed exactly the same files.
Replication is extremely shows efficient for two reasons:

  All replication can be scheduled and the bandwidth used for each time of day can be controlled
DFS-R uses a process called Compression remote differential in addition to sending only the differences, compact the replicated file for faster and more efficient shipping.

There are three replication topologies

RING – Bidirectional Replication ring
Full Mesh – All replicate to all
Hub and Spoke – All replicate to a single server “HUB”

I will be presenting to you a tutorial to create a DFS structure with file replication.

Consider the following example scenario: Your company wants a redundancy for your file server. Currently she can not invest in a more robust solution with storage and cluster, and thus provides just another server.

Solution: Use the DFS service to provide access through namespace and replication of files between servers.

What is DFS? DFS (Distributed File System) is a service that has as main objective to centralize shared folders and use replication for availability (Full Mesh topology) or centralization of files (Hub and Spoke topology).

For those who want more details about this service you can see at:

For the new DFS in Windows Server 2008 R2: Technet: What’s New in Distributed File System

It is important to remember that DFS does not replace a more complete high availability solution as Cluster let alone a backup routine. In addition, DFS is also widely used to facilitate the management of folders shared in large corporations.

Requirements: I created this tutorial using a lab VMs, but the process is the same for physical machines.

The VMS which were used:

– SVRDC1 (Domain Controller). – SVRFS1 (File Server in production). – SVRFS2 (disponilizado additional server). – CLIENT1 (client machine to perform the tests).

NOTE: The SVRFS1 and SVRFS2 servers must be part of SVRDC1 domain.

Installation: First, install the DFS service in SVRFS1 server:
1 – Go to Start> Run and type ServerManager.msc.
2 – In the Roles node click Add Roles.
3 – Click Next.
4 – Select Role Services File and click Next twice more.
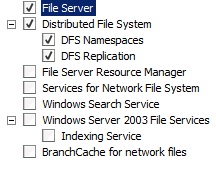
5 – Check the boxes of the DFS service (Namespace and Replication) as the figure below.


2

6 – On the Create Namespace select the Create a namespace later option using the DFS Management snap-in Server Manager. 7 – Click Next and then to install.

Repeat steps 1 through 7 in SVRFS2 server.

Note: In the case of installation on a file server that already has the shares, the File Services role is already enabled, then in step two you need to select the Add Role Services option that just below the Add Roles.

Configuring DFS-N (DFS Namespace):

1 – In SVRFS1 server, open Start> Run and type Dfsmgmt.msc.

2 – With the open console, the Namespace node click the right mouse button and select New Namespace option.

3 – On the screen that appears, enter the first name server that will host the DFS namespace, in my case will be SVRFS1 and then click Next.

4 – Choose the name of your namespace, in my case I chose shares.

5 – On the next screen you must choose the type of Namespace, choose Domain-based type and check the Enable Windows Server 2008 Mode box is checked, then click Next and Create.

6 – After finishing the setting, select the namespace created and right select the Add Namespace Server option.

7 – In the box that appears enter the second server that will be used in my case will be SVRFS2 click OK.

Adding Folders in Namespace:

1 – Click again with the right mouse button on the namespace node and select the New Folder option.

NOTE: You will add the shares or subfolders of the shares that are available in DFS and will be replicated to the second server. It is important to remember that the shares should be already created and permissions (NTFS and Sharing) properly configured (on the second server should only have the shares created with the permissions of Sharing, the rest will be replicated by the DFS service).

2 – In the Name field enter the name of the Folder, counsel put the same name as the share that will be added to facilitate understanding.

3 – Click add and then Browse. Confirm that the Server field this with the desired server and click the Show Shared Folders button.

4 – Is listed all shares for the selected server, choose the desired share, and click OK twice.

Repeat the same process to add the share that the second server. It should look something like the image below:

3

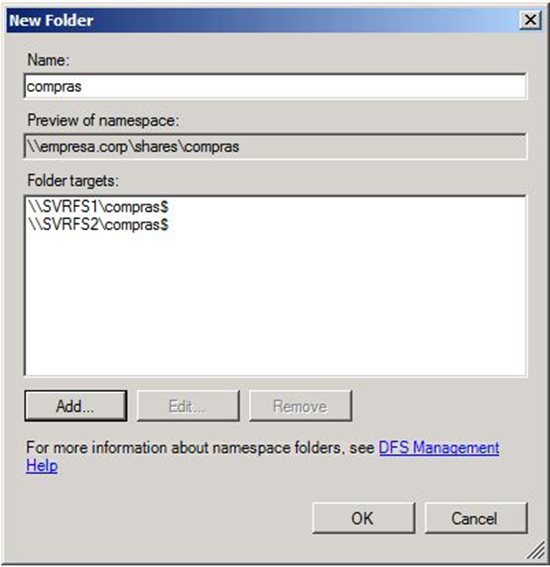
Click OK and a box will appear asking whether to create a replication group for the file, choose Yes.


Configuring DFS-R (DFS Replication):


1 – The replication group wizard will open, click Next twice.
2 – On the Primary Member select the server that will give precedence to the initial replication (this is only used in the first replication, the rest is based on multi-master replication).
3 – In our case select the SVRFS1 production server. Click Next twice.
4 – In Replication Group Schedule and Bandwidth screen you can select a specific time for replication to occur and determine how much bandwidth is used. I will leave the default settings. Click Next and Create and wait for the end of creation.
The screen of your console should look like the image below (except empresa.corp to be the domain where the server part):

4

NOTE: The first replication can take 10 to 15 minutes to start, depending on the environment because the information must be replicated to the domain controller that has the PDC FSMO.

Making tests:

Replication: – To test the replication access the SVRFS1, navigate to the share that you added as folder Namespace and create a new folder or file, and then access the SVRFS2 server in the same way and see if the file is there.

Availability: – Access the client machine (with a user who will have permission to access the shares) and enter the Start> Run the path of the DFS (in my case will be empresa.corp \\ \ shares). – Browse the folder you created and create some files. – If you are doing a lab using VM Hyper-V you can remove the network interface or shut down one of the VMs if the servers are physical can only remove the network cable from one of the servers.

Try to navigate back in the folder, Windows Explorer will be locked for a while but then will return. – Turn the server and do the same with each other and try to access the folder again.

Continue Reading

Recuperando a senha do Administrador do Windows Server 2008 / R2

Aplica-se: Windows Vista /  Windows 7 / Windows Server 2008 / Windows Server 2008 R2

Neste tutorial iremos abordar um assunto muito polemico referente a recuperação de senha do Windows, podemos realizar uma busca no Bing ou Google iremos achar vários tutorias e ferramentas para realização da tarefa, queremos demonstrar de forma clara e fácil como podemos resolver este problema.

A forma segura que não altere a estrutura do sistema operacional e suas funcionalidades, estamos falando em realizar esta ação sem precisar daquelas mídias com aqueles sistema com milhares de distribuições e alterações, neste caso iremos utilizar a mídia do próprio sistema operacional em nosso exemplo: Windows Server 2008 R2

Em nosso exemplo estamos utilizando o Hyper-V R2 utilizando uma VM com Windows Server 2008 R2 e conforme a mensagens abaixo não possuímos a senha do administrador : Nome de usuário ou senha incorreta.

1

Então iremos realizar o Boot com a mídia do sistema.

2

Primeiramente temos as opções de Idiomas e formato do teclado.

3

Iniciando modo de recuperação da senha, devemos entrar no modo de Recuperação do Sistema.

4

Iremos selecionar a opção ( Prompt de Comando ).

5

Com o Prompt de Cmando aberto, iremos mudar o diretório para “D:” e navegar até a pastaD:\Windows\Sustem32

Obs.: em nosso exemplo a letra D: é referência onde o Windows foi instalado, contudo na maiorias das vezes fica localizado em C:

6

Agora vamos renomear o utilitário conhecido como Utilman, através do seguinte comando: “renutilman.exe utilman.bak

Agora vamos renomear o utilitário conhecido como Utilman, através do seguinte comando: “renutilman.exe utilman.bak

7

Processo com a mídia de instalação concluída, devemos reiniciar o computador.

9

Neste momento não iremos utilizar a mídia de instalação, devemos iniciar o sistema normalmente.

Com o sistema iniciado, iremos utilizar um combinação de teclas “Windows + U”, neste momento a ferramenta do Windows será inciada, contudo será o Prompt de Comando que iremos possuir total acesso.

10

Neste momento iremos realizar a alteração da senha, iremos alterar a senha do usuário como Administrador.

Iremos utilizar o comando “net user [nome do usuário administrador do domínio] [nova senha], em nosso exemplo: “Net user administrador Pass@word”

11

Basta fechar o utilitario e entrar com a nova senha da conta administrador.

12

Neste tutorial demonstramos como utilizar a propria midia do sistema operacional para recuperar a senha do Windows Server 2008 R2, no entando para garantir a segurança do sistema e recomendado retornar o processo e voltar a habilitar a ferramenta de utilman.exe. Ele é o gerenciador de utilitários do Windows e serve para garantir a acessibilidade a pessoas com deficiências visuais, auditivas, que estejam com problemas no teclado, etc. Ele é um aplicativo do sistema, legítimo e não convém desabilitá-lo.

Obrigado pela leitura e até a próxima publicação.

Continue Reading