Como replicar do VMware ao VMware Cloud com Veeam

Olá amigos, depois depois de muito tempo sem postar retorno trazendo algo simples.

Vejo muitas pessoas com duvidas neste assunto, então vamos explicar de uma maneira didática e simples como replicar uma maquina virtual do seu parque ESXI para o VMware Cloud (VCLOUD) . Está uma demanda que vem crescendo de pessoas saindo do on-premise para cloud.

O que será necessário:

  • Uma licença vCenter Server que suporte replicação ( As licenças Standard, Enterprise e Enterprise Plus suportam replicação)
  • Uma licença do Veeam Backup & Replication que seja igual ou superior à edição Standard
  • Uma rede que conecte o vCenter Server, o repositório de backup e o destino de replicação.

Vamos começar a configuração do JOB de replicação abrindo o Veeam Backup Server indo no caminho abaixo:

Passo 1

Backup Infrastructure / Service Provider / Add Service Provider
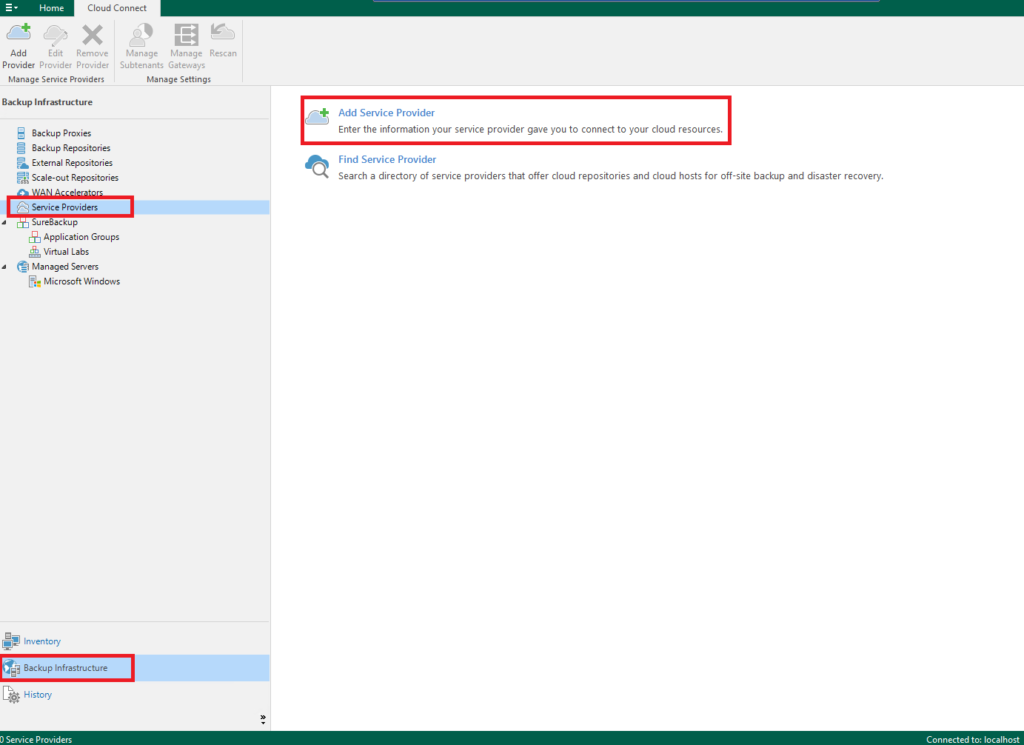
Passo 2

No passo de numero dois vamos adicionar o endereço (URL) informado por seu provedor de nuvem. E clicar na opção Next para avançar a configuração do seu JOB.

Nota: A porta 6180 é a padrão utilizada por muitos, porem pode acontecer de ser utilizado outra porta para essa comunicação.
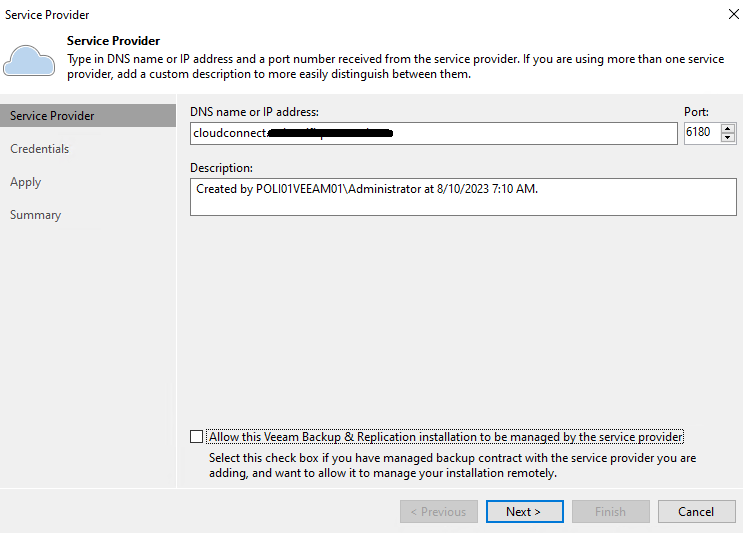
Passo 3

No passo de numero três vamos informar as credenciais e clicar na opção Next para avançar a configuração do seu JOB. Porem vamos entender como a credencial abaixo é composta

Nota: A credencial é composta pelo nome da organização e o usuário do VMware Cloud, então por mais que o provedor tenha fornecido as credenciais, você mesmo pode ir até o painel e criar um usuário especifico para o Veeam .

Exemplo: nome-da-minha-org-vmware-cloud/usuario-de-acesso
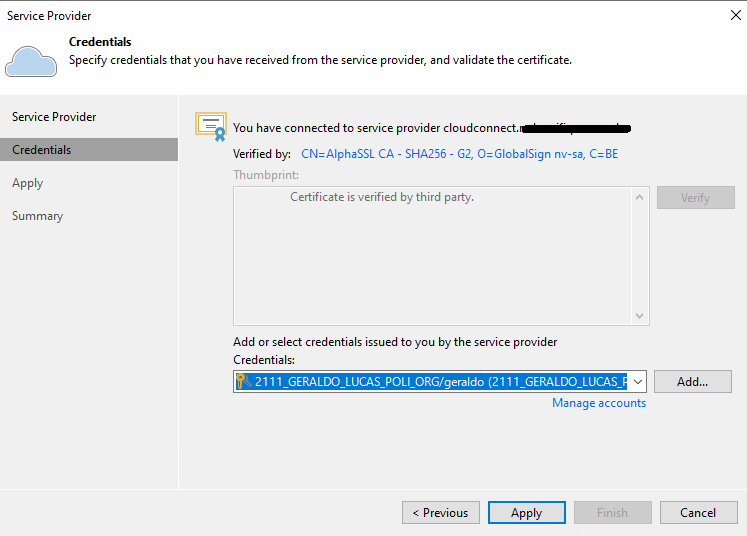
Passo 4

No passo de numero quatro será importante observar se o seu provedor forneceu repositório de backup ou apenas ambiente para replicação em nuvem. No caso abaixo podemos ver um repositório de 1TB. Com isso podemos avançar a configuração do JOB.
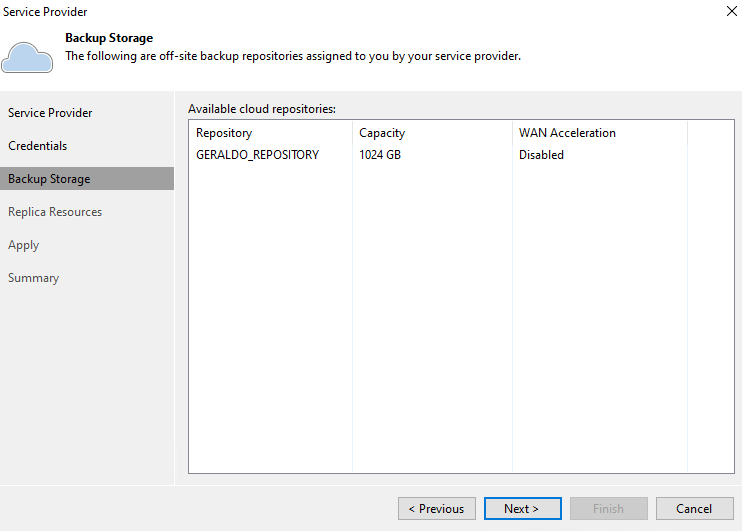
Passo 5

Nenhuma configuração se faz necessário neste estagio, veremos listados os seus recursos dentro do VMware Cloud para replicação do seu ambiente virtual. Se tudo estiver de acordo com seu contratado pode ser aplicado as configurações.

Nota: Pode aparecer mais de um tennant dependendo da quantidade de virtuais datacenter que serão utilizados ou contratados pelo cliente.

Passo 6

Abaixo podemos ver nos logs se todas as configurações ocorreram bem. Caso algo falhe durante a configuração do seu JOB retorne e revise as informações cadastradas.

Passo 7

Por fim podemos validar todos os recursos que foram configurados. Com isso pode ser finalizado a configuração.

Passo 8

Após finalizado o passo acima o Veeam vai disparar um JOB para fazer o rescan em toda a infraestrutura de Service Provider, caso retorne sucesso você pode iniciar a configuração do seu JOB.

Passo 9

Simples, nosso Service Provider está cadastrado e disponível para realizar a replicação para seu provedor de nuvem.
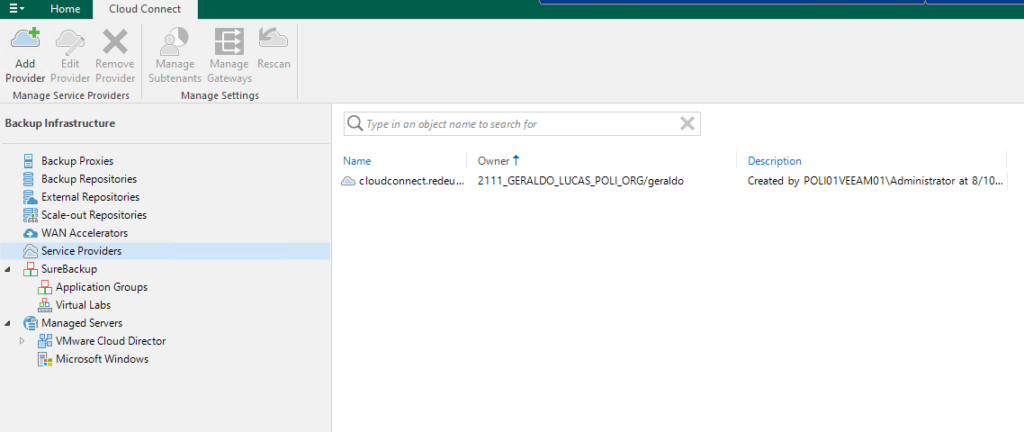
Passo 10

O passo de numero dez presume que você já tenha um host ESXI ou um VCenter Server cadastrado na infraestrutura do Veeam contendo suas maquinas virtuais . Em próximo artigo podemos focar apenas no cadastramento dos hosts e clusters VMware no Veeam.

Agora nosso próximo passo é criar um JOB para replicar a maquina virtual do seu ambiente on-premis para cloud

Vamos fazer a configuração do JOB no caminho abaixo:

Home / Jobs / Replication / Virtual Machine
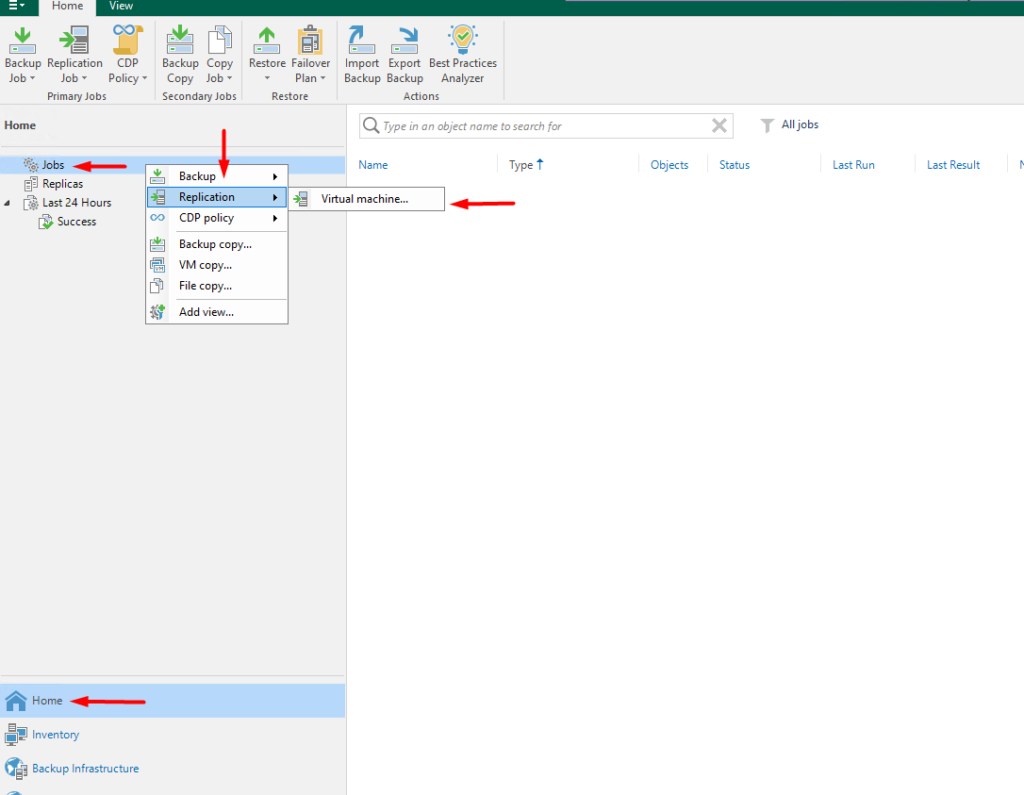
Passo 11

Note abaixo que no JOB de replica temos varias configurações especificas para mudança de placa de redes, baixo consumo de link e mudança de endereçamento. Neste momento não entraremos em nenhuma destas opções. Será tratado em um próximo post.

Abaixo foi colocado no campo Name a opção de nome desejada e avançado para próxima aba de configuração.

Passo 12

Abaixo podemos ver que na opção de Virtual Machines podemos escolher quais maquinas do nosso ESXI ou VCenter Server podemos replicar para o VMware Cloud via CloudConnect. No caso abaixo vou replicar a maquina virtual do CLIENTE-A.

Passo 13

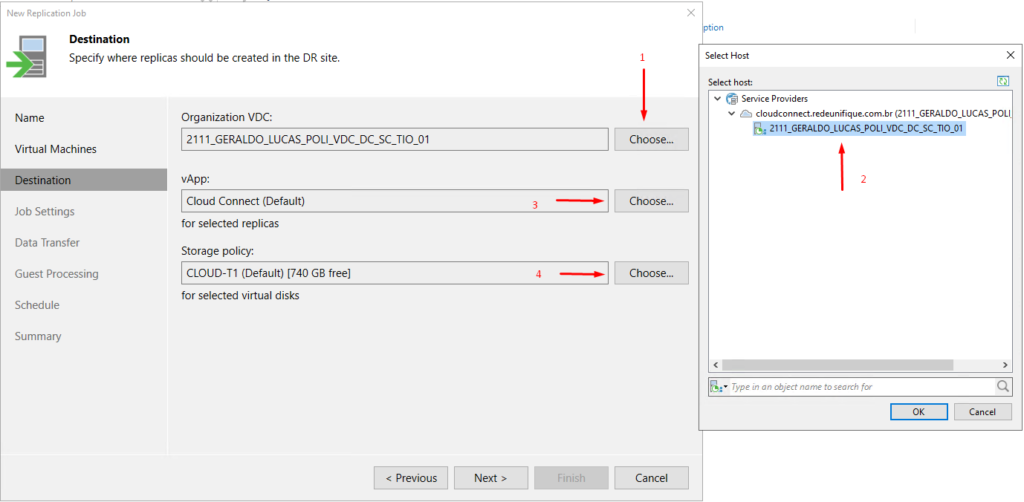
Com a maquina virtual escolhida a replicar temos que apontar o Destino que no nosso caso é um VMware Cloud utilizando CloudConnect :

Item 1 – ORG do VMware Cloud informada pelo seu provedor de Nuvem.

Item 2 – Selecione o VDC ( Virtual Datacenter) cadastrado no passo de numero 2.

Item 3 – vApp, caso você não tenha nenhum vApp no VMware Cloud o Veeam já replica para o vApp default.

Item 4 – Pode ser escolhido as politicas de discos disponíveis em seu Cloud como T1, T2 ou T3.
Passo 14

Importante saltar se caso tenha algum repositório especifico que você deseja manter os metadados é importante adiciona-lo antes de chegar nesta etapa. No caso abaixo deixamos o repetitório default do Veeam que acaba sendo o disco do próprio servidor aonde Veeam está instalado.

Alem disto no campo Replica name suffix pode ser adicionado qualquer nome adicionar que você deseja incrementar ao nome da maquina virtual no momento da replicação. Gosto sempre de deixar o suffix como _replica pois fica mais claro na gerencia do VMware Cloud para saber que aquela maquina virtual é uma replica.

Com isso você tambem pode definir quantos restores point de replicação deseja manter na maquina virtual.

Passo 15

Este passo não aprofundaremos muito, pois você pode selecionar proxy veeam diferentes na sua infraestrutura caso tenha algum servidor de proxy dedicado para grandes demandas e segmentação dos seus backups.

Vamos seguir com o proxy default que é o mesmo servidor do Veeam Server. Lembrando que este é um cenário de laboratório, pequenas replicações e até mesmo o único movimento de mover do seus servidores locais para a nuvem.

Passo 16

O Guest Processsing tambem é algo que não vamos adentrar nesta configuração básica, nele você pode definir parâmetros de aplicação de banco e até mesmo as credenciais do servidor para gerencia de arquivos da maquina a ser replicada.

No exemplo não estamos definindo nenhum destes parâmetros pois estamos movendo a maquina para a nuvem.

Passo 17

Para finalizar você pode escolher por iniciar o JOB manualmente e replicar a maquina apenas uma vez , ou deixar conforme abaixo replicando a cada 1 hora. E no momento ideal você para o servidor na origem para iniciar o seu servidor na nuvem e garantir a consistência dos dados.

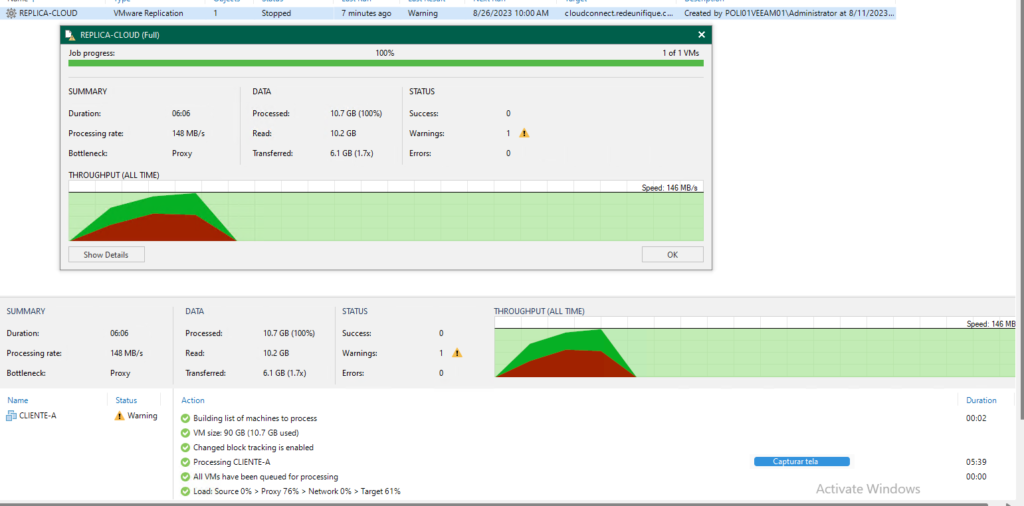
Neste momento podemos ver a replica iniciar e validar nossa maquina virtual no VMware Cloud

Porem fim nosso JOB começou a replicar e concluiu sem problemas.
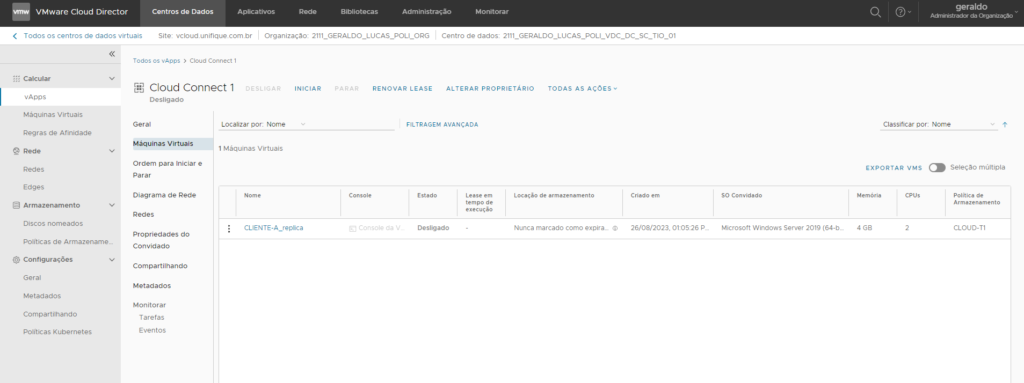
Chegado o grande momento de ver sua maquina dentro do VMware Cloud

Pronto, conforme abaixo podemos ver a maquina virtual foi replicada e já se encontra desligada dentro do VMware Cloud.

Ai cabe a sua estratégia de como migrar seus serviços, muitos casos que vejo clientes desligam seu servidores no VMware, fazem uma replica com a maquina desligada para garantir a consistência e ligam a maquina depois de replicada na nuvem.
Nos próximos materiais aprofundaremos melhor sobre arquiteturas de replicação e configurações avançadas.

Existe vários parâmetros que podem ser melhorados, porem este post visa ajudar pessoas que querem fazer pequenas movimentações e replicas.

Até a próxima.

Continue Reading

Veeam Agent Linux

Olá amigos, tudo bem?

Já faz um tempo sem postar conteúdo tão técnico , mas hoje vamos falar do Veeam que disparado é uma das ferramentas mais usadas do mercado e muito simples, porem que gera algumas duvidas para adimistradores.

Existe muitas formas de utilizar o Veeam para realizar backup da estrutura, pode usar como BaaS, DRaaS ou On-premise. Hoje estarei mostrando abaixo um exemplo com o Oracle Linux aonde o mesmo é apontado para um repositório BaaS com o CloudConnect. Neste caso simularemos um cliente que vai enviar o seu backup do Oracle para um repositório fora da empresa.

Primeiro vou deixar abaixo o link da documentação oficial da Veeam para configuração do Veeam Agente no Linux:

Installing Veeam Agent for Linux

Abaixo sambem vai ficar disponível os requisitos e quais os sistemas operacionais suportados, até o momento não tive problema com nenhuma das distribuições utilizadas, o veeam tem uma boa gama de SO compatível. Bacana também ler no link abaixo sobre os destinos possíveis para arquivar o backup.

System Requirements

Modos de Instalação

É possível realizar dois tipos de instalação, Online e Offline, aonde na opção online o repositório será adicionado e a instalação via yum irá acontecer.

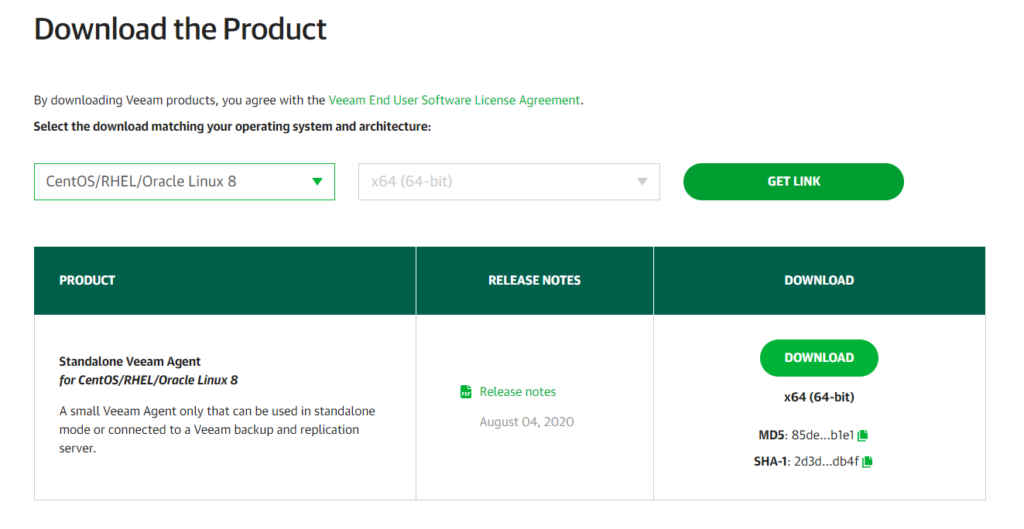
Abrindo o link abaixo você pode escolher o sistema operacional e a arquitetura desejada conforme imagem abaixo:

Instalação Online

Realizado o download do pacote acima foi enviado o mesmo para o servidor via Winscp conforme imagem abaixo:

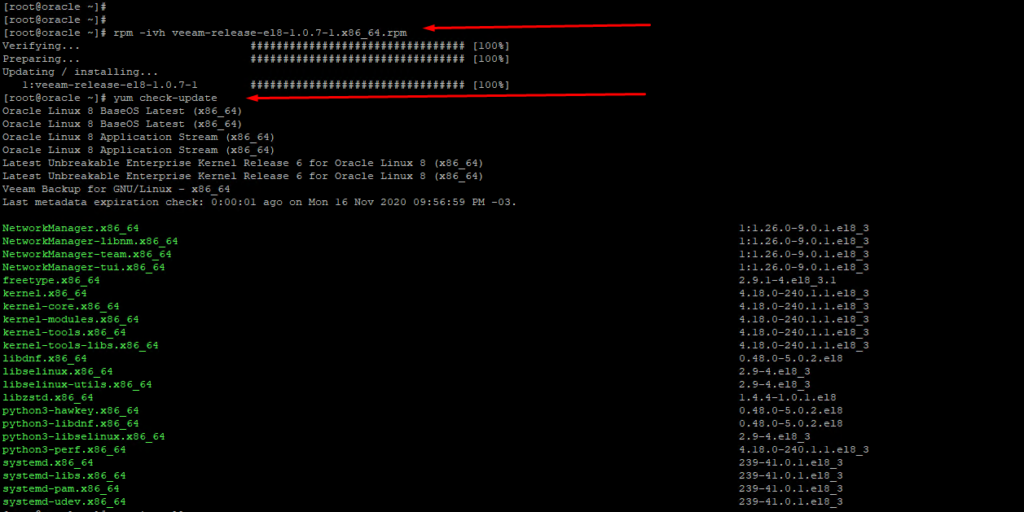
Agora abaixo vamos adicionar o repositório do Veeam no Oracle Linux, atualizar o repositório e por fim instalar o Veeam.

Comandos:

rpm -ivh veeam-release-el8-1.0.7-1.x86_64.rpm
yum check-updat

Comandos:

yum install veeam

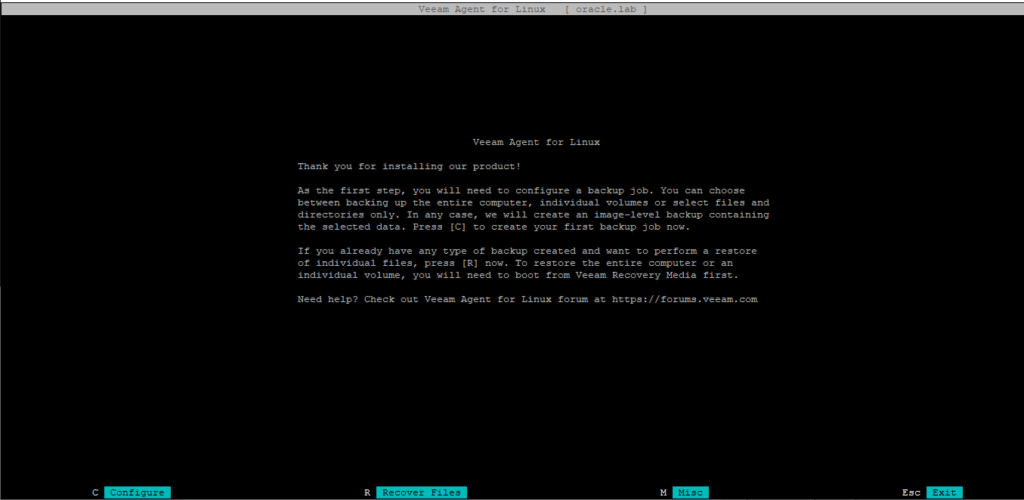
Prontinho, o processo está concluído com sucesso. Agora basta digitar no terminal o comando veeam para abertura do agente. Se tudo ocorreu certo a tela abaixo deve ser mostrada a você.

Na etapa acima e na etapa abaixo é realizado o aceite de termos e a configuração do patch “Veeam Recovery Media” esse ponto é importante caso seu Oracle ou servidor linux seja físico.

Por fim temos o apontamento da licença, hoje a Veeam permite o download da licença full por 30 dias para fim de homologação e testes. Recomento realizar o cadastro no site da Veeam juntamente com o download da licença.

Abaixo enviei o arquivo de licença para o servidor e na etapa de licenciamento apontei o arquivo juntamente com a opção “Server” .

Alguns provavelmente vão perguntar o porque da opção “Server”, segue o link abaixo aonde existe um PDF da Veeam que explica cada tipo e as vantagens como File Indexing, Application-aware e Transaction Log Backup que é utilizado no Oracle.

Editions Comparison

Como diria o Jeferson da Linux Tips “Simples como voar”

Seu Veeam está pronto para a configuração de um job de backup.

Seguindo a configuração vamos precisar informar o nome do Job conforme imagem abaixo:

E abaixo estou optando pelo backup de todo o servidor, porem existe as opções conforme sua demanda e necessidade.

Abaixo gosto de mostrarcomo o Veeam é maleável nos permitindo salvar o backup em discos locais, compartilhamento remoto, repositório Veeam ou em um repositório remoto com o Cloud Connect. Estarei selecionando a opção Cloud Connect.

Por estar usando um CloudConnect valido estou ocultando o endereço remoto, porem caso você contrate um repositório basta informar o endereço que o provedor fornecer.

Usuário e senha também são informados pelo provedor de serviço de Cloud Connect:

Será possível visualizar o repositório contratado para armazenamento apos a autenticação:

Depois de selecionado o repositório você pode configurar algumas opções avançadas conforme sua demanda . É importante usar essas funções quando existe um banco de dados por exemplo.

Por fim você tem a opção de agendamento do job de backup.

Deixei marcado a opção “Start Job Now” para validarmos se a execução vai acontecer com sucesso.

Pronto, nesse momento você já tem o backup sendo enviado para o repositório do CloudConnect.

Qualquer duvida só avisar. Abraços.

Continue Reading

How To Install and Configure Bacula Server on CentOS 7

Introduction
Bacula is an open source network backup solution that allows you create backups and perform data recovery of your computer systems. It is very flexible and robust, which makes it, while slightly cumbersome to configure, suitable for backups in many situations. A backup system is an important component in most server infrastructures, as recovering from data loss is often a critical part of disaster recovery plans.

Getting Started

The first thing to do after the installation is complete is update the CentOS using:

yum update

This goes through the update which takes a couple of minutes depending on how fast the network is.  You may be prompted to enter a “Y” at various stages of this process.
Installing Nano Text Editor

The next thing to do is install nano text editor so I can easily edit files.  I  find it much easier to use than vi so I prefer using nano.  To install this, I use:

yum -y install nano

Installing wget

Install wget because you will need it later in the installation process.

yum -y install wget

Installing Webmin on CentOS 7

After nano is installed, you need to create a new file called webmin.repo and save it in /etc/yum.repos.d/.  To do this, you can type:

nano /etc/yum.repos.d/webmin.repo

This opens a blank file where you can type in (or copy and paste):

[Webmin]
name=Webmin Distribution Neutral
#baseurl=http://download.webmin.com/download/yum
mirrorlist=http://download.webmin.com/download/yum/mirrorlist
enabled=1

Once it’s pasted (by right clicking), hit Control+X and then Y then Enter to save the file.

Now, install Webmin GPG key using this command:

rpm --import http://www.webmin.com/jcameron-key.asc

Now lets check for any updates by typing:

yum check-update

Now it’s time to install Webmin and we do that by typing in:

yum -y install webmin

1

After a short period of time, Webmin will be installed and it’s time to set it to start automatically by typing the following lines:

chkconfig webmin on
service webmin start

Webmin is now installed and running but we need to allow port 10000 through the firewall so we can access it from another computer.  In order to do this, type the following command:

firewall-cmd --add-port=10000/tcp

If you want to make this rule permanent, you can also type in this which will add it to the rules:

firewall-cmd --permanent --add-port=10000/tcp

If you plan on running Webmin on a different port, you can skip adding 10000 as a permanent rule and set it later with the port of your choice.

Now you should be able to access Webmin using the IP address you used to set up the server when you installed it by going to the browser and typing:

http://192.168.1.2:10000 (where 192.168.1.2 is the IP of your server)

2

Installing Bacula 7 on CentOS 7

Now that I have Webmin installed and running, it’s time to install Bacula.

The first thing that you need to do is install epel.  To do this, go find the latest release for CentOS 7 and right click on it to copy the link:

http://www.rpmfind.net/linux/rpm2html/search.php?query=epel-release

Once you have the link copied, type in wget and paste the link…  it should look like

wget  ftp://195.220.108.108/linux/centos/7.0.1406/extras/x86_64/Packages/epel-release-7-5.noarch.rpm

This will download the RPM and now you will need to install it by typing in the following:

yum -y install epel-release-7-5.noarch.rpm

NOTE: the latest version may be different than shown above so be sure to change it if that is the case.

After the installation of the EPEL, Go ahead and do another update by typing in:

yum update

Now we need to create a file in the /etc/yum.repos.d/ directory like we did with Webmin above.  To to that, we will use nano again and type in the following:

nano /etc/yum.repos.d/epel-bacula7.repo

Now you will need to copy and paste the following into the file we just created:

[epel-bacula7]
name=Bacula backports from rawhide
baseurl=http://repos.fedorapeople.org/repos/slaanesh/bacula7/epel-$releasever/$basearch/
enabled=1
skip_if_unavailable=1
gpgkey=http://repos.fedorapeople.org/repos/slaanesh/bacula7/RPM-GPG-KEY-slaanesh
gpgcheck=1
[epel-bacula7-source]
name=Bacula backports from rawhide - Source
baseurl=http://repos.fedorapeople.org/repos/slaanesh/bacula7/epel-$releasever/SRPMS
enabled=0
skip_if_unavailable=1
gpgkey=http://repos.fedorapeople.org/repos/slaanesh/bacula7/RPM-GPG-KEY-slaanesh
gpgcheck=1

Now hit Control + X to exit and hit Y and then Enter to save the new file.

Once you have saved the file, verify that Bacula 7 shows up on the list by typing the following and hitting enter:

yum list bacula*

3

If you don’t see Bacula 7, verify that you did the steps above correctly.
Now we are ready to Install MariaDB and Bacula

Next you will install MariaDB and all of the Bacula files.  To do that, type in the following:

yum -y install mariadb mariadb-server bacula-director-mysql bacula-console
yum -y install bacula-client bacula-storage-mysql mysql-server mysql-devel

Once everything installs (takes about a minute or two), you will need to start the MariaDB database server by typing in:

systemctl start mariadb.service
chkconfig mariadb on

Next you need to run through the secure installation process for MariaDB which will allow you to set the root password, remove test users etc.  The prompts are easy to follow and everything should be Yes.

mysql_secure_installation

The default root password is blank to just hit enter and set a new root password.  This isn’t the password you will use for Bacula, it’s the root mysql password.

After you have completed this step, you will want to go to Webmin which you installed earlier so you can set up the database and a Bacula user for the database.

If you look under Servers, you will probably not see MySql Database Server because you just installed it.  You will need to go to Refresh Modules at the bottom of the menu and click it.  Now you should see MySql Database Server in the list.  Click it and you will be asked to enter the username and password for the database.  This will be root and the password you just entered when setting up the database.

Now you will need to add a bacula database so click Create a New Database.

Type in bacula as your database name for your bacula database and leave the rest of the fields default.  Note, the name must be bacula!

4

Now you will need to create a bacula user for your database.  To do this, go to User Permissions and Add User to add the user.  Be sure to set the Hosts to localhost and don’t worry about setting permissions.  Click Create.
5
Now you will click on Database Permissions and add all permissions except Grant for the user you created to the bacula database.  Once again, be sure to have the hosts set as localhost.

6

Now that your database is created and the user is setup, you will need to create the tables.  You can do this by going back to your SSH terminal and typing (note: add the username you created):

/usr/libexec/bacula/make_mysql_tables -u usernameyoucreated -p

Enter the password you used for the user.

7

Now we need to tell Bacula to use Mysql as the libary.  To do this, lets first stop the services by typing in:

systemctl stop bacula-dir
systemctl stop bacula-fd
systemctl stop bacula-sd

Now lets set Bacula to use the Mysql library:

su -c 'alternatives --config libbaccats.so'

This should show you the following:
There are 3 programs which provide ‘libbaccats.so’.

Selection    Command
———————————————–
1           /usr/lib64/libbaccats-mysql.so
2           /usr/lib64/libbaccats-sqlite3.so
*+  3           /usr/lib64/libbaccats-postgresql.so

Hit 1 and press enter to select MySql.

Now lets start the services back by using the following commands:

systemctl start bacula-dir

systemctl start bacula-fd

systemctl start bacula-sd

Now you should be able to go to Webmin and look under System and you will need to click on Bacula Backup System.  Don’t worry if it gives you an error.  This is because you haven’t set up the config yet.  You will need click on Module Configuration and set it up to use MySql and enter the login information you created previously for your Bacula user.

8

Click Save and you should be able to access the Bacula page where you can set up your Bacula System.

9

Getting Everything Working

Now that you have that part working, you still can not start any of the daemons yet since they are not set up.  You will have to go into each file and modify them so that they will communicate with each other.

If you try to start Bacula, you may receive the following message:

The Bacula console command /sbin/bconsole could not communicate with the Bacula director. Make sure the password in /etc/bacula/bconsole.conf is correct.

You can either use the File Manager within Webmin or connect to your server using sftp and look in the /etc/bacula directory and you will find the following files you need to edit.  I just drag them back to my desktop and edit them in a text editor.

bacula-dir.conf
bacula-fd.conf
bacula-sd.conf
bconsole.conf

There are a lot of passwords and IP addresses that need to be changed in there files so pay attention to and @@PASSWORD@@ areas and change them accordingly.

Be sure to catch the bottom of the bacula-dir.conf file and change the catalog database password to the one you assigned when you created the database user.

Also, look for localhost and change this to your local IP address on your backup server.  You don’t need to do this on the clients since you will be setting those up later on.  In fact, you can delete most of the test clients that are in the default if you wish.  I will post a guide on setting up all the configuration files later on.
Firewall Ports

In order to allow clients and consoles to talk to your Bacula server, you need to open ports 9101, 9102 and 9103.  The following command in your SSH console with open these ports.

firewall-cmd --add-port=9101/tcp
firewall-cmd  --permanent --add-port=9101/tcp
firewall-cmd --add-port=9102/tcp
firewall-cmd  --permanent --add-port=9102/tcp
firewall-cmd --add-port=9103/tcp
firewall-cmd  --permanent --add-port=9103/tcp

Now you should be able to start Bacula and see all of the Daemons are showing UP.

Installing Bacula-Web

Bacula-Web uses Apache to serve up the pages so you will need to install Apache and get it running using the following:

yum -y install httpd
chkconfig httpd on
service httpd start

Configure Apache to start at boot:

systemctl start httpd.service
systemctl enable httpd.service

Next you need to add MySql support to Apache by entering the following:

yum -y install php php-gd php-gettext php-mysql php-pdo

Install other common modules needed…

yum -y install php-gd php-ldap php-odbc php-pear php-xml php-xmlrpc php-mbstring php-snmp php-soap curl curl-devel

In order for Apache to get past the firewall, you will need to open the ports by using the following:

firewall-cmd --permanent --zone=public --add-service=http
firewall-cmd --permanent --zone=public --add-service=https
firewall-cmd --reload

Now you need to get the web files.  Go to the Bacula-Web website and download the latest version.

http://www.bacula-web.org/download.html

Save and unpack the archive to your desktop or another location.  We will need to modify the config file before uploading to the server.

Open the Application/Config directory and rename config.php.sample to config.php and then open it in a text editor.

Look for the MySql area and change the settings to match your server.  Be sure to uncomment the config settings be removing the “//” in front of the $config settings.  You probably just need to edit the password at this point.

//MySQL bacula catalog
$config[0]['label'] = 'Backup Server';
$config[0]['host'] = 'localhost';
$config[0]['login'] = 'bacula';
$config[0]['password'] = 'verystrongpassword';
$config[0]['db_name'] = 'bacula';
$config[0]['db_type'] = 'mysql';
$config[0]['db_port'] = '3306';

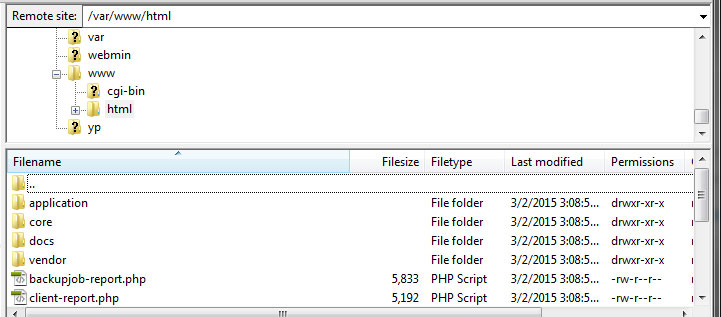
After you have saved the config file, you need to upload the files to your server under the /var/www/ directory.  You can SFTP to your server using FileZilla and the IP of your server.   If this server is only serving as a backup server, you can upload the files into the root HTML directory, otherwise you can put the files in whatever directory you wish.   Go ahead and upload the files now.

10.

Now you will need to modify the php.ini file so it has the correct time zone for your system.  Since you already have the FTP up, browse to /etc/php.ini and copy if over to your desktop and them open it in a text editor.  Do a search for “date.timezone” which should be around line 878.  You can find the different time zones available by going to: http://php.net/date.timezone

11

Make the change and save the file then re-upload it to the server.

Now you need to go into SELINUX and change the settings to PERMISSIVE.  In order to do this, exit the config file for SELINUX:

nano /etc/selinux/config

Change if from enforcing to permissive and hit Control + X then Y then Enter to exit and save.

12

Type reboot

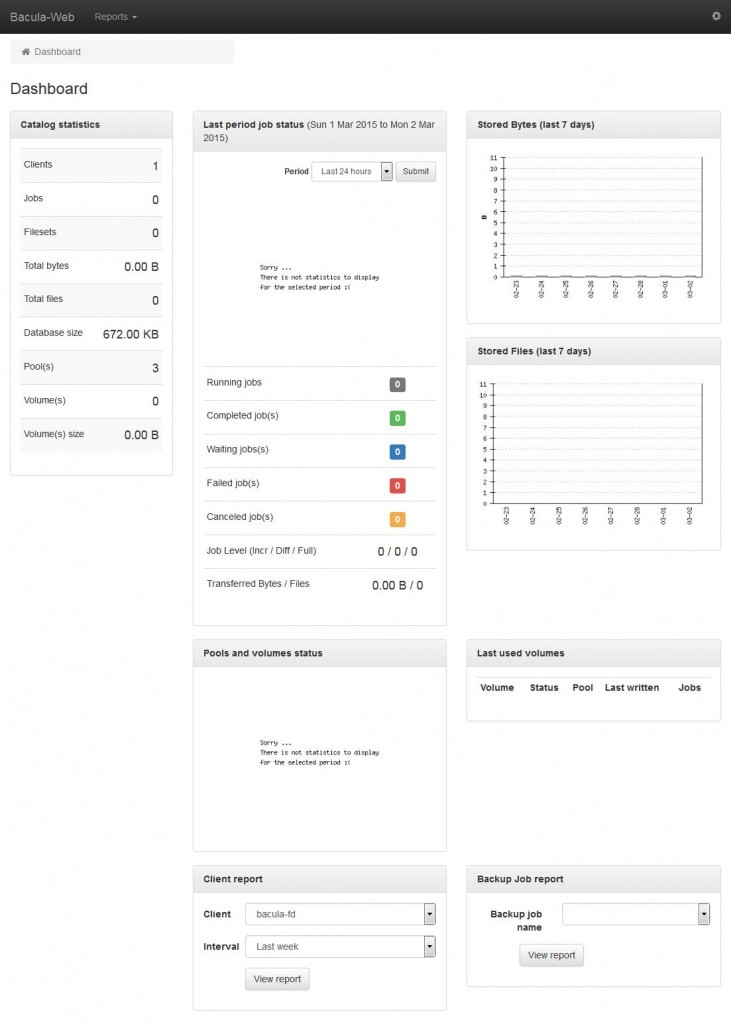
After the system comes back online, you should be able to use your IP address to access Bacula-Web!

13
YOU’RE DONE!

Continue Reading