iRedMail is out of the box open source mail server solution on Linux like operating system. The beauty of iRedMail is that it provides web based admin panel from where mail admin or system admins can do all email related operations task. Some of other features are listed below :
Support unlimited email accounts.
It provides Roundcube as webmail (MUA )
It used Postfix as MTA & Dovecot as MDA
It pvoides Calendar service via CalDAV & Contact service via CardDAV
It uses SpamAssassin for Spam scan and Amavis & Clamav for Mail virus scan.
OpenLDAP, MariaDB and PostgreSQL can be used to save mail accounts
In this article we will demonstrate how to install and configure iRedMail on CentOS 7 & RHEL 7. I am going to use followings for iRedMail setup.
OS = CentOS 7 or RHEL 7
Domain = nsitmail.com
Server Hostname = mail.nsitmail.com
Note : In case if you want mails from your mail server to be delivered in inbox not in spam folder then update the DNS records like A & PTR before installation and TXT ( SPF & DKIM ) after installation.
Step:1 Set hostname and disable Selinux.
Set the proper hostname using hostnamectl command if it is not set.
[root@mail ~]# hostnamectl set-hostname mail.nsitmail.com
[root@mail ~]# hostname -f
mail.nsitmail.com
[root@mail ~]#
Update the /etc/hosts file
127.0.0.1 mail.nsitmail.com localhost.localdomain localhost
Disable Selinux
[root@mail ~]# setenforce 0
Edit the file /etc/sysconfig/selinux , set the parameter “SELINUX=disabled” , Reboot the server to disable selinux completely.
Step:2 Download the tar file of iRedmail.
Download the latest version of iRedmail from their Official Web Site or use below wget command to download from terminal.
[root@mail ~]# wget https://bitbucket.org/zhb/iredmail/downloads/iRedMail-0.9.3.tar.bz2
Step:3 Extract the tar file & execute installation Script.
[root@mail ~]# ll
total 124
-rw-r--r-- 1 root root 126277 Dec 20 19:12 iRedMail-0.9.3.tar.bz2
[root@mail ~]#
[root@mail ~]# tar -jxvf iRedMail-0.9.3.tar.bz2
[root@mail ~]# cd iRedMail-0.9.3
[root@mail iRedMail-0.9.3]# sh iRedMail.sh
After couple of seconds , below screen will appear , Select yes and press enter.

Define the folder or directory where users mailbox will be stored.

Select the web Server for iRedmail. Default is Nginx.

Select the database of your choice which will store domain names and mail accounts. In my case i am using MariaDB.

Define the domain name for your mail server. In my case domain name is “nsitmail.com”

Set Password for postmaster account.

Select Optional Components of iRedmail installation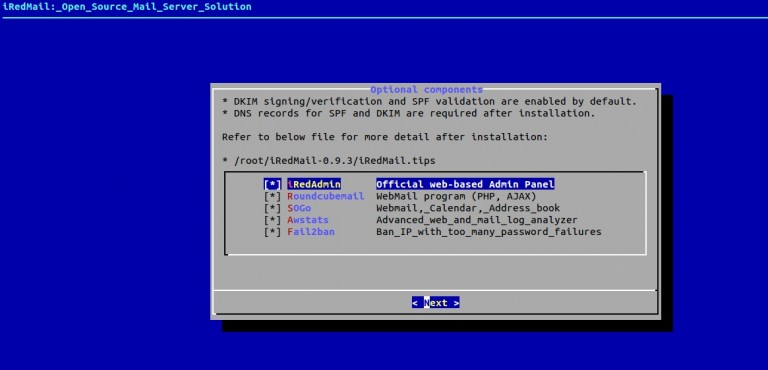
Press “y” to continue installation, Mail Server info & Credentials are kept in the file “/root/iRedMail-0.9.3/config”. Please keep this file in secure place.


As per instructions , reboot the server to enable all mail services.
Postfix mail logs and iRedmail logs are stored in “/var/log/maillog” and “/var/log/iredapd/iredapd.log” respectively.
Note : Default administrator name is “postmaster@nsitmail.com”
Following are the Important URLs after the Installation is completed , replace the domain name as per your setup in mentioned URLs.
iRedAdmin – official web-based admin panel:
https://mail.nsitmail.com/iredadmin/
Username: postmaster@nsitmail.com, password: XXXXXXXXXX
Roundcube webmail URL :
http://mail.nsitmail.com/mail/
SOGo Groupware
https://mail.nsitmail.com/SOGo/
Step:4 Create Users & domain from Admin Panel.
To create users first login to admin panel. Use user name as “postmaster@<domain>” and password that we set during installation.


Click on Add option and then Select Users.

Add a new Domain :
From the admin Panel , Select “Domain & accounts” option and then click on Add domain

Define the domain name & Organization Name and then further we can create users on newly created domain.

Step:5 Access Roundcube (Webmail).
Open the url in the browser “https://mail.nsitmail.com/mail/” , replace the domain name as per your setup.
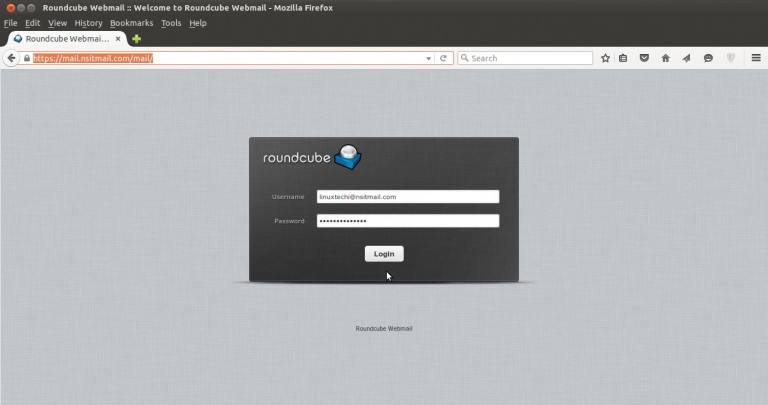

Send a test mail to verify the functionality.

As we see that i got the mail from iRedmail mail server, so we can say the iRedmail is successfully installed and configured.


 *click on image to view larger size.