This tutorial shows how you can install an Apache2 webserver on a CentOS 7.0 server with PHP5 support (mod_php) and MySQL support. LAMP is short for Linux, Apache, MySQL, PHP.
1 Preliminary Note
In this tutorial, I use the hostname server1.example.com with the IP address 192.168.0.100. These settings might differ for you, so you have to replace them where appropriate.
I will add EPEL-7 repo here to install latest phpMyAdmin as follows:
rpm -ivh http://dl.fedoraproject.org/pub/epel/7/x86_64/e/epel-release-7-5.noarch.rpm
2 Installing MySQL 5
To install MySQL, we do install mariadb like this:
yum -y install mariadb-server mariadb
Then we create the system startup links for MySQL (so that MySQL starts automatically whenever the system boots) and start the MySQL server:
systemctl start mariadb.service
systemctl enable mariadb.service
Set passwords for the MySQL root account:
mysql_secure_installation
Return:
[root@server1 ~]# mysql_secure_installation
/usr/bin/mysql_secure_installation: line 379: find_mysql_client: command not found

NOTE: RUNNING ALL PARTS OF THIS SCRIPT IS RECOMMENDED FOR ALL MariaDB
SERVERS IN PRODUCTION USE! PLEASE READ EACH STEP CAREFULLY!

In order to log into MariaDB to secure it, we'll need the current
password for the root user. If you've just installed MariaDB, and
you haven't set the root password yet, the password will be blank,
so you should just press enter here.

Enter current password for root (enter for none): <--ENTER
OK, successfully used password, moving on...

Setting the root password ensures that nobody can log into the MariaDB
root user without the proper authorisation.

Set root password? [Y/n]
New password: <--yourmariadbpassword
Re-enter new password: <--yourmariadbpassword
Password updated successfully!
Reloading privilege tables..
... Success!
By default, a MariaDB installation has an anonymous user, allowing anyone
to log into MariaDB without having to have a user account created for
them. This is intended only for testing, and to make the installation
go a bit smoother. You should remove them before moving into a
production environment.

Remove anonymous users? [Y/n] <--ENTER
... Success!

Normally, root should only be allowed to connect from 'localhost'. This
ensures that someone cannot guess at the root password from the network.

Disallow root login remotely? [Y/n] <--ENTER
... Success!

By default, MariaDB comes with a database named 'test' that anyone can
access. This is also intended only for testing, and should be removed
before moving into a production environment.

Remove test database and access to it? [Y/n] <--ENTER
- Dropping test database...
... Success!
- Removing privileges on test database...
... Success!

Reloading the privilege tables will ensure that all changes made so far
will take effect immediately.

Reload privilege tables now? [Y/n] <--ENTER
... Success!

Cleaning up...

All done! If you've completed all of the above steps, your MariaDB
installation should now be secure.

Thanks for using MariaDB!
[root@server1 ~]#
3 Installing Apache2
CentOS 7.0 ships with apache 2.4. Apache2 is directly available as a CentOS 7.0 package, therefore we can install it like this:
Return:
[root@server1 ~]# yum install httpd
Loaded plugins: fastestmirror, langpacks
Loading mirror speeds from cached hostfile
* base: ftp.plusline.de
* extras: mirror.23media.de
* updates: mirror.23media.de
Package httpd-2.4.6-17.el7.centos.1.x86_64 already installed and latest version
Nothing to do
[root@server1 ~]#
By default apache will be installed, if-not then please install it as shown above
Now configure your system to start Apache at boot time…
systemctl start httpd.service
systemctl enable httpd.service
In CentOS 7.0 uses Firewall-cmd, so I will customize it to allow external access to port 80 (http) and 443 (https).
firewall-cmd --permanent --zone=public --add-service=http
firewall-cmd --permanent --zone=public --add-service=https
firewall-cmd --reload
Now direct your browser to http://192.168.0.100, and you should see the Apache2 placeholder page:

4 Installing PHP5
We can install PHP5 and the Apache PHP5 module as follows:
We must restart Apache afterwards:
systemctl restart httpd.service
5 Testing PHP5 / Getting Details About Your PHP5 Installation
The document root of the default website is /var/www/html. We will now create a small PHP file (info.php) in that directory and call it in a browser. The file will display lots of useful details about our PHP installation, such as the installed PHP version.
vi /var/www/html/info.php
Code:
Now we call that file in a browser (e.g. http://192.168.0.100/info.php):
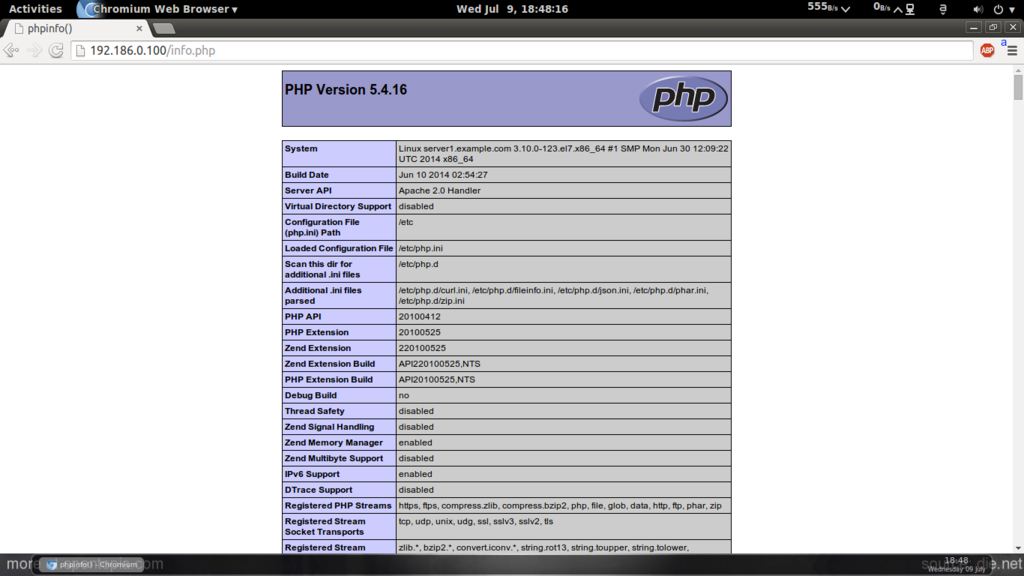
As you see, PHP5 is working, and it’s working through the Apache 2.0 Handler, as shown in the Server API line. If you scroll further down, you will see all modules that are already enabled in PHP5. MySQL is not listed there which means we don’t have MySQL support in PHP5 yet.
6 Getting MySQL Support In PHP5
To get MySQL support in PHP, we can install the php-mysql package. It’s a good idea to install some other PHP5 modules as well as you might need them for your applications. You can search for available PHP5 modules like this:
Pick the ones you need and install them like this:
In the next step I will install some common PHP modules that are required by CMS Systems like WordPress, Joomla and Drupal:
yum -y install php-gd php-ldap php-odbc php-pear php-xml php-xmlrpc php-mbstring php-snmp php-soap curl curl-devel
Now restart Apache2:
systemctl restart httpd.service
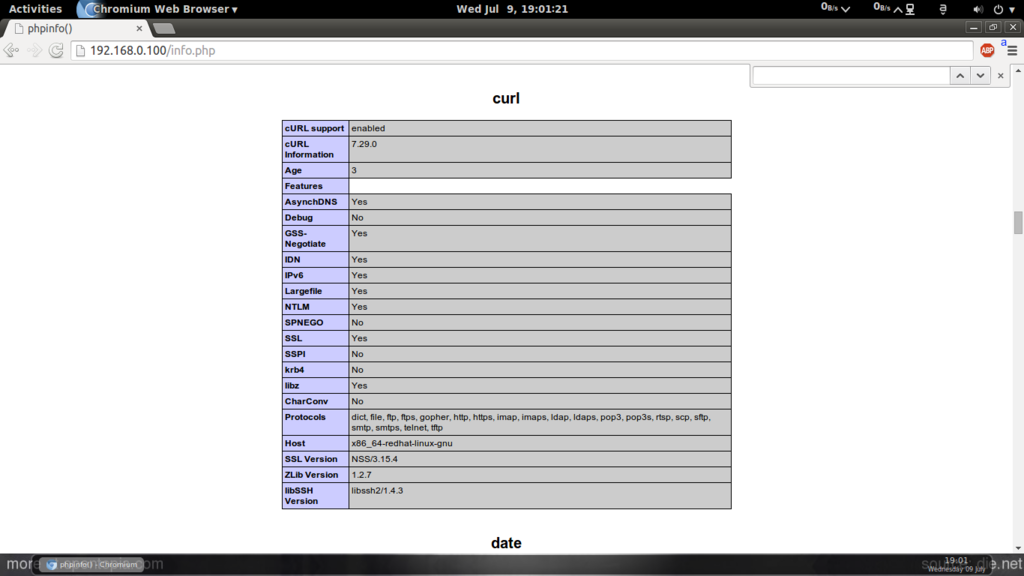
Now reload http://192.168.0.100/info.php in your browser and scroll down to the modules section again. You should now find lots of new modules like curl etc there.:
7 phpMyAdmin installation
phpMyAdmin is a web interface through which you can manage your MySQL databases.
phpMyAdmin can now be installed as follows:
Now we configure phpMyAdmin. We change the Apache configuration so that phpMyAdmin allows connections not just from localhost (by commenting out the <Directory “/usr/share/phpmyadmin”> stanza):
vi /etc/httpd/conf.d/phpMyAdmin.conf
Code:
[...]
Alias /phpMyAdmin /usr/share/phpMyAdmin
Alias /phpmyadmin /usr/share/phpMyAdmin

#<Directory /usr/share/phpMyAdmin/>
# <IfModule mod_authz_core.c>
# # Apache 2.4
# <RequireAny>
# Require ip 127.0.0.1
# Require ip ::1
# </RequireAny>
# </IfModule>
# <IfModule !mod_authz_core.c>
# # Apache 2.2
# Order Deny,Allow
# Deny from All
# Allow from 127.0.0.1
# Allow from ::1
# </IfModule>
#</Directory>
<Directory /usr/share/phpMyAdmin/>
Options none
AllowOverride Limit
Require all granted
</Directory>

[...]
Next we change the authentication in phpMyAdmin from cookie to http:
vi /etc/phpMyAdmin/config.inc.php
Code:
[...]
$cfg['Servers'][$i]['auth_type'] = 'http'; // Authentication method (config, http or cookie based)?
[...]
Restart Apache:
systemctl restart httpd.service
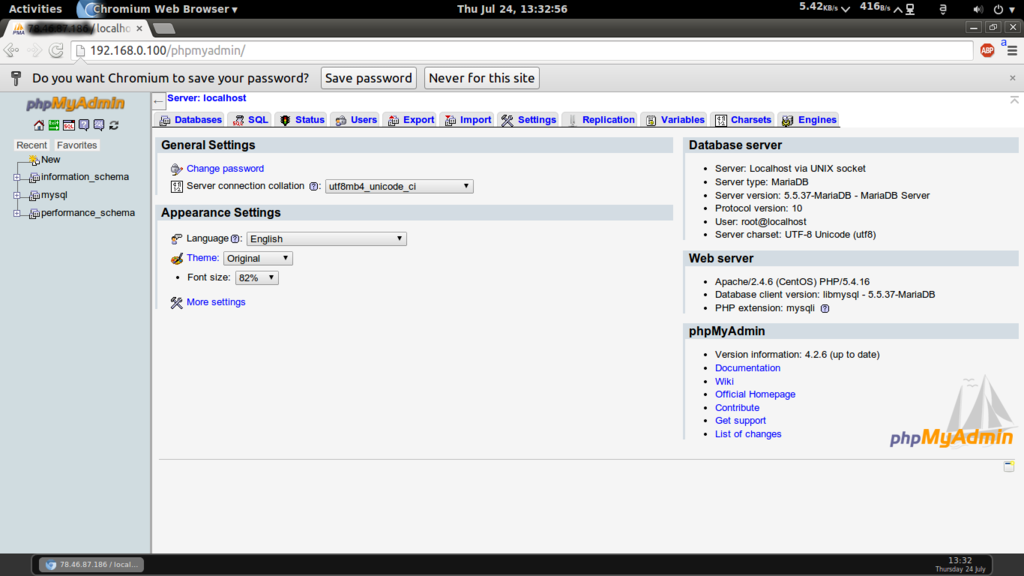
Afterwards, you can access phpMyAdmin under http://192.168.0.100/phpmyadmin/:
8 Links
Apache: http://httpd.apache.org/
PHP: http://www.php.net/
MySQL: http://www.mysql.com/
CentOS: http://www.centos.org/
phpMyAdmin: http://www.phpmyadmin.net/