Install Apache, PHP And MySQL On CentOS 7 (LAMP)

This tutorial shows how you can install an Apache2 webserver on a CentOS 7.0 server with PHP5 support (mod_php) and MySQL support. LAMP is short for Linux, Apache, MySQL, PHP.

1 Preliminary Note

In this tutorial, I use the hostname server1.example.com with the IP address 192.168.0.100. These settings might differ for you, so you have to replace them where appropriate.
I will add EPEL-7 repo here to install latest phpMyAdmin as follows:

rpm -ivh http://dl.fedoraproject.org/pub/epel/7/x86_64/e/epel-release-7-5.noarch.rpm

2 Installing MySQL 5

To install MySQL, we do install mariadb like this:

yum -y install mariadb-server mariadb

Then we create the system startup links for MySQL (so that MySQL starts automatically whenever the system boots) and start the MySQL server:

systemctl start mariadb.service
systemctl enable mariadb.service

Set passwords for the MySQL root account:

mysql_secure_installation

Return:

[root@server1 ~]# mysql_secure_installation
/usr/bin/mysql_secure_installation: line 379: find_mysql_client: command not found

NOTE: RUNNING ALL PARTS OF THIS SCRIPT IS RECOMMENDED FOR ALL MariaDB
SERVERS IN PRODUCTION USE! PLEASE READ EACH STEP CAREFULLY!

In order to log into MariaDB to secure it, we'll need the current
password for the root user. If you've just installed MariaDB, and
you haven't set the root password yet, the password will be blank,
so you should just press enter here.

Enter current password for root (enter for none): <--ENTER
OK, successfully used password, moving on...

Setting the root password ensures that nobody can log into the MariaDB
root user without the proper authorisation.

Set root password? [Y/n]
New password: <--yourmariadbpassword
Re-enter new password: <--yourmariadbpassword
Password updated successfully!
Reloading privilege tables..
... Success!
By default, a MariaDB installation has an anonymous user, allowing anyone
to log into MariaDB without having to have a user account created for
them. This is intended only for testing, and to make the installation
go a bit smoother. You should remove them before moving into a
production environment.

Remove anonymous users? [Y/n] <--ENTER
... Success!

Normally, root should only be allowed to connect from 'localhost'. This
ensures that someone cannot guess at the root password from the network.

Disallow root login remotely? [Y/n] <--ENTER
... Success!

By default, MariaDB comes with a database named 'test' that anyone can
access. This is also intended only for testing, and should be removed
before moving into a production environment.

Remove test database and access to it? [Y/n] <--ENTER
- Dropping test database...
... Success!
- Removing privileges on test database...
... Success!

Reloading the privilege tables will ensure that all changes made so far
will take effect immediately.

Reload privilege tables now? [Y/n] <--ENTER
... Success!

Cleaning up...

All done! If you've completed all of the above steps, your MariaDB
installation should now be secure.

Thanks for using MariaDB!
[root@server1 ~]#

3 Installing Apache2

CentOS 7.0 ships with apache 2.4. Apache2 is directly available as a CentOS 7.0 package, therefore we can install it like this:

yum -y install httpd

Return:

[root@server1 ~]# yum install httpd
Loaded plugins: fastestmirror, langpacks
Loading mirror speeds from cached hostfile
* base: ftp.plusline.de
* extras: mirror.23media.de
* updates: mirror.23media.de
Package httpd-2.4.6-17.el7.centos.1.x86_64 already installed and latest version
Nothing to do
[root@server1 ~]#

By default apache will be installed, if-not then please install it as shown above
Now configure your system to start Apache at boot time…

systemctl start httpd.service
systemctl enable httpd.service

In CentOS 7.0 uses Firewall-cmd, so I will customize it to allow external access to port 80 (http) and 443 (https).

firewall-cmd --permanent --zone=public --add-service=http
firewall-cmd --permanent --zone=public --add-service=https
firewall-cmd --reload

Now direct your browser to http://192.168.0.100, and you should see the Apache2 placeholder page:

1

4 Installing PHP5

We can install PHP5 and the Apache PHP5 module as follows:

yum -y install php

We must restart Apache afterwards:

systemctl restart httpd.service

5 Testing PHP5 / Getting Details About Your PHP5 Installation

The document root of the default website is /var/www/html. We will now create a small PHP file (info.php) in that directory and call it in a browser. The file will display lots of useful details about our PHP installation, such as the installed PHP version.

vi /var/www/html/info.php

Code:

<?php
phpinfo();
?>

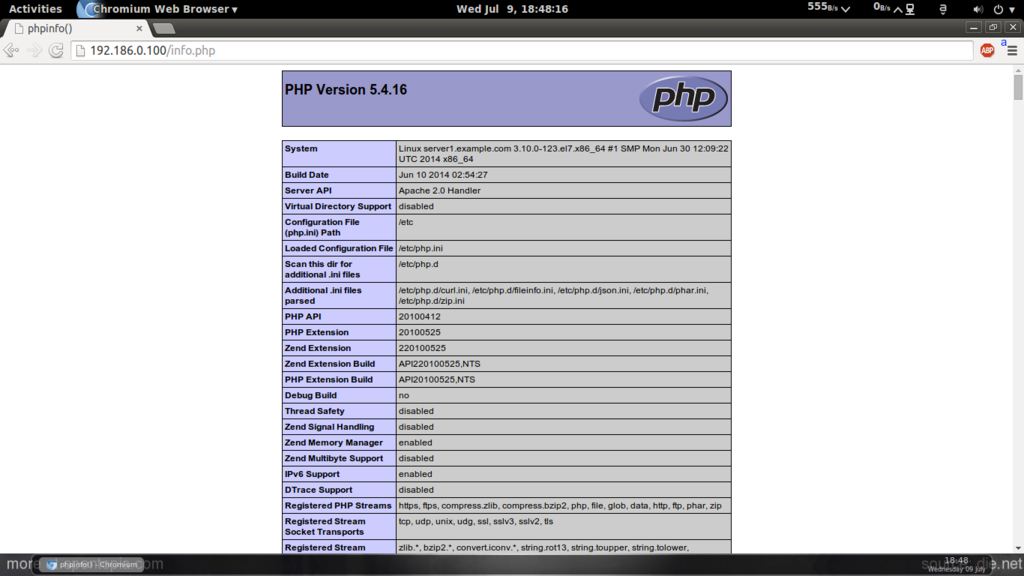
Now we call that file in a browser (e.g. http://192.168.0.100/info.php):
2

As you see, PHP5 is working, and it’s working through the Apache 2.0 Handler, as shown in the Server API line. If you scroll further down, you will see all modules that are already enabled in PHP5. MySQL is not listed there which means we don’t have MySQL support in PHP5 yet.

6 Getting MySQL Support In PHP5

To get MySQL support in PHP, we can install the php-mysql package. It’s a good idea to install some other PHP5 modules as well as you might need them for your applications. You can search for available PHP5 modules like this:

yum search php

Pick the ones you need and install them like this:

yum -y install php-mysql

In the next step I will install some common PHP modules that are required by CMS Systems like WordPress, Joomla and Drupal:

yum -y install php-gd php-ldap php-odbc php-pear php-xml php-xmlrpc php-mbstring php-snmp php-soap curl curl-devel

Now restart Apache2:

systemctl restart httpd.service

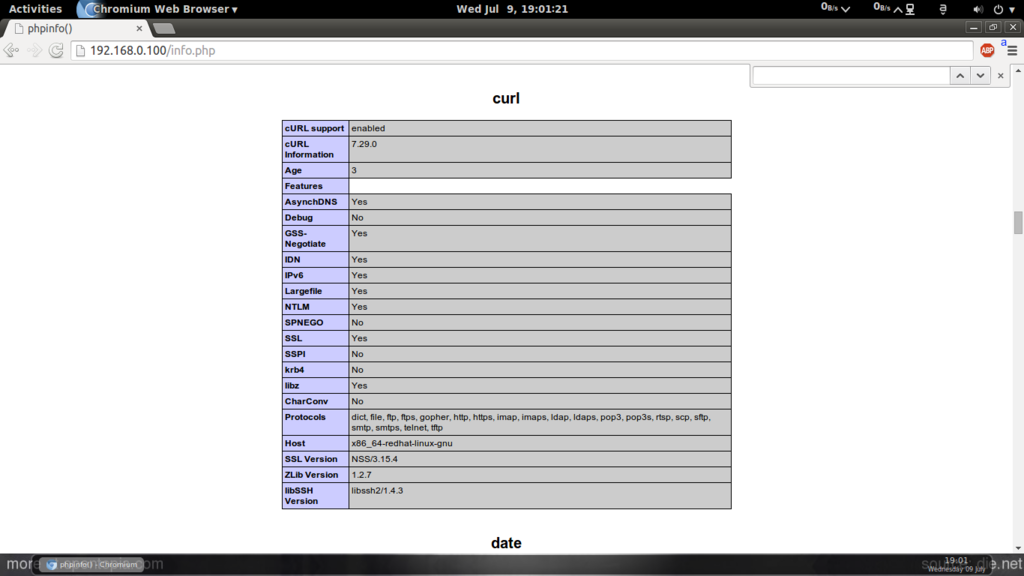
Now reload http://192.168.0.100/info.php in your browser and scroll down to the modules section again. You should now find lots of new modules like curl etc there.:
3

7 phpMyAdmin installation

phpMyAdmin is a web interface through which you can manage your MySQL databases.
phpMyAdmin can now be installed as follows:

yum install phpMyAdmin

Now we configure phpMyAdmin. We change the Apache configuration so that phpMyAdmin allows connections not just from localhost (by commenting out the <Directory “/usr/share/phpmyadmin”> stanza):

vi /etc/httpd/conf.d/phpMyAdmin.conf

Code:

[...]
Alias /phpMyAdmin /usr/share/phpMyAdmin
Alias /phpmyadmin /usr/share/phpMyAdmin

#<Directory /usr/share/phpMyAdmin/>
# <IfModule mod_authz_core.c>
# # Apache 2.4
# <RequireAny>
# Require ip 127.0.0.1
# Require ip ::1
# </RequireAny>
# </IfModule>
# <IfModule !mod_authz_core.c>
# # Apache 2.2
# Order Deny,Allow
# Deny from All
# Allow from 127.0.0.1
# Allow from ::1
# </IfModule>
#</Directory>
<Directory /usr/share/phpMyAdmin/>
Options none
AllowOverride Limit
Require all granted
</Directory>

[...]

Next we change the authentication in phpMyAdmin from cookie to http:

vi /etc/phpMyAdmin/config.inc.php

Code:

[...]
$cfg['Servers'][$i]['auth_type'] = 'http'; // Authentication method (config, http or cookie based)?
[...]

Restart Apache:

systemctl restart httpd.service

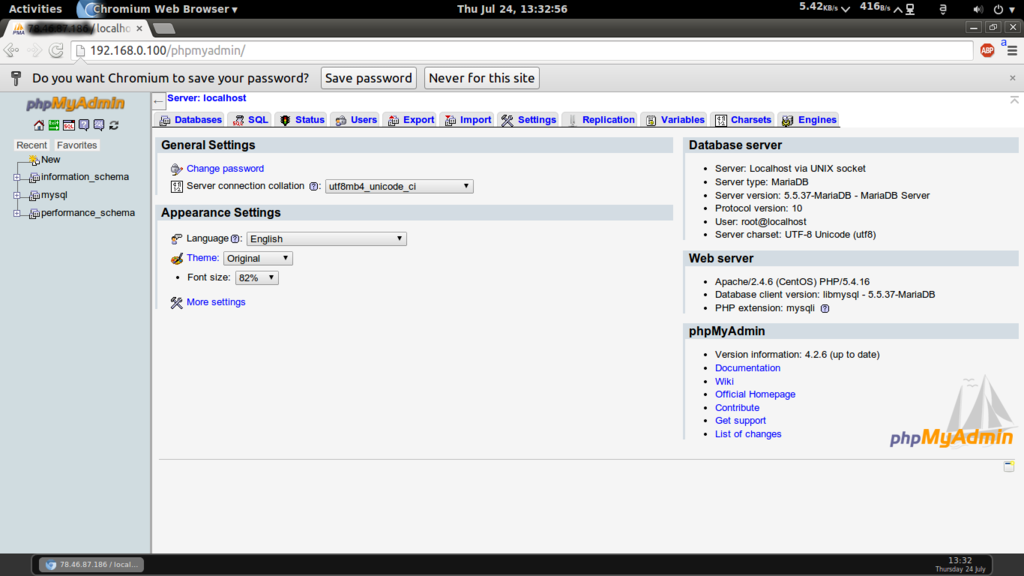
Afterwards, you can access phpMyAdmin under http://192.168.0.100/phpmyadmin/:
4

8 Links
Apache: http://httpd.apache.org/
PHP: http://www.php.net/
MySQL: http://www.mysql.com/
CentOS: http://www.centos.org/
phpMyAdmin: http://www.phpmyadmin.net/
Continue Reading

How to Install Squid (Caching / Proxy) on CentOS 7

Squid is a caching and forwarding web proxy. It is most often used in conjunction with a traditional LAMP stack (Linux, Apache, MySQL, PHP), and can be used to filter traffic on HTTP, FTP, and HTTPS, and increase the speed (thus lower the response time) for a web server via caching.

Pre-Flight Check
These instructions are intended specifically for installing Squid on a single CentOS 7 node.
I’ll be working from a Liquid Web Core Managed CentOS 7 server, and I’ll be logged in as root.

Step #1 Install Squid
First, clean-up yum:

yum clean all

As a matter of best practice we’ll update our packages:

yum -y update

Installing Squid and related packages is now as simple as running just one command:

yum -y install squid

Configure Squid to Start on Boot
And then start Squid:

systemctl start squid

Be sure that Squid starts at boot:

systemctl enable squid

To check the status of Squid:

systemctl status squid

To stop Squid:

systemctl stop squid

To access squid settings access : /etc/squid/squid.com

My basic config:

http_access allow localhost manager
http_access deny manager

# We strongly recommend the following be uncommented to protect innocent
# web applications running on the proxy server who think the only
# one who can access services on "localhost" is a local user
#http_access deny to_localhost

#
# INSERT YOUR OWN RULE(S) HERE TO ALLOW ACCESS FROM YOUR CLIENTS
#

# Example rule allowing access from your local networks.
# Adapt localnet in the ACL section to list your (internal) IP networks
# from where browsing should be allowed
http_access allow localnet
http_access allow localhost

# And finally deny all other access to this proxy
http_access deny all

# Squid normally listens to port 3128
http_port 3128

# Uncomment and adjust the following to add a disk cache directory.
#cache_dir ufs /var/spool/squid 10000 16 256
cache_replacement_policy heap LFUDA
cache_swap_low 90
cache_swap_high 95
maximum_object_size_in_memory 100 MB
cache_dir aufs /var/spool/squid 40000 16 256
cache_mem 40000 MB

# Leave coredumps in the first cache dir
coredump_dir /var/spool/squid

#
# Add any of your own refresh_pattern entries above these.
#

That is all!

Continue Reading

Install Cacti (Monitoring tool) on ubuntu 15.04 / 15.10 server.

Cacti is a complete network graphing solution designed to harness the power of RRDTool’s data storage and graphing functionality. Cacti provides a fast poller, advanced graph templating, multiple data acquisition methods, and user management features out of the box. All of this is wrapped in an intuitive, easy to use interface that makes sense for LAN-sized installations up to complex networks with hundreds of devices.

Features Graphs

Unlimited number of graph items can be defined for each graph optionally utilizing CDEFs or data sources from within cacti.
Automatic grouping of GPRINT graph items to AREA, STACK, and LINE[1-3] to allow for quick re-sequencing of graph items.
Auto-Padding support to make sure graph legend text lines up.
Graph data can be manipulated using the CDEF math functions built into RRDTool. These CDEF functions can be defined in cacti and can be used globally on each graph.
Support for all of RRDTool’s graph item types including AREA, STACK, LINE[1-3], GPRINT, COMMENT, VRULE, and HRULE.

Data Sources

Data sources can be created that utilize RRDTool’s “create” and “update” functions. Each data source can be used to gather local or remote data and placed on a graph.
Supports RRD files with more than one data source and can use an RRD file stored anywhere on the local file system.
Round robin archive (RRA) settings can be customized giving the user the ability to gather data on non-standard timespans while store varying amounts of data.

Data Gathering

Contains a “data input” mechanism which allows users to define custom scripts that can be used to gather data. Each script can contain arguments that must be entered for each data source created using the script (such as an IP address).
Built in SNMP support that can use php-snmp, ucd-snmp, or net-snmp.
Ability to retrieve data using SNMP or a script with an index. An example of this would be populating a list with IP interfaces or mounted partitions on a server. Integration with graph templates can be defined to enable one click graph creation for hosts.
A PHP-based poller is provided to execute scripts, retrieve SNMP data, and update your RRD files.

Templates

Graph templates enable common graphs to be grouped together by templating. Every field for a normal graph can be templated or specified on a per-graph basis.
Data source templates enable common data source types to be grouped together by templating. Every field for a normal data source can be templated or specified on a per-data source basis.
Host templates are a group of graph and data source templates that allow you to define common host types. Upon the creation of a host, it will automatically take on the properties of its template.

Graph Display

The tree view allows users to create “graph hierarchies” and place graphs on the tree. This is an easy way to manage/organize a large number of graphs.
The list view lists the title of each graph in one large list which links the user to the actual graph.
The preview view displays all of the graphs in one large list format. This is similar to the default view for the 14all cgi script for RRDTool/MRTG.

User Management

User based management allows administrators to create users and assign different levels of permissions to the cacti interface.
Permissions can be specified per-graph for each user, making cacti suitable for co location situations.
Each user can keep their own graph settings for varying viewing preferences.

Preparing your system

Before installing cacti you need to make sure you have installed Ubuntu 15.04 LAMP server.

Install Cacti on ubuntu 15.04 / 15.10 server

Open the terminal and run the following command

sudo apt-get install cacti-spine

The above command starts the cacti installation and you should see the first as php path change select ok and press enter

1

Now select the webserver you want to use (in my case it is apache2)

2

Cacti database configurations select yes

3

Enter database admin user password

4

Mysql application password for cacti

5

confirm the password

6

Now that Cacti is installed, we can start the configuration process on it.

Configuring cacti

Point your web browser towards http://YOURSERVERIP/cacti/install/ to start the initial setup and click next

7

Select new install option and click next

8

In the following screen you need to make sure you have all the required paths are correct and click on finish

9

Now login to Cacti with the default admin/admin, and change the password to something more sensible

10

After login in to Cacti you should see similar to the following screen

12


That is all!

Continue Reading

How to Install Plugin Mirage in Cacti

Prerequisites:

Cacti version 0.8.8+ It may work on previous versions, but we haven’t tested against them.
PIA version 3.1

Download Mirage Plugin 1.2.0

Dowload Mega URL: https://mega.nz/#F!joBCSajS
Key: !5xOf-FjcDAkkS3K2TkAkTA

Installation:

Move the folder mirage to CACTI_HOME/plugins/
Ensure permission are correct (CACTI_HOME/plugins/mirage)

Install Mirage through Cacti Plugin Management /Enable Mirage pluging through Cacti Plugin Management

cacti

Review and save Mirage settings

managemente-cacti

After installation it should generate a file called ” mirage_poller_output.log ” within the / var / www / html / cacti / log /

That is all!

Continue Reading

Easy Samba installation on RHEL/CentOS 7

Samba is a client/server system that implements network resource sharing for Linux and other UNIX computers. With Samba, UNIX files and printers can be shared with Windows clients and vice versa. Samba supports the Session Message Block (SMB) protocol. Nearly all Windows computers include SMB support with their internal network subsystems (NetBIOS in particular).
With an appropriately-configured Samba server on Linux, Windows clients can map drives to the Linux filesystems. Likewise, theSamba client on UNIX can connect to Windows shares by their UNC name. Although differences among various operating systems (such as filesystem naming conventions, end-of-line conventions, and authentication) can limit interoperability, Samba offers a generally serviceable mechanism for resource sharing on a heterogenous network.
In this tutorial we will show you how to install and configure Samba server on RHEL and CentOS 7 linux.

Install and configure Samba on Rhel/CentOS 7
To install samba packages enter following command:

#yum install samba samba-client samba-common -y

Now configure samba edit the file /etc/samba/smb.conf

#mv /etc/samba/smb.conf /etc/samba/smb.conf.bkp
#vi /etc/samba/smb.conf

and paste following line:

[global]
workgroup = WORKGROUP
server string = Samba Server %v
netbios name = centos
security = user
map to guest = bad user
dns proxy = no
#============================ Share Definitions ==============================
[Anonymous]
path = /samba/anonymous
browsable =yes
writable = yes
guest ok = yes
read only = no

Save the smb.conf file and restart the service:

#mkdir -p /samba/anonymous
#systemctl enable smb.service
#systemctl enable nmb.service
#systemctl restart smb.service
#systemctl restart nmb.service

Add these Iptables rules, so that samba will work perfectly:

#firewall-cmd --permanent --zone=public --add-service=samba
#firewall-cmd --reload

Change permission for samba share:

#chmod -R 0755 anonymous/
#chown -R nobody:nobody anonymous/

Further we need to allow the selinux for the samba configuration as follows:

#chcon -t samba_share_t anonymous/

Now you can access the Centos 7.0 sharing in windows as follows, go to the Run prompt and type \centos :

image1

Acesse \\centos

image2

Now anonymous user can browse & create new text documents:

image3

Secured samba server

For this I will create a group smbgrp & user rasho to access the samba server with proper authentication

#useradd rasho
#groupadd smbgrp
#usermod -a -G smbgrp rasho
#smbpasswd -a rasho
[root@localhost]# smbpasswd -a rasho
New SMB password: YOUR SAMBA PASS
Retype new SMB password: REPEAT YOUR SAMBA PASS
Added user rasho.

Create a new share, set the permission on the share:

#mkdir /home/secure
#chown -R rasho:smbgrp /home/secure/
#chmod -R 0770 /home/secure/
#chcon -t samba_share_t /home/secure/

Again edit the configuration file as :

#vi /etc/samba/smb.conf

Add the newly created samba share in smb.conf file:

[Secure]
path = /home/secure
valid users = @smbgrp
guest ok = no
writable = yes
browsable = yes

Screenshot-from-2014-09-23-224711

Restart the samba service:

#systemctl restart smb.service
#systemctl restart nmb.service

Now at windows machine check the folder now with the proper credentials

image5

Open samba sharing

image6

Create new text documents:image7

That is all!


Continue Reading