Olá leitoires, muito se fale sobre versões, é importante destacar que não existe ESXi 9 — a nomenclatura mudou: a VMware passou a se referir à versão como vSphere 9, sem o “i”. Essa mudança de nome traz também ajustes na forma como os produtos são licenciados e implantados, especialmente para soluções de nuvem híbrida e infraestrutura moderna.
Principais diferenças estratégicas:
vSphere 9 é a base do VCF9:
O VMware Cloud Foundation 9 (VCF9) traz todo o ecossistema atualizado para gestão unificada de compute, storage e rede, com suporte nativo a vSAN, NSX-T e Tanzu.
Isso simplifica a operação, automatiza o ciclo de vida e permite adoção mais rápida de ambientes híbridos e multi-cloud.
Suporte a modernização de workloads:
Integração completa com Kubernetes via Tanzu, facilitando a execução de containers junto de máquinas virtuais em um mesmo stack.
Melhor performance para workloads críticos e aumento da eficiência de hardware.
Licenciamento e Foundation:
O vSphere 9, dentro do VCF9, é distribuído principalmente via vSphere Foundation, permitindo uma visão consolidada de todos os recursos e licenças.
Atualizações e upgrades passam a ser mais automáticas, reduzindo risco operacional.
Segurança e compliance:
Hardening nativo, criptografia avançada e integração com VMware Trust Authority, aumentando a segurança do ambiente de datacenter e cloud.
Estratégia recomendada:
Se você está avaliando migração ou expansão de ambientes, o VCF9 é o caminho estratégico. Ele não só traz o vSphere 9, mas também padroniza infraestrutura e operações, garantindo suporte a novas tecnologias e maior agilidade para projetos de nuvem híbrida ou modernização de data centers.
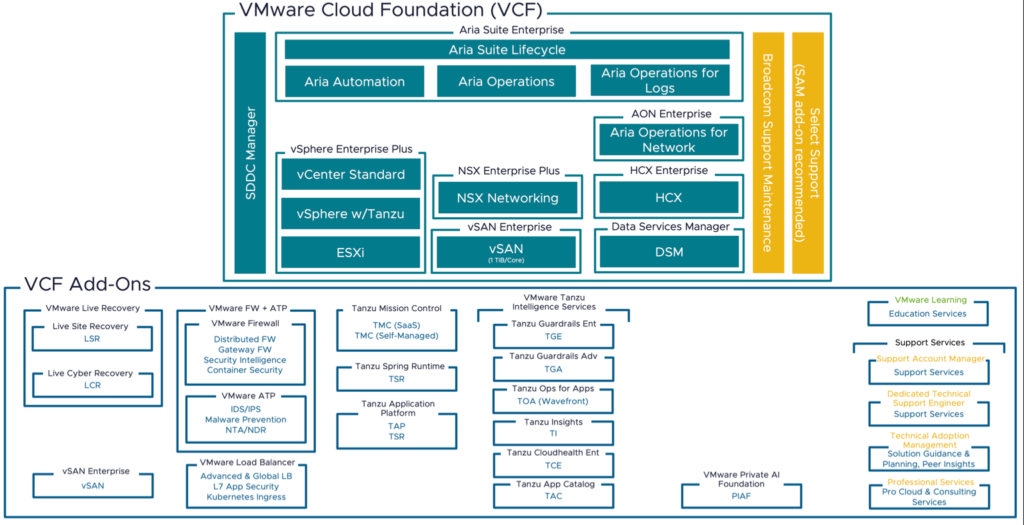
VMware Cloud Foundation 9.0 – O que vem incluso ?
O VCF 9.0 simplifica o licenciamento ao trazer um arquivo único de licença para toda a infraestrutura. Antes, cada componente exigia chaves separadas, como vCenter, ESXi e add-ons. Agora, com o VCF9, os principais recursos inclusos no arquivo de licença são:
VMware Cloud Foundation cores
vSAN (até 1 TiB por core)
Private AI Foundation
vSphere Foundation cores
VCF Edge cores
Serviços adicionais:
Add-on via licença no arquivo:
Private AI extra
vSAN adicional (acima do limite incluso)
Add-on via licença separada:
VMware vDefend Firewall
VMware Avi Load Balancer
VMware Tanzu Platform
VMware Data Services Manager
SaaS:
VMware Live Recovery
Bundles via licença separada:
VMware Telco Cloud Platform
Principais mudanças em relação às versões anteriores:
Não há mais chaves separadas por componente ou versão.
Licenciamento agora é agregado e escalável, permitindo distribuir a capacidade de licenças em múltiplos vCenters.
Avaliação estendida de 60 para 90 dias.
Licenciamento pode ser gerido nos modos Connected (automático) ou Disconnected (manual).
Olha, o VCF9 realmente soma. Ele traz várias melhorias legais, simplifica bastante a gestão e dá aquele up em compute, storage e rede. Agora, vamos ser sinceros: ele ainda não está pronto para absorver tudo do NSX e do VMware Cloud Director, principalmente quando falamos de ambientes multi-tenant de verdade. Por enquanto, ainda estamos no aguardo das melhorias que a Broadcom vai trazer para fechar essas lacunas e tornar a plataforma realmente completa para cenários complexos.
Se você trabalha com virtualização, essa notícia merece sua atenção! A Broadcom, atual proprietária da VMware, anunciou uma mudança significativa nas regras de licenciamento que vai impactar diretamente os clientes da plataforma. A distribuidora Arrow informou que, a partir de 10 de abril de 2025, o número mínimo de núcleos exigidos para licenciamento VMware saltará de 16 para 72. Além disso, a Broadcom aplicará penalidades financeiras para renovações fora do prazo.
O Impacto do Aumento de Núcleos no Licenciamento
Se antes um servidor com 8 núcleos precisava de uma licença para 16 núcleos, agora será necessário pagar por 72, independentemente do real consumo. Ou seja, muitos clientes estarão pagando por 64 núcleos que não utilizam. Isso representa um aumento expressivo nos custos para pequenas e médias empresas que utilizam VMware para virtualização de servidores.
Essa mudança deixa claro que a Broadcom está focando nos grandes clientes corporativos e reduzindo as opções para empresas menores. Desde que assumiu a VMware, a Broadcom vem consolidando produtos, reestruturando ofertas e reformulando preços para aumentar receita e lucro.
Multas Para Renovações Fora do Prazo
Além do aumento na exigência de núcleos, há outro ponto crítico: clientes que não renovarem suas licenças na data de vencimento pagarão uma multa de 20% sobre o valor cotado para o primeiro ano da assinatura renovada. Isso significa que qualquer atraso pode custar caro.
Com essas mudanças, empresas precisarão adotar um planejamento financeiro ainda mais estratégico para evitar surpresas desagradáveis no orçamento de TI.
A Melhor Estratégia: Buscar um Parceiro Broadcom
Com essas novas regras, o ideal é buscar um parceiro Broadcom autorizado para encontrar a melhor solução de licenciamento. Dependendo do porte da empresa e da complexidade do ambiente, optar pelo VMware vSphere Foundation (VVF) ou pelo VMware Cloud Foundation (VCF) pode fazer toda a diferença.
VMware vSphere Foundation (VVF): Indicado para empresas que precisam de uma solução confiável de virtualização, sem a complexidade do VCF.
VMware Cloud Foundation (VCF): Mais robusto, ideal para organizações que necessitam de um ambiente completo, integrado e seguro para computação, armazenamento e redes.
Um parceiro Broadcom pode ajudar a dimensionar corretamente sua necessidade, evitando gastos desnecessários e garantindo conformidade com as novas regras de licenciamento
Olá pessoal, espero que todos estejam bem, hoje vamos tentar esclarecer um pouco das mudanças da Broadcom sobre a VMware.
Qual a diferença?
Na hora de planejar a infraestrutura de virtualização, muitas empresas se deparam com duas opções da VMware: o vSphere Foundation (VVF) e o Cloud Foundation (VCF). Mas quais são as diferenças entre eles e qual escolher para seu ambiente? Vamos direto ao ponto!
🔹 O que é o VMware vSphere Foundation (VVF)?
O VVF é a base da virtualização com VMware. Ele inclui o vSphere ESXi (hipervisor) e o vCenter Server, permitindo criar e gerenciar máquinas virtuais de forma centralizada.
✅ Focado em virtualização de servidores
✅ Ideal para ambientes menores que não precisam de recursos avançados
✅ Gerenciamento básico, sem automação integrada
✅ Menor custo, pois não inclui armazenamento e redes definidas por software (SDN e SDS)
Se a sua empresa precisa apenas de uma plataforma sólida de virtualização sem complexidade extra, o VVF pode ser suficiente.
🔹 O que é o VMware Cloud Foundation (VCF)?
Já o VCF é uma solução completa para infraestrutura hiperconvergente e nuvem híbrida. Ele não só inclui o vSphere, mas também:
vSAN (armazenamento definido por software)
NSX (rede definida por software)
Aria Suite (antigo vRealize, para automação e gerenciamento)
SDDC Manager (para administração e orquestração do ambiente)
✅ Permite nuvem privada e híbrida
✅ Infraestrutura completa e automatizada
✅ Gerenciamento centralizado e simplificado
✅ Escalabilidade e segurança avançadas
Se sua empresa busca uma solução robusta para modernizar o data center e facilitar a automação, o VCF é a melhor escolha.
🔥 Principais Diferenças
Característica
VMware vSphere Foundation (VVF)
VMware Cloud Foundation (VCF)
Escopo
Virtualização básica
Infraestrutura completa para nuvem híbrida
Componentes principais
vSphere e vCenter
vSphere, vSAN, NSX, Aria Suite
Gerenciamento
Manual ou com ferramentas externas
Automatizado com SDDC Manager
Rede
Necessita soluções externas
Inclui NSX para SDN
Armazenamento
Soluções tradicionais (SAN, NAS)
Inclui vSAN para SDS
Automação
Limitada
Avançada com Aria Suite
Casos de uso
Pequenas e médias empresas
Data centers modernos, nuvem híbrida e hiperconvergência
Custo
Menor
Maior, mas mais completo
Conclusão: Qual escolher?
Se sua necessidade é somente virtualização, o VVF resolve bem.
Se você precisa de um ambiente mais automatizado, integrado e escalável, vá de VCF.
A escolha certa depende da estratégia da sua empresa e do nível de complexidade que deseja administrar.
O VMware Cloud Foundation (VCF) é a melhor escolha para infraestrutura moderna, oferecendo suporte direto da VMware e recursos avançados como NSX (rede definida por software) e HCX (migração simplificada de workloads). Além disso, cada core licenciado já inclui 1TB de vSAN, garantindo armazenamento eficiente sem custos adicionais. Com automação integrada e gerenciamento centralizado, o VCF proporciona escalabilidade, segurança e alta performance para ambientes corporativos.
Consegui um Hardware da DELL para laboratório chamado VEP “Virtual Edge Platform” para rodar em meu HomeLab. E o resultado dos testes foi além do esperado. Gostaria de elencar abaixo alguns dos pontos que me fez adorar este Hardware, principalmente para fazer a função de Edge mas também como um excelente equipamento para ter em casa e executar laboratórios.
Baixo consumo de Energia (Monitorei a alimentação deste Hardware e o seu consumo é de 35 a 45W .
Tamanho reduzido, diferente de um servidor de Rack este Hardware tem o tamanho de um ThinClient.
Recurso de Hardaware bem interessante (16 Cores, 64GB RAM , 2 TB SSD, 6 Interfaces 1GB e 2 Interfaces 10GB SFP+)
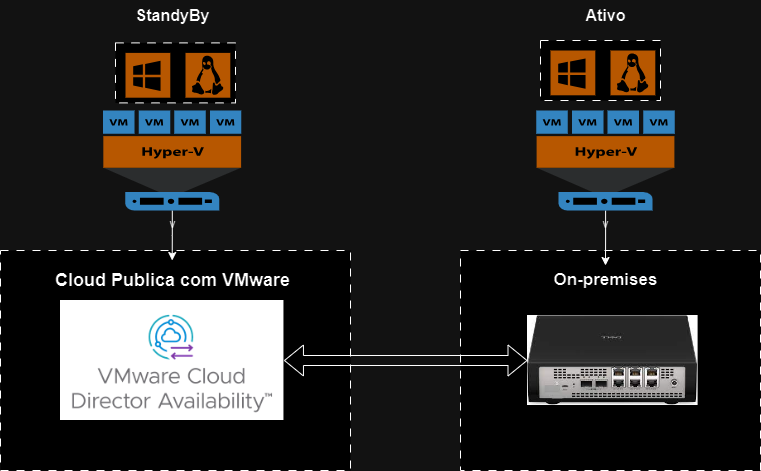
Hoje em dia falamos muito da Jornada de migrar nossas aplicações para Nuvem, porém algumas aplicações ainda são sensíveis com questão de latência, podemos imaginar que boa parte das aplicações estejam rodando na Nuvem.
Vamos imaginar o seguinte cenário onde você precisa manter localmente serviços como um Controlador de Domínio ou algum servidor de aplicação que depende de latência baixa e com a adoção deste Hardware você pode deixar suas máquinas virtuais ou até mesmo containers rodando neste equipamento com uma réplica para Nuvem configurada.
Com a replica das máquinas deste equipamento para Nuvem no caso de um sinistro você até pode sofrer com latência, porém garante a continuidade da sua operação até realizar o FailBack.
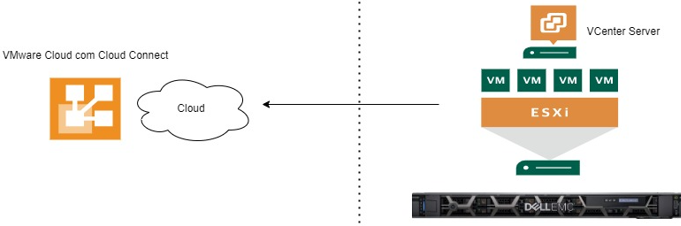
O caso acima é um exemplo simples que pode ser implementando de várias formas, replicando com VMware fazendo uma nuvem estendida. Também é possível utilizar o VEEAM caso o Datacenter trabalhe com CloudConnect da VEEAM , você pode replicar essa máquina para dentro do seu tennant no VMware Cloud Director.
Abaixo gosto de mostrar um exemplo real e simples com VEEM , aonde o print é exatamente um ESXI rodando no VEP com várias maquinas virtuais como de VEEAM, PFsense, AD, DNS e WTS. Sendo muito parecido com senário de muitos clientes.
Foi criado no VEEAM uma réplica utilizando o CloudConnect e conforme a imagem abaixo minha VM de WTS já está replicada e aguardando ser iniciada na Cloud caso aconteça algum sinistro na borda. Isso é possível com o DR Planning no Veeam.
Claro existe várias questões de remap de rede e roteamentos que precisam ser ajustadas para rodar na Nuvem, mas este não é o foco deste tópico.
Olá amigos, depois depois de muito tempo sem postar retorno trazendo algo simples.
Vejo muitas pessoas com duvidas neste assunto, então vamos explicar de uma maneira didática e simples como replicar uma maquina virtual do seu parque ESXI para o VMware Cloud (VCLOUD) . Está uma demanda que vem crescendo de pessoas saindo do on-premise para cloud.
O que será necessário:
Uma licença vCenter Server que suporte replicação ( As licenças Standard, Enterprise e Enterprise Plus suportam replicação)
Uma licença do Veeam Backup & Replication que seja igual ou superior à edição Standard
Uma rede que conecte o vCenter Server, o repositório de backup e o destino de replicação.
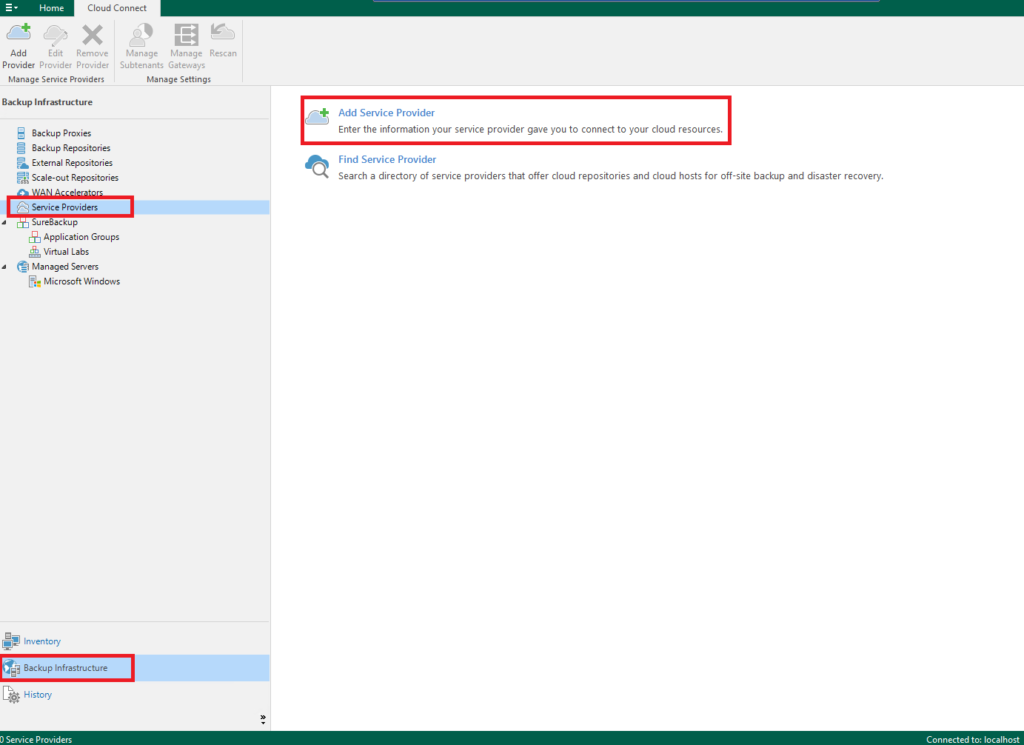
Vamos começar a configuração do JOB de replicação abrindo o Veeam Backup Server indo no caminho abaixo:
Passo 1
Backup Infrastructure / Service Provider / Add Service Provider
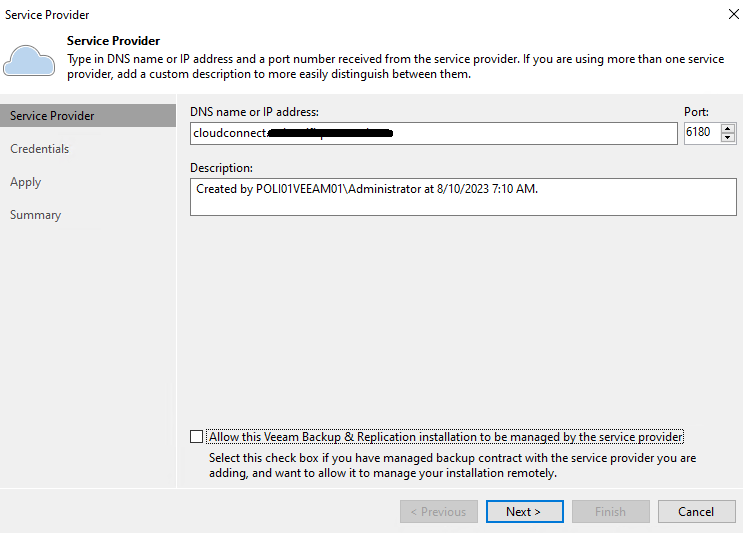
Passo 2
No passo de numero dois vamos adicionar o endereço (URL) informado por seu provedor de nuvem. E clicar na opção Next para avançar a configuração do seu JOB.
Nota: A porta 6180 é a padrão utilizada por muitos, porem pode acontecer de ser utilizado outra porta para essa comunicação.
Passo 3
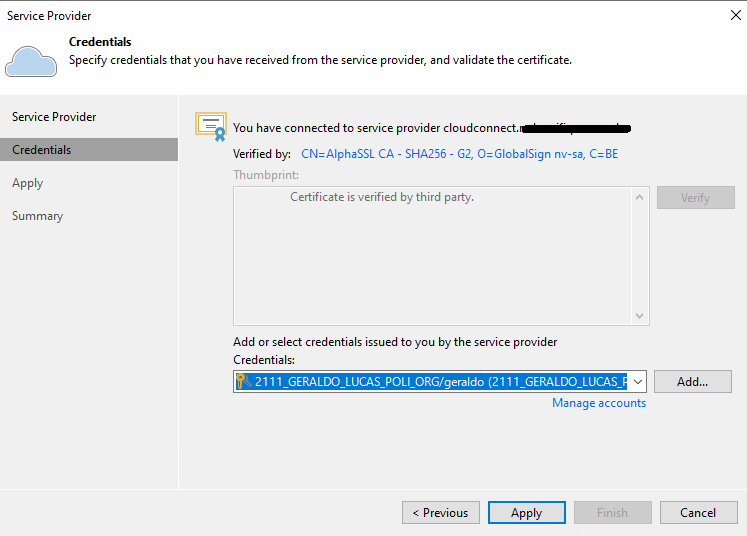
No passo de numero três vamos informar as credenciais e clicar na opção Next para avançar a configuração do seu JOB. Porem vamos entender como a credencial abaixo é composta
Nota: A credencial é composta pelo nome da organização e o usuário do VMware Cloud, então por mais que o provedor tenha fornecido as credenciais, você mesmo pode ir até o painel e criar um usuário especifico para o Veeam .
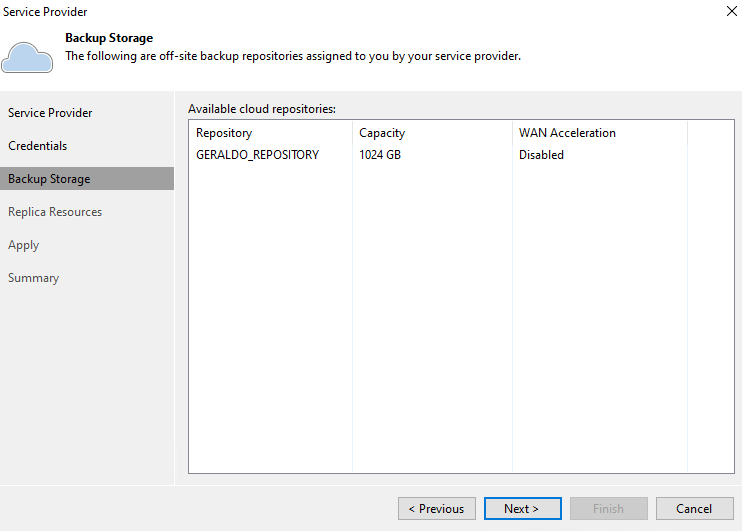
No passo de numero quatro será importante observar se o seu provedor forneceu repositório de backup ou apenas ambiente para replicação em nuvem. No caso abaixo podemos ver um repositório de 1TB. Com isso podemos avançar a configuração do JOB.
Passo 5
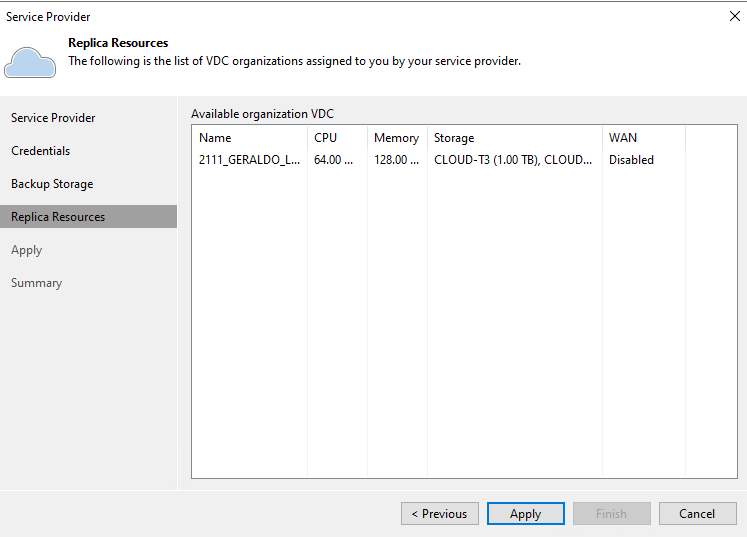
Nenhuma configuração se faz necessário neste estagio, veremos listados os seus recursos dentro do VMware Cloud para replicação do seu ambiente virtual. Se tudo estiver de acordo com seu contratado pode ser aplicado as configurações.
Nota: Pode aparecer mais de um tennant dependendo da quantidade de virtuais datacenter que serão utilizados ou contratados pelo cliente.
Passo 6
Abaixo podemos ver nos logs se todas as configurações ocorreram bem. Caso algo falhe durante a configuração do seu JOB retorne e revise as informações cadastradas.
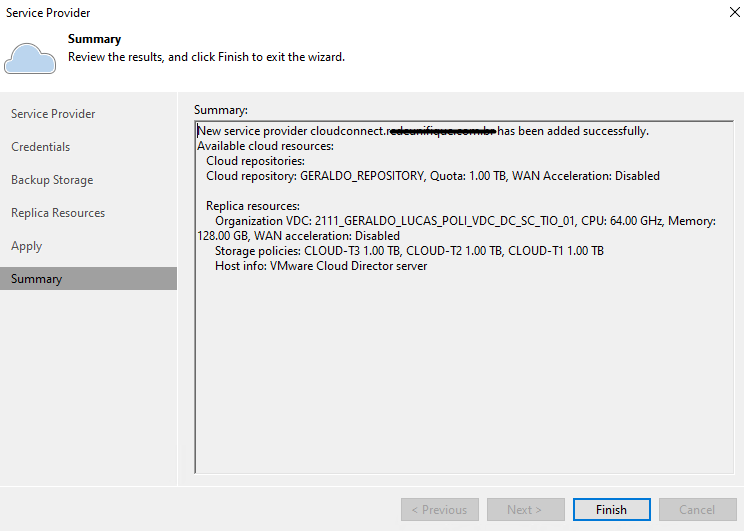
Passo 7
Por fim podemos validar todos os recursos que foram configurados. Com isso pode ser finalizado a configuração.
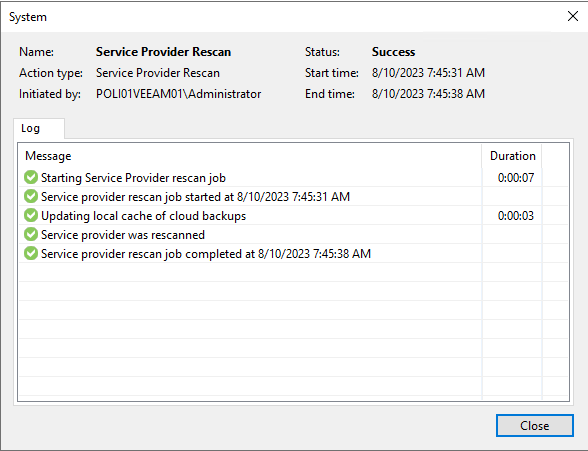
Passo 8
Após finalizado o passo acima o Veeam vai disparar um JOB para fazer o rescan em toda a infraestrutura de Service Provider, caso retorne sucesso você pode iniciar a configuração do seu JOB.
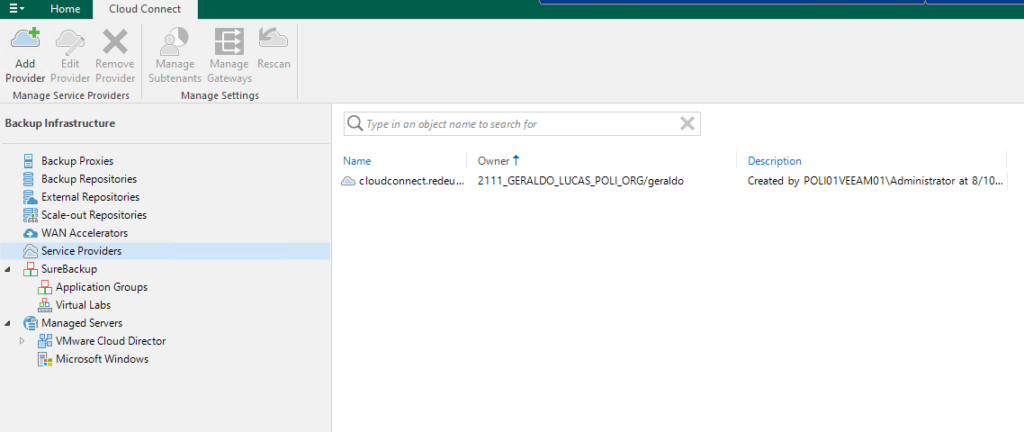
Passo 9
Simples, nosso Service Provider está cadastrado e disponível para realizar a replicação para seu provedor de nuvem.
Passo 10
O passo de numero dez presume que você já tenha um host ESXI ou um VCenter Server cadastrado na infraestrutura do Veeam contendo suas maquinas virtuais . Em próximo artigo podemos focar apenas no cadastramento dos hosts e clusters VMware no Veeam.
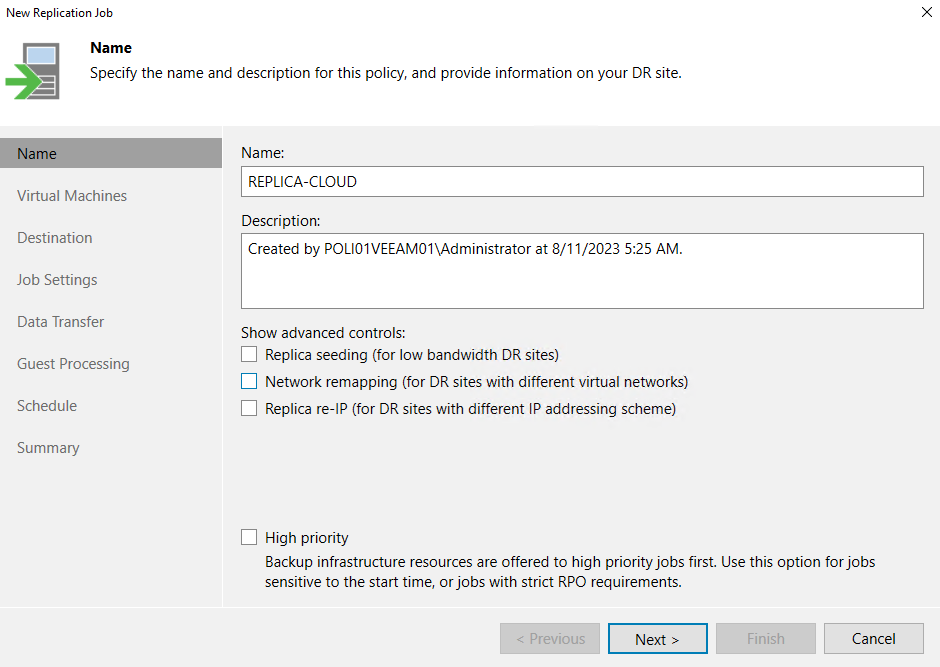
Agora nosso próximo passo é criar um JOB para replicar a maquina virtual do seu ambiente on-premis para cloud
Vamos fazer a configuração do JOB no caminho abaixo:
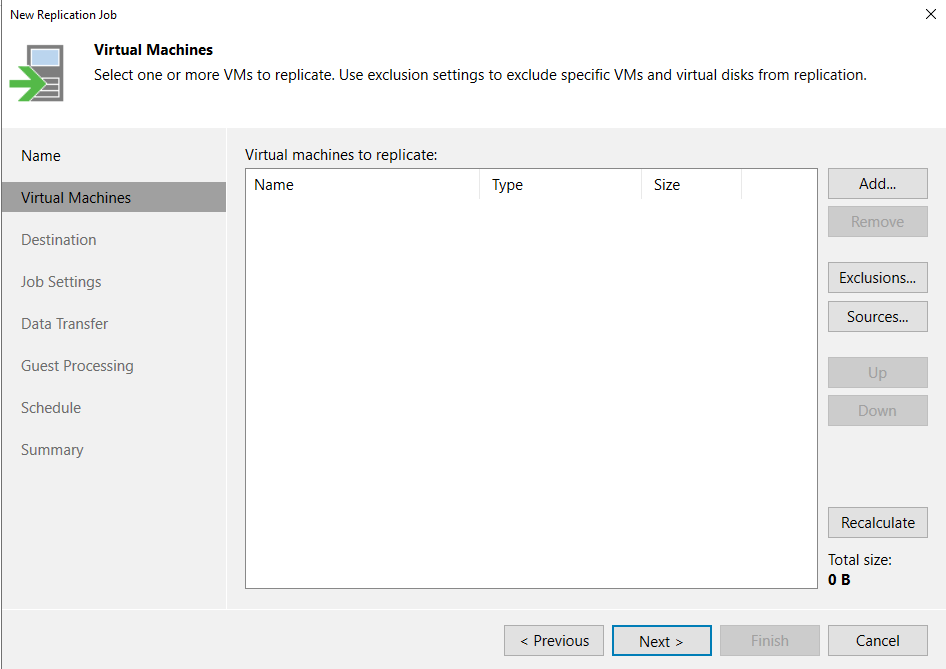
Home / Jobs / Replication / Virtual Machine
Passo 11
Note abaixo que no JOB de replica temos varias configurações especificas para mudança de placa de redes, baixo consumo de link e mudança de endereçamento. Neste momento não entraremos em nenhuma destas opções. Será tratado em um próximo post.
Abaixo foi colocado no campo Name a opção de nome desejada e avançado para próxima aba de configuração.
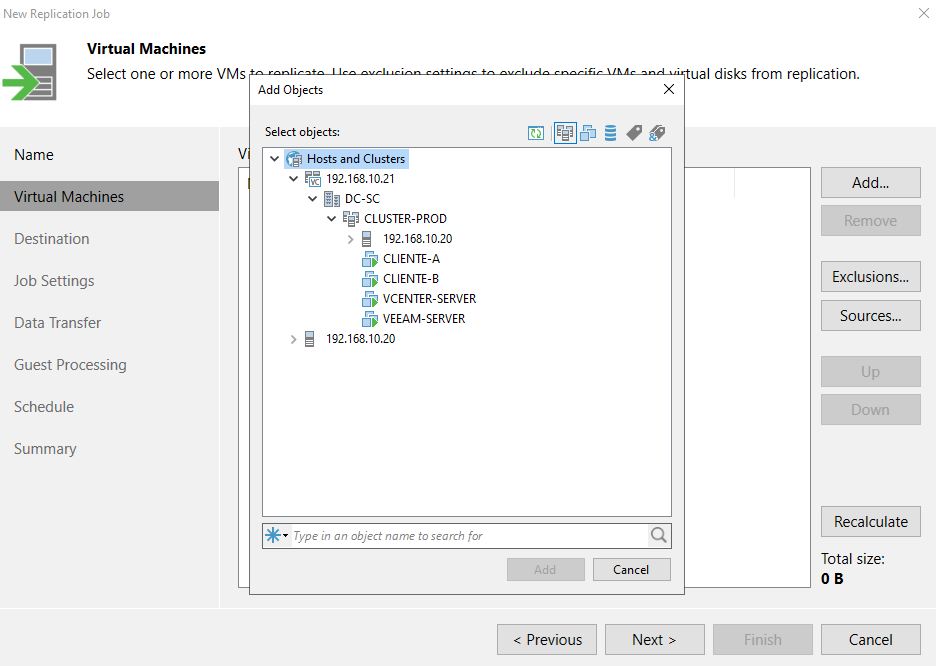
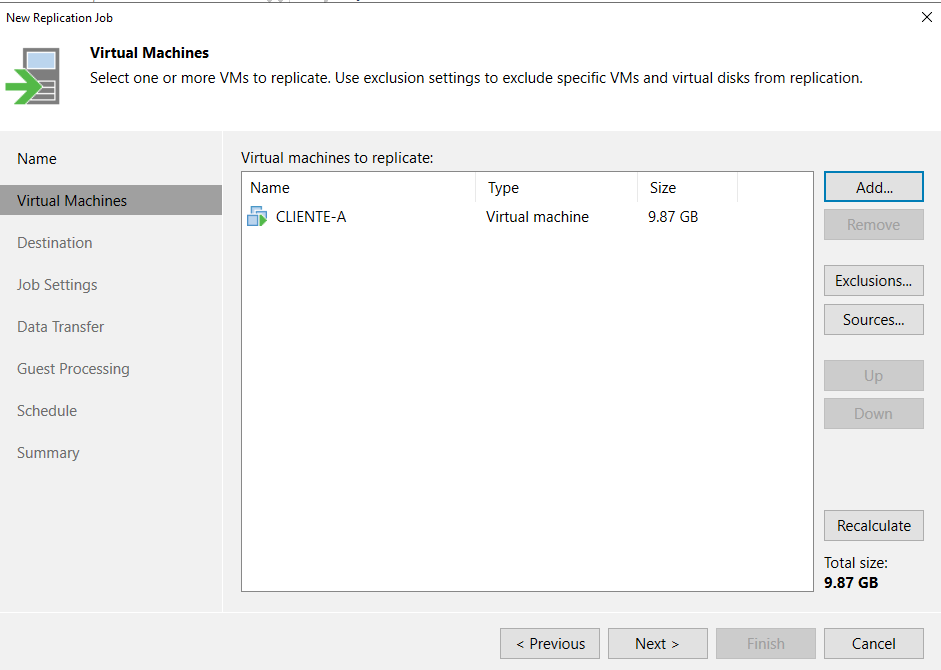
Passo 12
Abaixo podemos ver que na opção de Virtual Machines podemos escolher quais maquinas do nosso ESXI ou VCenter Server podemos replicar para o VMware Cloud via CloudConnect. No caso abaixo vou replicar a maquina virtual do CLIENTE-A.
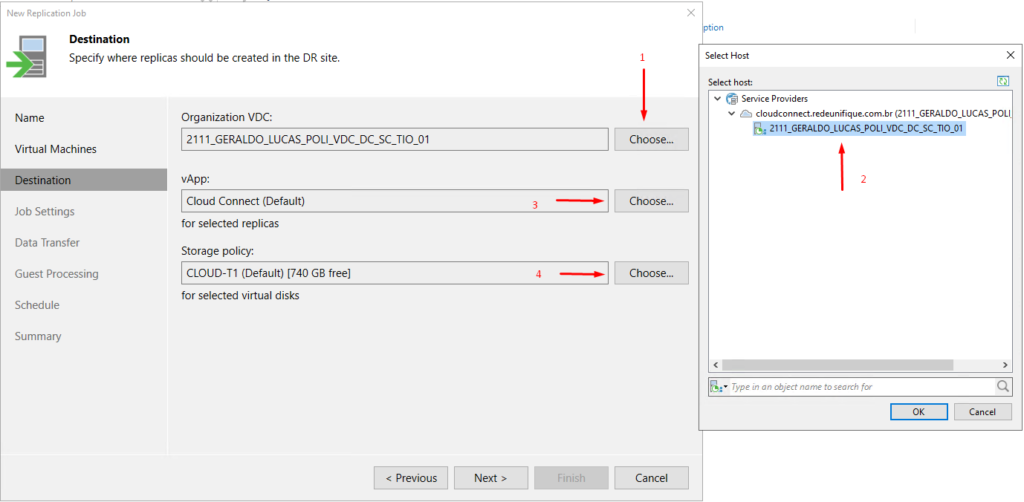
Passo 13
Com a maquina virtual escolhida a replicar temos que apontar o Destino que no nosso caso é um VMware Cloud utilizando CloudConnect :
Item 1 – ORG do VMware Cloud informada pelo seu provedor de Nuvem.
Item 2 – Selecione o VDC ( Virtual Datacenter) cadastrado no passo de numero 2.
Item 3 – vApp, caso você não tenha nenhum vApp no VMware Cloud o Veeam já replica para o vApp default.
Item 4 – Pode ser escolhido as politicas de discos disponíveis em seu Cloud como T1, T2 ou T3.
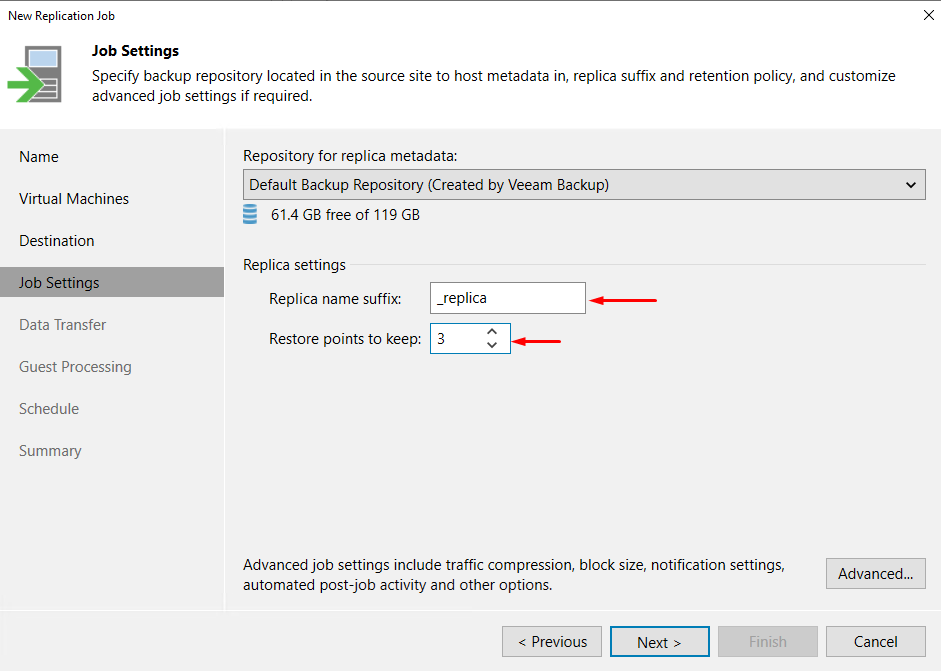
Passo 14
Importante saltar se caso tenha algum repositório especifico que você deseja manter os metadados é importante adiciona-lo antes de chegar nesta etapa. No caso abaixo deixamos o repetitório default do Veeam que acaba sendo o disco do próprio servidor aonde Veeam está instalado.
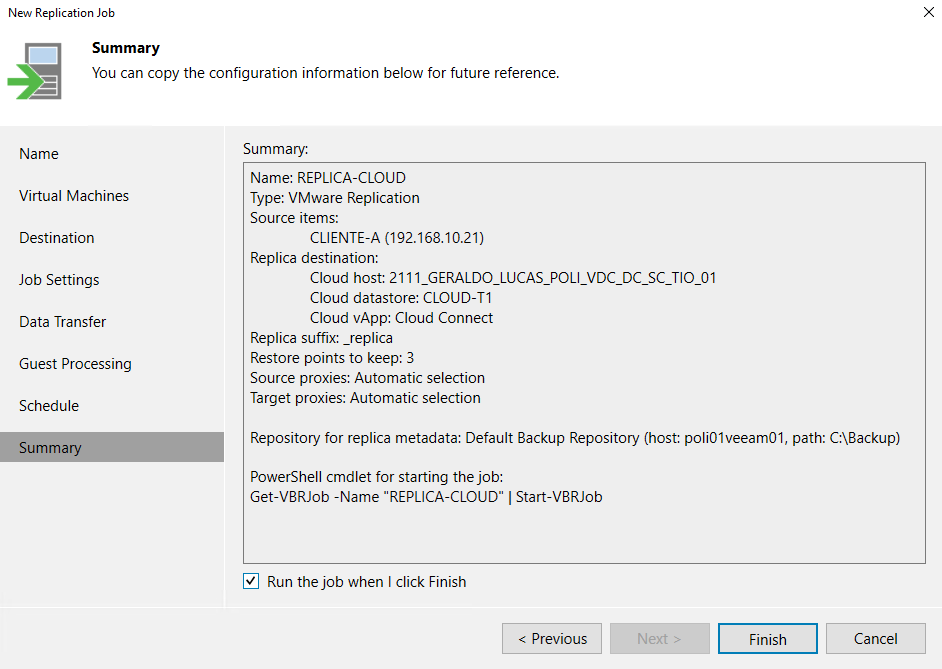
Alem disto no campo Replica name suffix pode ser adicionado qualquer nome adicionar que você deseja incrementar ao nome da maquina virtual no momento da replicação. Gosto sempre de deixar o suffix como _replica pois fica mais claro na gerencia do VMware Cloud para saber que aquela maquina virtual é uma replica.
Com isso você tambem pode definir quantos restores point de replicação deseja manter na maquina virtual.
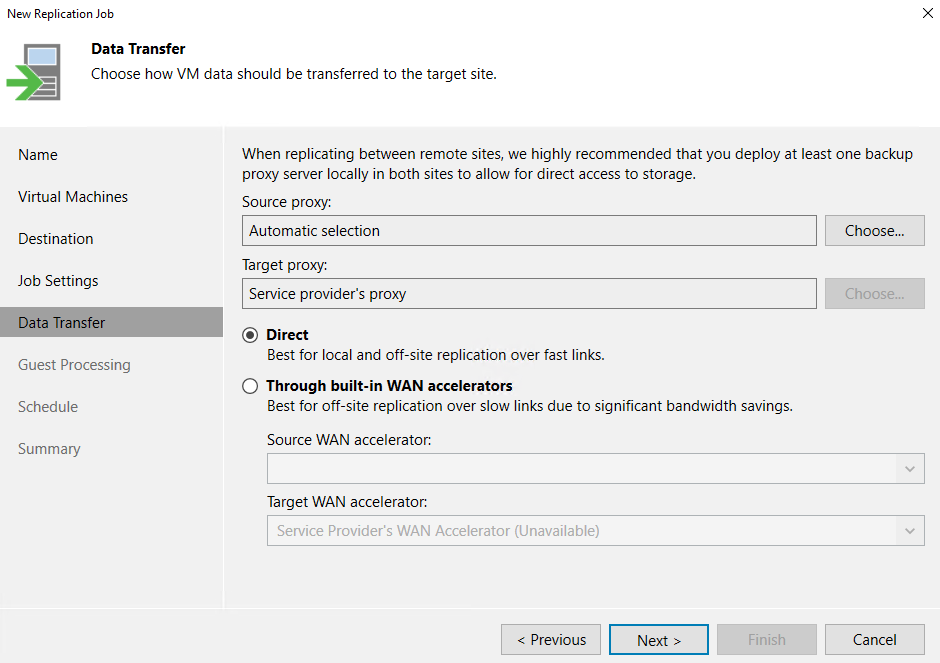
Passo 15
Este passo não aprofundaremos muito, pois você pode selecionar proxy veeam diferentes na sua infraestrutura caso tenha algum servidor de proxy dedicado para grandes demandas e segmentação dos seus backups.
Vamos seguir com o proxy default que é o mesmo servidor do Veeam Server. Lembrando que este é um cenário de laboratório, pequenas replicações e até mesmo o único movimento de mover do seus servidores locais para a nuvem.
Passo 16
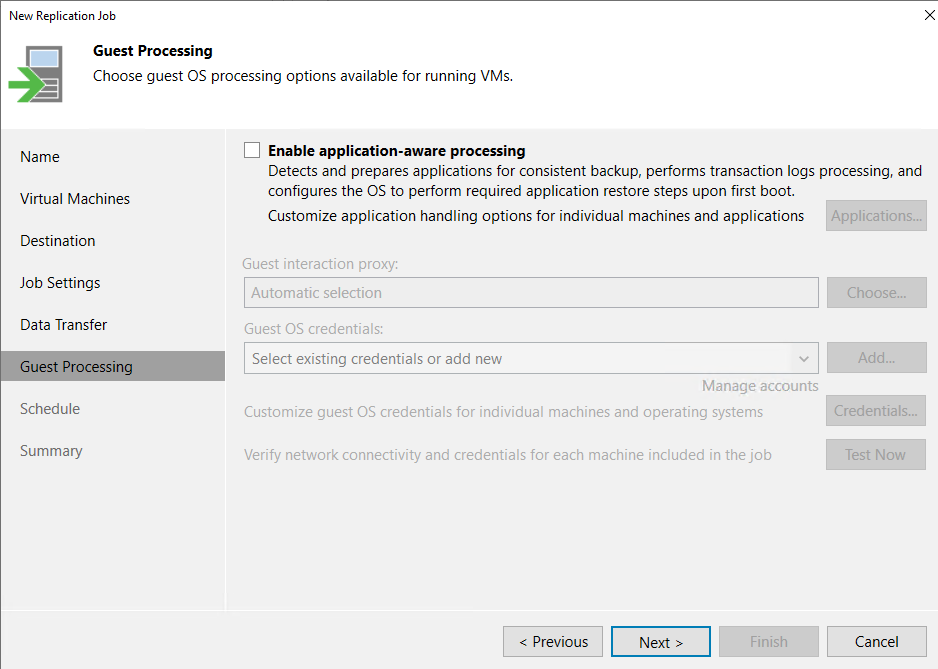
O Guest Processsing tambem é algo que não vamos adentrar nesta configuração básica, nele você pode definir parâmetros de aplicação de banco e até mesmo as credenciais do servidor para gerencia de arquivos da maquina a ser replicada.
No exemplo não estamos definindo nenhum destes parâmetros pois estamos movendo a maquina para a nuvem.
Passo 17
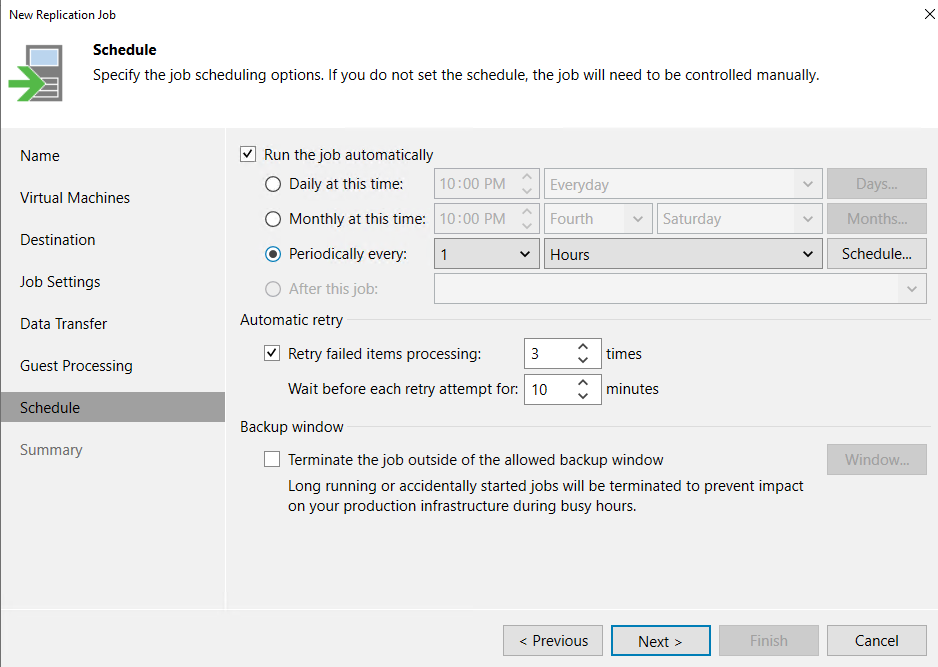
Para finalizar você pode escolher por iniciar o JOB manualmente e replicar a maquina apenas uma vez , ou deixar conforme abaixo replicando a cada 1 hora. E no momento ideal você para o servidor na origem para iniciar o seu servidor na nuvem e garantir a consistência dos dados.
Neste momento podemos ver a replica iniciar e validar nossa maquina virtual no VMware Cloud
Porem fim nosso JOB começou a replicar e concluiu sem problemas.
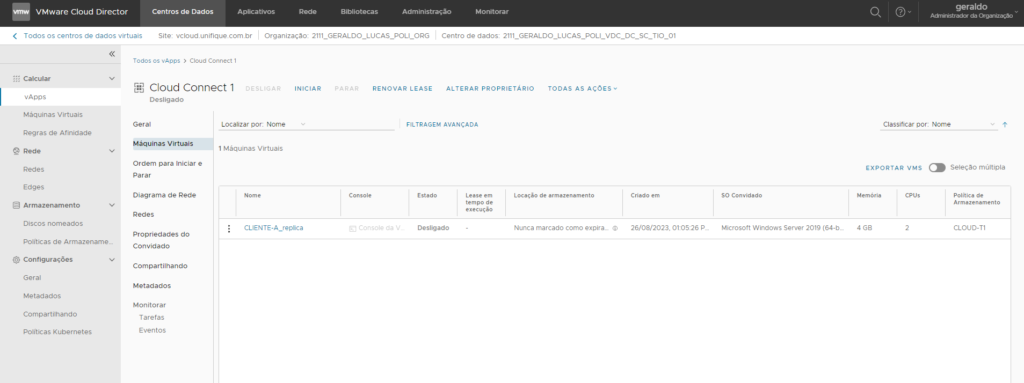
Chegado o grande momento de ver sua maquina dentro do VMware Cloud
Pronto, conforme abaixo podemos ver a maquina virtual foi replicada e já se encontra desligada dentro do VMware Cloud.
Ai cabe a sua estratégia de como migrar seus serviços, muitos casos que vejo clientes desligam seu servidores no VMware, fazem uma replica com a maquina desligada para garantir a consistência e ligam a maquina depois de replicada na nuvem.
Nos próximos materiais aprofundaremos melhor sobre arquiteturas de replicação e configurações avançadas.
Existe vários parâmetros que podem ser melhorados, porem este post visa ajudar pessoas que querem fazer pequenas movimentações e replicas.