Scalability and availability of archives using the DFS – Windows 2008 R2

1

Scalability and availability of files using the DFS – Windows 2008 R2.


Scaling, consolidation, scalability, availability, dynamism and transparency are common challenges when dealing with files. Imagine you have multiple folders scattered across multiple servers. You would have to go to your user exactly which server is his folder and when a search was needed you would have to leave entering all servers. This decreases scalability, dynamism and transparency as to put more servers you need to possibly notify users that new files are on a different server.
The dynamism and transparency are compromised because if you need to take a folder on a server and put it in another, there would be the need to redo all mappings and also notify affected users. Imagine if you have N folders Z servers for each mapping you have to access the form \\ servidorZ \ Pastan
With DFS (Distributed File System) that can be resolved. This because it makes use of a feature called namespace, which is nothing more than create a name where contains links to folders on any server. So to access the N folders now you only have one namespace can access the form \\ namespace \ Filesystem \ graze for example.
How they are created only links, when you want to add a new server, just create a new link. If you want to change a folder from one server to another, only return to the link destination, and the users do not learn that this happened. In fact for users is so transparent that even though you have N servers they will see how just one.
Solved the scalability issues, transparency and dynamism, is the largest, availability. This is where you enter the DFS-R (Distributed File System Replication), DFS replication can not only keep several folders synchronized as to let them be accessed through the same link in the namespace, so that even if a server that hosts one of the copies will died, others are still accessed exactly the same files.
Replication is extremely shows efficient for two reasons:

  All replication can be scheduled and the bandwidth used for each time of day can be controlled
DFS-R uses a process called Compression remote differential in addition to sending only the differences, compact the replicated file for faster and more efficient shipping.

There are three replication topologies

RING – Bidirectional Replication ring
Full Mesh – All replicate to all
Hub and Spoke – All replicate to a single server “HUB”

I will be presenting to you a tutorial to create a DFS structure with file replication.

Consider the following example scenario: Your company wants a redundancy for your file server. Currently she can not invest in a more robust solution with storage and cluster, and thus provides just another server.

Solution: Use the DFS service to provide access through namespace and replication of files between servers.

What is DFS? DFS (Distributed File System) is a service that has as main objective to centralize shared folders and use replication for availability (Full Mesh topology) or centralization of files (Hub and Spoke topology).

For those who want more details about this service you can see at:

For the new DFS in Windows Server 2008 R2: Technet: What’s New in Distributed File System

It is important to remember that DFS does not replace a more complete high availability solution as Cluster let alone a backup routine. In addition, DFS is also widely used to facilitate the management of folders shared in large corporations.

Requirements: I created this tutorial using a lab VMs, but the process is the same for physical machines.

The VMS which were used:

– SVRDC1 (Domain Controller). – SVRFS1 (File Server in production). – SVRFS2 (disponilizado additional server). – CLIENT1 (client machine to perform the tests).

NOTE: The SVRFS1 and SVRFS2 servers must be part of SVRDC1 domain.

Installation: First, install the DFS service in SVRFS1 server:
1 – Go to Start> Run and type ServerManager.msc.
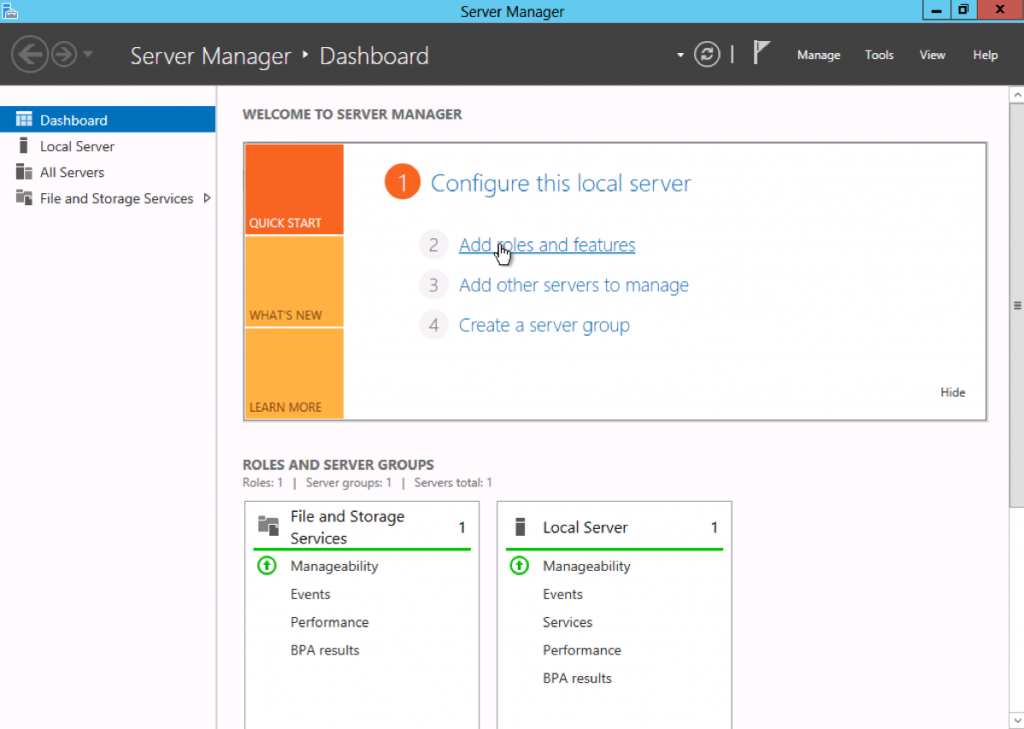
2 – In the Roles node click Add Roles.
3 – Click Next.
4 – Select Role Services File and click Next twice more.
5 – Check the boxes of the DFS service (Namespace and Replication) as the figure below.


2

6 – On the Create Namespace select the Create a namespace later option using the DFS Management snap-in Server Manager. 7 – Click Next and then to install.

Repeat steps 1 through 7 in SVRFS2 server.

Note: In the case of installation on a file server that already has the shares, the File Services role is already enabled, then in step two you need to select the Add Role Services option that just below the Add Roles.

Configuring DFS-N (DFS Namespace):

1 – In SVRFS1 server, open Start> Run and type Dfsmgmt.msc.

2 – With the open console, the Namespace node click the right mouse button and select New Namespace option.

3 – On the screen that appears, enter the first name server that will host the DFS namespace, in my case will be SVRFS1 and then click Next.

4 – Choose the name of your namespace, in my case I chose shares.

5 – On the next screen you must choose the type of Namespace, choose Domain-based type and check the Enable Windows Server 2008 Mode box is checked, then click Next and Create.

6 – After finishing the setting, select the namespace created and right select the Add Namespace Server option.

7 – In the box that appears enter the second server that will be used in my case will be SVRFS2 click OK.

Adding Folders in Namespace:

1 – Click again with the right mouse button on the namespace node and select the New Folder option.

NOTE: You will add the shares or subfolders of the shares that are available in DFS and will be replicated to the second server. It is important to remember that the shares should be already created and permissions (NTFS and Sharing) properly configured (on the second server should only have the shares created with the permissions of Sharing, the rest will be replicated by the DFS service).

2 – In the Name field enter the name of the Folder, counsel put the same name as the share that will be added to facilitate understanding.

3 – Click add and then Browse. Confirm that the Server field this with the desired server and click the Show Shared Folders button.

4 – Is listed all shares for the selected server, choose the desired share, and click OK twice.

Repeat the same process to add the share that the second server. It should look something like the image below:

3

Click OK and a box will appear asking whether to create a replication group for the file, choose Yes.


Configuring DFS-R (DFS Replication):


1 – The replication group wizard will open, click Next twice.
2 – On the Primary Member select the server that will give precedence to the initial replication (this is only used in the first replication, the rest is based on multi-master replication).
3 – In our case select the SVRFS1 production server. Click Next twice.
4 – In Replication Group Schedule and Bandwidth screen you can select a specific time for replication to occur and determine how much bandwidth is used. I will leave the default settings. Click Next and Create and wait for the end of creation.
The screen of your console should look like the image below (except empresa.corp to be the domain where the server part):

4

NOTE: The first replication can take 10 to 15 minutes to start, depending on the environment because the information must be replicated to the domain controller that has the PDC FSMO.

Making tests:

Replication: – To test the replication access the SVRFS1, navigate to the share that you added as folder Namespace and create a new folder or file, and then access the SVRFS2 server in the same way and see if the file is there.

Availability: – Access the client machine (with a user who will have permission to access the shares) and enter the Start> Run the path of the DFS (in my case will be empresa.corp \\ \ shares). – Browse the folder you created and create some files. – If you are doing a lab using VM Hyper-V you can remove the network interface or shut down one of the VMs if the servers are physical can only remove the network cable from one of the servers.

Try to navigate back in the folder, Windows Explorer will be locked for a while but then will return. – Turn the server and do the same with each other and try to access the folder again.

Continue Reading

How to install Webmin on CentOS 7

Webmin is a web-based graphical tool for unix . It is used to manage services like User management, Disk managemet, Network, Iptables (Firewall), Cron, Apache, DNS, File sharing and much more .
In this article i will show you how to install webmin on CentOS 7 linux.


Install Webmin on CentOS 7

To get started, login your remote server and follow the steps below:
First, create a new file webmin.repo in /etc/yum.repos.d/ :

vi /etc/yum.repos.d/webmin.repo

and paste below line:

[Webmin]
name=Webmin Distribution Neutral
#baseurl=http://download.webmin.com/download/yum
mirrorlist=http://download.webmin.com/download/yum/mirrorlist
enabled=1

Install webmin GPG key using below command.

rpm --import http://www.webmin.com/jcameron-key.asc

Now, update the repositorys:

yum check-update

Install webmin:

yum install webmin -y

Start the service and make it start automatically

chkconfig webmin on
service webmin start

By default, Webmin will listen on port 10000. Enable webmin Port:

firewall-cmd --add-port=10000/tcp

Now, open http://ip.add.re.ss:10000 in your browser and enter yor root username and password:

1

2

That is all!

Continue Reading

How to Install iRedMail on CentOS 7 & RHEL 7

iRedMail is out of the box open source mail server solution on Linux like operating system. The beauty of iRedMail is that it provides web based admin panel from where mail admin or system admins can do all email related operations task. Some of other features are listed below :

Support unlimited email accounts.
It provides Roundcube as webmail (MUA )
It used Postfix as MTA & Dovecot as MDA
It pvoides Calendar service via CalDAV & Contact service via CardDAV
It uses SpamAssassin for Spam scan and Amavis & Clamav for Mail virus scan.
OpenLDAP, MariaDB and PostgreSQL can be used to save mail accounts

In this article we will demonstrate how to install and configure iRedMail on CentOS 7 & RHEL 7. I am going to use followings for iRedMail setup.

OS = CentOS 7 or RHEL 7
Domain = nsitmail.com
Server Hostname = mail.nsitmail.com

Note : In case if you want mails from your mail server to be delivered in inbox not in spam folder then update the DNS records like A & PTR  before installation and TXT ( SPF & DKIM ) after installation.

Step:1 Set hostname and disable Selinux.

Set the proper hostname using hostnamectl command if it is not set.

[root@mail ~]# hostnamectl set-hostname mail.nsitmail.com
[root@mail ~]# hostname -f
mail.nsitmail.com
[root@mail ~]#

Update the /etc/hosts file

127.0.0.1 mail.nsitmail.com localhost.localdomain localhost

Disable Selinux

[root@mail ~]# setenforce 0

Edit the file /etc/sysconfig/selinux , set the parameter “SELINUX=disabled” , Reboot the server to disable selinux completely.
Step:2 Download the tar file of iRedmail.

Download the latest version of iRedmail from their Official Web Site or use below wget command to download from terminal.

[root@mail ~]# wget https://bitbucket.org/zhb/iredmail/downloads/iRedMail-0.9.3.tar.bz2

Step:3 Extract the tar file & execute installation Script.

[root@mail ~]# ll
total 124
-rw-r--r-- 1 root root 126277 Dec 20 19:12 iRedMail-0.9.3.tar.bz2
[root@mail ~]#
[root@mail ~]# tar -jxvf iRedMail-0.9.3.tar.bz2
[root@mail ~]# cd iRedMail-0.9.3
[root@mail iRedMail-0.9.3]# sh iRedMail.sh

After couple of seconds , below screen will appear , Select yes and press enter.

1

Define the folder or directory where users mailbox will be stored.

2

Select the web Server for iRedmail. Default is Nginx.

3

Select the database of your choice which will store domain names and mail accounts. In my case i am using MariaDB.

4

Define the domain name for your mail server. In my case domain name is “nsitmail.com”

5

Set Password for postmaster account.

6

Select Optional Components of iRedmail installation8

Press “y” to continue installation, Mail Server info & Credentials are kept in the file “/root/iRedMail-0.9.3/config”. Please keep this file in secure place.

9

10

As per instructions , reboot the server to enable all mail services.

Postfix mail logs and iRedmail logs are stored in “/var/log/maillog” and “/var/log/iredapd/iredapd.log” respectively.

Note : Default administrator name is “postmaster@nsitmail.com”

Following are the Important URLs after the Installation is completed , replace the domain name as per your setup in mentioned URLs.

iRedAdmin – official web-based admin panel:

https://mail.nsitmail.com/iredadmin/

Username: postmaster@nsitmail.com, password: XXXXXXXXXX

Roundcube webmail URL :

http://mail.nsitmail.com/mail/

SOGo Groupware

https://mail.nsitmail.com/SOGo/

Step:4 Create Users & domain from Admin Panel.

To create users first login to admin panel. Use user name as “postmaster@<domain>” and password that we set during installation.

1-11-2

Click on Add option and then Select Users.

1-3

Add a new Domain :

From the admin Panel , Select “Domain & accounts” option and then click on Add domain

1-4

Define the domain name & Organization Name and then further we can create users on newly created domain.

1-5

Step:5 Access Roundcube (Webmail).

Open the url in the browser “https://mail.nsitmail.com/mail/” , replace the domain name as per your setup.

1-6

1-7

Send a test mail to verify the functionality.

1-8

As we see that i got the mail from iRedmail mail server, so we can say the iRedmail is successfully installed and configured.

Continue Reading

Configure CUPS Printing Server on CentOS

Configure CUPS Printing on CentOS

when you need to setup a CentOS Linux print server, CUPS (Common UNIX Printing System)to the rescue!

login to your server, and su to root.

1- Install CUPS

yum install cups

2- Install dependency

yum install ghostscript.x86_64 hplip-common.x86_64

3-start the cups service, and then set to to run on startup

service cups start
chkconfig cups on

to best administer CUPS we need to configure the web GUI

vim /etc/cups/cupsd.conf

add the following line to the top (this allows easy administration)

DefaultEncryption Never

safelist your network to allow access

download

–obviously you want to enter the IP of the server here, rather than what i have,

now allow your local subnet to have access to the web GUI

download (1)

that’s just for the web access, but for the ADMIN pages, you may want to lock it down further:

download (2)

save + quit after all configured

also make sure to allow the port through IPtables (if enabled)

restart the cups service once completed

download (4)

browse to https://serverip:631

download (5)

That is all

Continue Reading

HOW TO INSTALL VESTA CP

Step 1 – First, login to your server’s shell via SSH as root, as always, for this task I use putty.

2013-12-23_154432

Step 2 – Next, download VestaCP installation script using curl command:

curl -O http://vestacp.com/pub/vst-install.sh

download-vestacp-620x195

Step 3 – Next, issue this magic command to start installing VestaCP:

bash vst-install.sh

4

Step 4 – The installer asks to confirm disabling SELinux and start the install process. Type Y and hit Enter.
Step 5 – The installer also asks to enter valid email address. So type your valid email address and double-check it to make sure your email is correct because VestaCP will also send your admin password there.

5

Step 6 – Once you hit Enter on your keyboard, the installer starts. Sit tight and wait for the installerto process and finish its job.
Step 7 – As long as you found no fatal error, the installer should finish quicker and you will see something like this on your screen:

7

You can also check your mailbox just to ensure the password is delivered and mail server (Exim) works properly on your server.

8

Step 8 – Now open up your favorite browser and login to VestaCP web-based UI using your VPS IP at port 8083.

https://xxx.xxx.xxx.xxx:2083/
Login as admin and use given password,
As you may also aware that the link is https:// which means via secure connection (SSL) so you may have to add / confirm exception on your browser.

vestacp-login

Voila! You should now see the main UI of Vesta hosting control panel.

vestacp-main-ui-620x242*click on image to view larger size.
Congratulation! You now have Vesta CP installed and a ready-to-use VPS to host all your websites.

Continue Reading