Installing and Configuring DHCP role on Windows Server 2012

Installing DHCP role via new Server Manager

Ensure the computer has at least one static IP address assigned before starting the role installation.

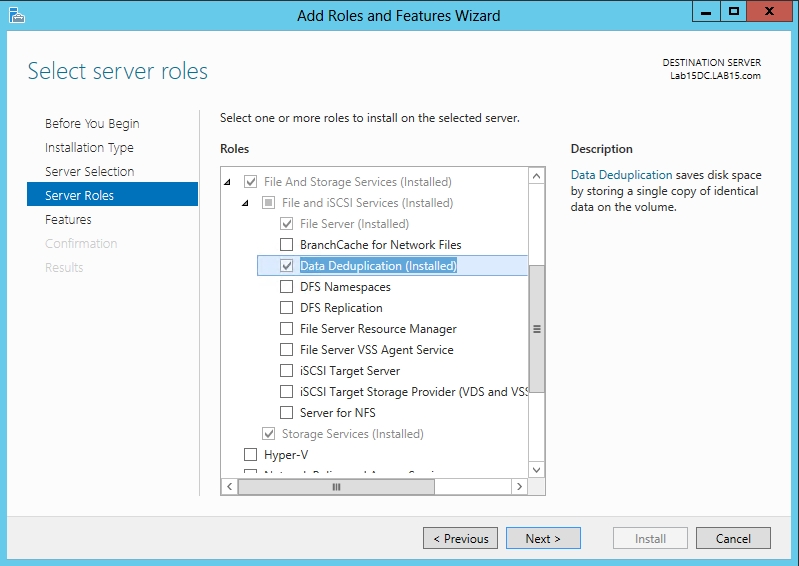
Launch the Add Role Wizard from Server Manager.
Select DHCP server role and go through the steps needed for installation.

The last page of the wizard (which comes up after the role has been installed), provides a link – “Complete DHCP configuration”.

This provides some tasks that need to be performed to enable the DHCP server role to work properly after role installation.

1

Launch the DHCP post-install wizard and complete the steps required.

Creation of DHCP security groups (DHCP Administrators and DHCP Users). For these security groups to be effective, the DHCP server service needs to be restarted. This will need to be performed separately by the administrator.

2

Authorization of DHCP server in Active Directory (only in case of a domain-joint setup). In a domain joined environment, only after the DHCP server is authorized, it will start serving the DHCP client requests. Authorization of DHCP server can only be performed by a domain user that has permissions to create objects in the Net services container in Active Directory. See how to delegate permissions to do this in active directory.

3

Figure 3: DHCP Post-Install configuration wizard – Authorization Page

4

In case completing of the post-install step is missed after role installation, the administrator will continue to see a notification on the action pane and also a link on the DHCP role tile on the main Server Manager page suggesting that some configuration is required. That link would go away only after completion of the post-install task.5

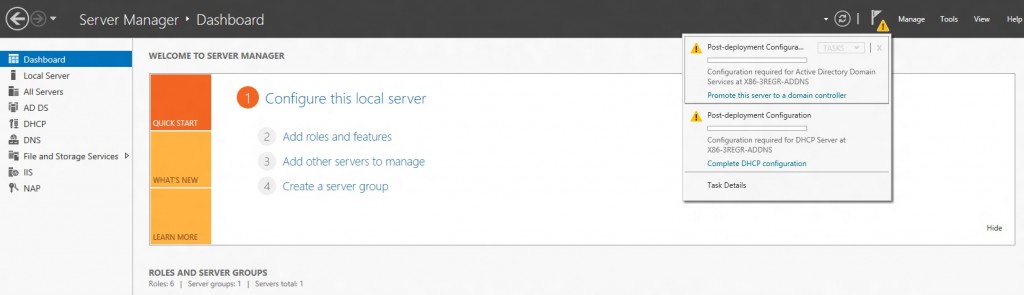
The configuration of DHCP server parameters such as scope, options etc. are no longer available in the new Server Manager. The administrator can now launch DHCP MMC either via Server manager (as shown below), or via the DHCP MMC application in the Start Menu, or writing dhcpmgmt.msc on the command prompt. The administrator can now create scopes, set option values so as to be able to lease out IP addresses and provide option values to clients.

6

Installing via PowerShell

To install the DHCP server role via PowerShell, one needs to run the following command:
Command: Add-WindowsFeature -IncludeManagementTools dhcp
Note the extra switch (IncludeManagementTools) which is now needed, in contrast to Windows 7. Without this switch, just the DHCP server role would be installed. The DHCP server RSAT tools which includes DHCP MMC, netsh context and the new DHCP PowerShell cmdlets, is not installed by default, unless you give the above flag.

After the role is installed, there are a few other steps that the administrator needs to perform so that the server can work correctly and lease out addresses. This the post-install configuration as performed by the above mentioned post-install wizard. The administrator can either launch the Server Manager and complete the DHCP post-installation task from there (as this is UI-only task) or run the below set of commands which are an equivalent of above.
Creating DHCP security groups

Creating DHCP security groups

Command:netsh dhcp add securitygroups

You will need to restart the DHCP service for these groups to become active.
Command: Restart-service dhcpserver
Authorizing the DHCP server in Active Directory (only needed for a domain-joined setup)
Command: Add-DhcpServerInDC <hostname of the DHCP server> <IP address of the DHCP server>
Now the administrator can launch DHCP MMC either via Server manager, or via the DHCP MMC application from the start menu, or by writing dhcpmgmt.msc on the command prompt. The administrator can now also create scopes, set option values so as to be able to lease out IP addresses and provide option values to clients using DHCP MMC or the new DHCP PowerShell.
If the administrator has completed the post-install configuration using PowerShell, Server Manager may still raise a flag (alert) for its completion using the post-install configuration wizard. This alert can be suppressed by notifying the Server Manager that the post-install configuration has been completed. This can be done by the below command:

Command: Set-ItemProperty –Path registry::HKEY_LOCAL_MACHINE\SOFTWARE\Microsoft\ServerManager\Roles\12 –Name ConfigurationState –Value 2.

Continue Reading

Scalability and availability of archives using the DFS – Windows 2008 R2

1

Scalability and availability of files using the DFS – Windows 2008 R2.


Scaling, consolidation, scalability, availability, dynamism and transparency are common challenges when dealing with files. Imagine you have multiple folders scattered across multiple servers. You would have to go to your user exactly which server is his folder and when a search was needed you would have to leave entering all servers. This decreases scalability, dynamism and transparency as to put more servers you need to possibly notify users that new files are on a different server.
The dynamism and transparency are compromised because if you need to take a folder on a server and put it in another, there would be the need to redo all mappings and also notify affected users. Imagine if you have N folders Z servers for each mapping you have to access the form \\ servidorZ \ Pastan
With DFS (Distributed File System) that can be resolved. This because it makes use of a feature called namespace, which is nothing more than create a name where contains links to folders on any server. So to access the N folders now you only have one namespace can access the form \\ namespace \ Filesystem \ graze for example.
How they are created only links, when you want to add a new server, just create a new link. If you want to change a folder from one server to another, only return to the link destination, and the users do not learn that this happened. In fact for users is so transparent that even though you have N servers they will see how just one.
Solved the scalability issues, transparency and dynamism, is the largest, availability. This is where you enter the DFS-R (Distributed File System Replication), DFS replication can not only keep several folders synchronized as to let them be accessed through the same link in the namespace, so that even if a server that hosts one of the copies will died, others are still accessed exactly the same files.
Replication is extremely shows efficient for two reasons:

  All replication can be scheduled and the bandwidth used for each time of day can be controlled
DFS-R uses a process called Compression remote differential in addition to sending only the differences, compact the replicated file for faster and more efficient shipping.

There are three replication topologies

RING – Bidirectional Replication ring
Full Mesh – All replicate to all
Hub and Spoke – All replicate to a single server “HUB”

I will be presenting to you a tutorial to create a DFS structure with file replication.

Consider the following example scenario: Your company wants a redundancy for your file server. Currently she can not invest in a more robust solution with storage and cluster, and thus provides just another server.

Solution: Use the DFS service to provide access through namespace and replication of files between servers.

What is DFS? DFS (Distributed File System) is a service that has as main objective to centralize shared folders and use replication for availability (Full Mesh topology) or centralization of files (Hub and Spoke topology).

For those who want more details about this service you can see at:

For the new DFS in Windows Server 2008 R2: Technet: What’s New in Distributed File System

It is important to remember that DFS does not replace a more complete high availability solution as Cluster let alone a backup routine. In addition, DFS is also widely used to facilitate the management of folders shared in large corporations.

Requirements: I created this tutorial using a lab VMs, but the process is the same for physical machines.

The VMS which were used:

– SVRDC1 (Domain Controller). – SVRFS1 (File Server in production). – SVRFS2 (disponilizado additional server). – CLIENT1 (client machine to perform the tests).

NOTE: The SVRFS1 and SVRFS2 servers must be part of SVRDC1 domain.

Installation: First, install the DFS service in SVRFS1 server:
1 – Go to Start> Run and type ServerManager.msc.
2 – In the Roles node click Add Roles.
3 – Click Next.
4 – Select Role Services File and click Next twice more.
5 – Check the boxes of the DFS service (Namespace and Replication) as the figure below.


2

6 – On the Create Namespace select the Create a namespace later option using the DFS Management snap-in Server Manager. 7 – Click Next and then to install.

Repeat steps 1 through 7 in SVRFS2 server.

Note: In the case of installation on a file server that already has the shares, the File Services role is already enabled, then in step two you need to select the Add Role Services option that just below the Add Roles.

Configuring DFS-N (DFS Namespace):

1 – In SVRFS1 server, open Start> Run and type Dfsmgmt.msc.

2 – With the open console, the Namespace node click the right mouse button and select New Namespace option.

3 – On the screen that appears, enter the first name server that will host the DFS namespace, in my case will be SVRFS1 and then click Next.

4 – Choose the name of your namespace, in my case I chose shares.

5 – On the next screen you must choose the type of Namespace, choose Domain-based type and check the Enable Windows Server 2008 Mode box is checked, then click Next and Create.

6 – After finishing the setting, select the namespace created and right select the Add Namespace Server option.

7 – In the box that appears enter the second server that will be used in my case will be SVRFS2 click OK.

Adding Folders in Namespace:

1 – Click again with the right mouse button on the namespace node and select the New Folder option.

NOTE: You will add the shares or subfolders of the shares that are available in DFS and will be replicated to the second server. It is important to remember that the shares should be already created and permissions (NTFS and Sharing) properly configured (on the second server should only have the shares created with the permissions of Sharing, the rest will be replicated by the DFS service).

2 – In the Name field enter the name of the Folder, counsel put the same name as the share that will be added to facilitate understanding.

3 – Click add and then Browse. Confirm that the Server field this with the desired server and click the Show Shared Folders button.

4 – Is listed all shares for the selected server, choose the desired share, and click OK twice.

Repeat the same process to add the share that the second server. It should look something like the image below:

3

Click OK and a box will appear asking whether to create a replication group for the file, choose Yes.


Configuring DFS-R (DFS Replication):


1 – The replication group wizard will open, click Next twice.
2 – On the Primary Member select the server that will give precedence to the initial replication (this is only used in the first replication, the rest is based on multi-master replication).
3 – In our case select the SVRFS1 production server. Click Next twice.
4 – In Replication Group Schedule and Bandwidth screen you can select a specific time for replication to occur and determine how much bandwidth is used. I will leave the default settings. Click Next and Create and wait for the end of creation.
The screen of your console should look like the image below (except empresa.corp to be the domain where the server part):

4

NOTE: The first replication can take 10 to 15 minutes to start, depending on the environment because the information must be replicated to the domain controller that has the PDC FSMO.

Making tests:

Replication: – To test the replication access the SVRFS1, navigate to the share that you added as folder Namespace and create a new folder or file, and then access the SVRFS2 server in the same way and see if the file is there.

Availability: – Access the client machine (with a user who will have permission to access the shares) and enter the Start> Run the path of the DFS (in my case will be empresa.corp \\ \ shares). – Browse the folder you created and create some files. – If you are doing a lab using VM Hyper-V you can remove the network interface or shut down one of the VMs if the servers are physical can only remove the network cable from one of the servers.

Try to navigate back in the folder, Windows Explorer will be locked for a while but then will return. – Turn the server and do the same with each other and try to access the folder again.

Continue Reading

How to Use Data Deduplication in Windows Server 2012 R2

One of the more useful features of Windows Server 2012 and Windows Server 2012 R2 is native data deduplication. Although deduplication features have existed in storage hardware for years, the release of Windows Server 2012 marks the first time that Microsoft has allowed deduplication to occur at the operating system level.

Before you can use the deduplication feature, you will have to install it. To do so, open Server Manager and then choose the Add Roles and Features command from the Manage menu. When the Add Roles and Features Wizard launches, navigate through the wizard until you reach the Add Roles screen. Expand the File and Storage Services role, and then expand the File and iSCSI Services container and select Data Deduplication, as shown in Figure 1. Click Next on the remaining screens and then click Install to install the necessary components. When the process completes, click Close.

Deduplication_Fig1

Deduplication is performed on a per-volume basis. To do duplicate a volume, open the Server Manager and select the Volumes container. Next, right click on a volume and choose the Configure Data Deduplication command from the resulting shortcut menu, as shown in Figure 2.

Deduplication_Fig2

At this point the Deduplication Settings dialog box will appear, as shown in Figure 3. You can enable data deduplication by simply selecting the Enable Data Deduplication check box and clicking OK. However, there are a couple of other settings on this dialog box that are worth paying attention to.

Deduplication_Fig3

The first such setting is the Duplicate Files Older Than setting. The deduplication mechanism in Windows is post process. In other words, deduplication does not happen in real time. Instead, a scheduled process performs the deduplication at a later time. The reason why Microsoft gives you the option of waiting until a file is a few days old before it is be duplicated is because the deduplication process consumes system resources such as CPU cycles and disk I/O. You really don’t want to waste these resources on deduplicating temporary files. Making sure that a file is at least a few days old before it is deduplicated is a great way to avoid wasting system resources.

Another setting that is worth paying attention to is the File Extensions to Exclude setting. The basic idea behind this setting is that some types of files cannot be deduplicated because they are already compressed. This includes things like zip files, and compressed media files such as MP3 files. The File Extensions to Exclude setting lets you avoid wasting system resources by preventing Windows from trying to do duplicate files that most likely will not benefit from the deduplication process. Similarly, if you have folders containing compressed files you can exclude those folders from the deduplication process.

Finally, there is an option to set the deduplication schedule. You should configure the deduplication process to occur outside of peak hours of operation.

Of course this raises the question of the hardware resources that are required in order to perform data deduplication. The minimum supported configuration is a single processor system with 4 GB of RAM and a SATA hard disk. According to Microsoft, a deduplication job needs one CPU core and about 350 MB of RAM. Such a system could theoretically run a single deduplication job that would be capable of processing about 100 GB per hour. Higher-end systems can be duplicate multiple volumes simultaneously. The theoretical limit is that ninety volumes can be deduplicated simultaneously. In reality however, seventeen volumes at a time is a more realistic expectation from today’s hardware.

It is also worth noting that not every volume type can be deduplicated. Windows Server cannot deduplicate a system volume or a boot volume. Furthermore, the volume cannot reside on removable media and it must not be formatted as ReFS. Cluster shared volumes also cannot be deduplicated.

As I alluded to earlier, there are certain data types that can benefit from the deduplication process more than others. However, there are some types of data that should not be deduplicated. For example, you should not attempt to deduplicate a volume containing files that are constantly open or that change frequently. Similarly, Microsoft does not support deduplicating volumes containing Hyper-V virtual hard disks (for production VMs), although Windows Server 2012 R2 supports the deduplication of Hyper-V-based virtual desktops. You should also avoid deduplicating any volume containing files that are near 1 TB in size.

The biggest restriction with regard to data deduplication is that you cannot deduplicate volumes containing Exchange Server or SQL Server databases. If you attempt to do duplicate these volumes, there is a very real chance that you will corrupt the databases. Although not explicitly spelled out by Microsoft support policies, I recommend that you avoid deduplicating any volume containing a database. Many database applications expect to have control over the way the database pages are stored. Introducing deduplication when the database application expects to have full control over the underlying storage can result in corruption.

The Windows Server native deduplication feature does a great job of helping to conserve physical storage. Even so, it is important to properly plan for deduplication prior to implementing it because there are a number of situations in which the use of deduplication is not appropriate.

Continue Reading