Increasing disk spaces on the Linux servers is a daily routine work for very system administrator. So, in this article we are going to show you some simple simple steps that you can use to increase your disk spaces on Linux CentOS 7 without rebooting to your production server using Linux commands. We will cover multiple methods and possibilities to increase and add new disks to the Linux systems, so that you can follow the one that you feel comfortable while using according to your requirements.
1) Increasing Disk of VM Guest:
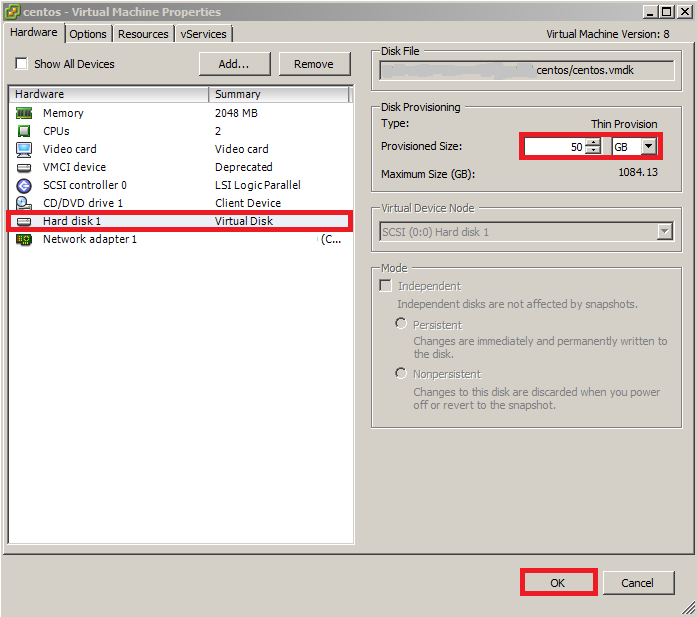
Before increasing the disk volume inside your Linux system, you need to add a new disk or increase the one its has already attached with the system by editing its settings from your VMware vShere, Workstation or any other infrastructure environment that you are using.
2) Check Disk Space:
Run the following command to check the current size of your disk space.
# df -h
and
# fdisk -l
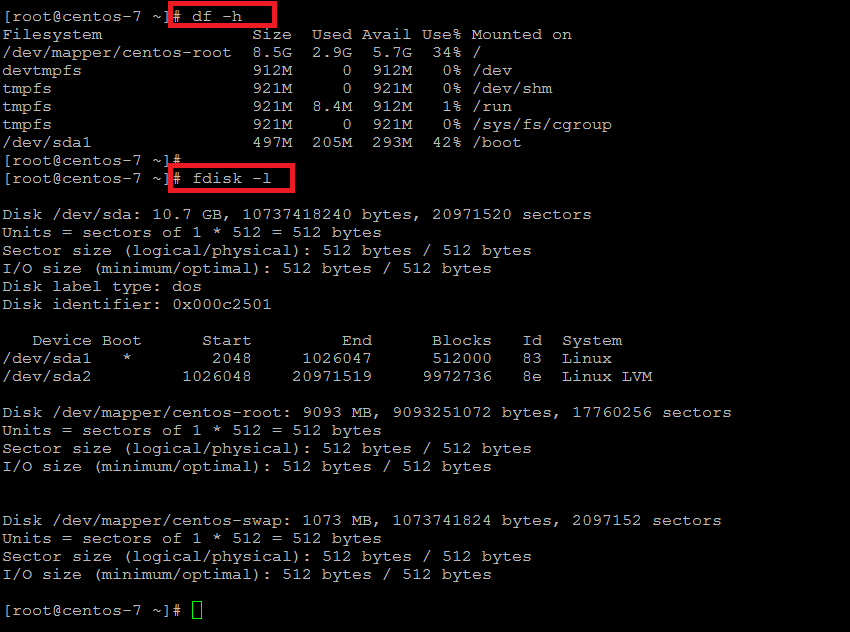
Here we can see that the total disk size is still the same that is 10 GB while we have already increased it to 50 GB from the back end.
3) Expanding Space without Rebooting VM
Now run the following commands to expand the disk space in the physical volume of the Operating System without rebooting the virtual machine by Re-scanning the SCSI Bus and then adding SCSI Device.
# ls /sys/class/scsi_host/

# echo "- - -" > /sys/class/scsi_host/host0/scan

# echo "- - -" > /sys/class/scsi_host/host1/scan

# echo "- - -" > /sys/class/scsi_host/host2/scan
Check the names of your SCSI devices and then rescan the SCSI buses using below commands.
# ls /sys/class/scsi_device/

# echo 1 > /sys/class/scsi_device/0\:0\:0\:0/device/rescan

# echo 1 > /sys/class/scsi_device/2\:0\:0\:0/device/rescan
That will rescan the current scsi bus and the disk size that we increased from the VM guest settings will be show up as you can see in the below image.

4) New Disk Partition:
Once you are able to see the increased disk space inside your system then the run the following command to format your disk for creating a new partition by following the steps to increase your physical disk volume.
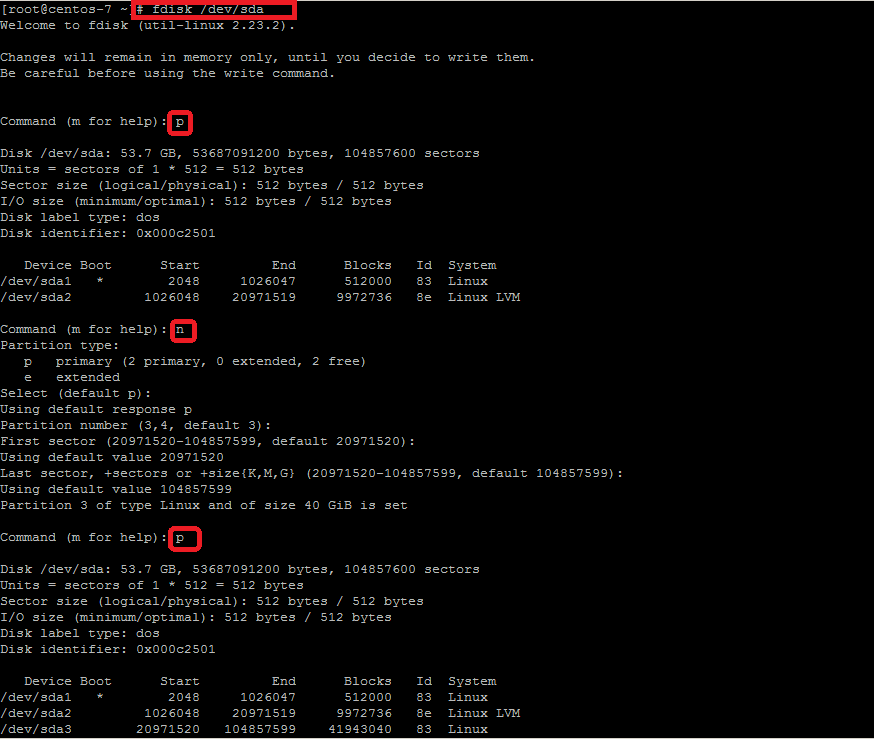
# fdisk /dev/sda
result:
Welcome to fdisk (util-linux 2.23.2) press the 'm' key for help
Command (m for help): m
Command action
a toggle a bootable flag
b edit bsd disklabel
c toggle the dos compatibility flag
d delete a partition
g create a new empty GPT partition table
G create an IRIX (SGI) partition table
l list known partition types
m print this menu
n add a new partition
o create a new empty DOS partition table
p print the partition table
q quit without saving changes
s create a new empty Sun disklabel
t change a partition's system id
u change display/entry units
v verify the partition table
w write table to disk and exit
x extra functionality (experts only)

Command (m for help):
Type the ‘p’ to print the current partition table then create a new primary partition by typing the ‘n’ key and selecting the available sectors. Change the disk type to ‘Linux LVM’ by using ‘t’ command and selecting the code to ‘8e’ or leave as it to its default type that is ’83’.
Now write the table to disk and exit by Entring ‘w’ key as shown.
Command (m for help): w
The partition table has been altered!

Calling ioctl() to re-read partition table.

WARNING: Re-reading the partition table failed with error 16: Device or resource busy.
The kernel still uses the old table. The new table will be used at
the next reboot or after you run partprobe(8) or kpartx(8)
5)Creating Physical Volume:
As indicated above run the ‘partprobe’ or kpartx command so that the tables are ready to use and then create the new Physical Volume using the below commands.
# partprobe

# pvcreate /dev/sda3
To check the newly created volume run the following command to see if the new physical volume has been created and visible. After that we will extend the Volume Group ‘centos’ with the newly create Physical Volume as shown.
# pvdisplay

# vgextend centos /dev/sda3

6) Extending Logical Volume:
Now we will extend the Logical Volume to increase the disk space on it using the the below command.
# lvextend -L +40G /dev/mapper/centos-root
Once you get the successfully increased message, run the command as shown below to extend the size of your logical volume .
# xfs_growfs /dev/mapper/centos-root
The size of the ‘/’ partition has been increased successfully, you can check the size of your disk drives by using the ‘df’ command as shown.

7) Extending Root Partition by Adding New Disk Without Reboot:
This is the second method with but with quite similar commands to increase the size of the Logical volume in CentOS 7.
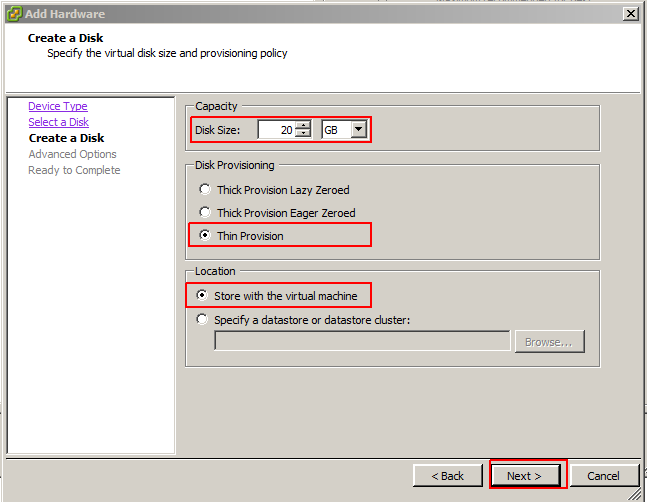
So, the first step is to Open the setting of your VM guest settings and click on the ‘Add’ new button and proceed to the next option.

Choose the required configuration for the new disk by selecting the size of the new disk and its type as shown in the below image.
Then come to the server side and repeat the following commands to scan your disk devices to the new disk is visible on the system.
# echo "- - -" > /sys/class/scsi_host/host0/scan

# echo "- - -" > /sys/class/scsi_host/host1/scan

# echo "- - -" > /sys/class/scsi_host/host2/scan
List the names of your SCSi devices
# ls /sys/class/scsi_device/

# echo 1 > /sys/class/scsi_device/1\:0\:0\:0/device/rescan
# echo 1 > /sys/class/scsi_device/2\:0\:0\:0/device/rescan
# echo 1 > /sys/class/scsi_device/3\:0\:0\:0/device/rescan

# fdisk -l

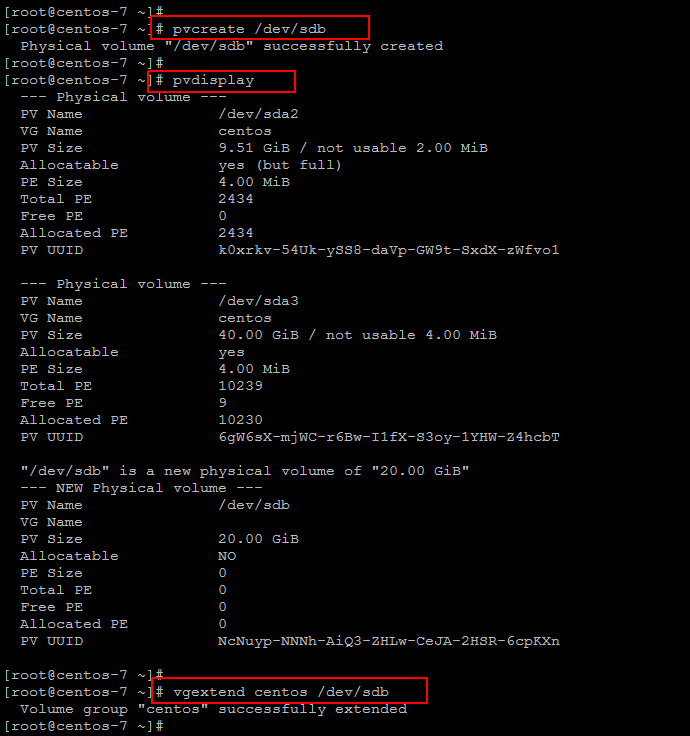
Once the new disk is visible run the below commands to create the new physical volume and add it to the volume group as shown.
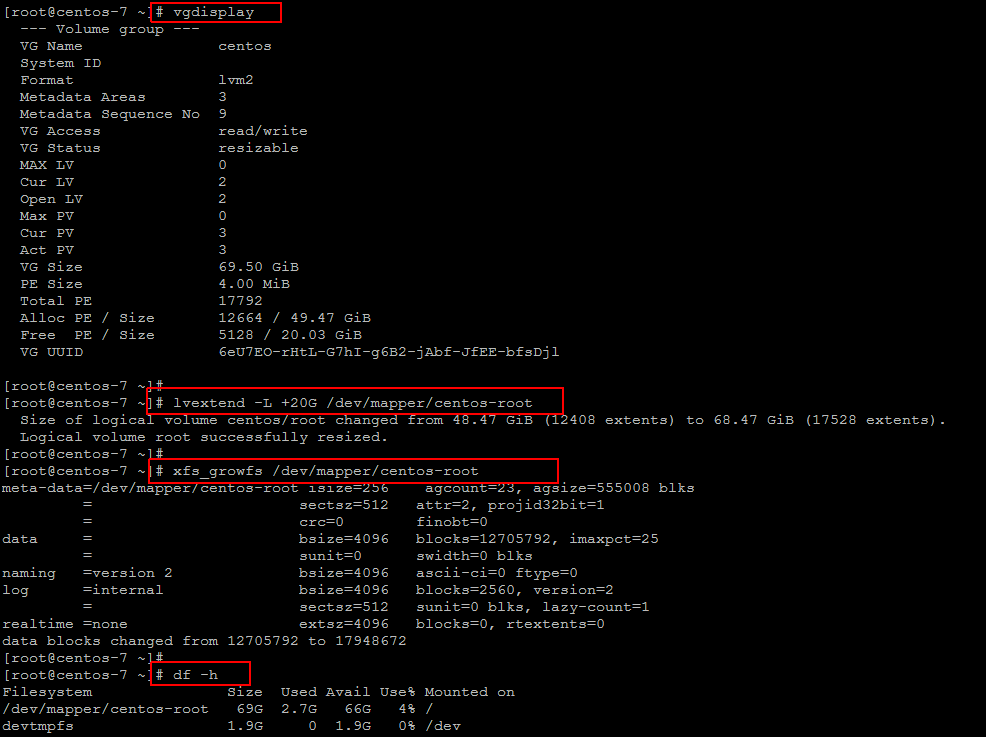
# pvcreate /dev/sdb

# vgextend centos /dev/sdb

# vgdisplay
Now extend the Logical Volume by adding the disk space on it and then add it to the root partition.
# lvextend -L +20G /dev/mapper/centos-root

# xfs_growfs /dev/mapper/centos-root

# df -h
Conclusion:
Managing disk partitions in Linux CentOS 7 is a simple process to increase the disk space of any of your logical volumes by using the steps as described in this article. You don’t need to give your production server’s reboot for this purpose but simply rescan your SCSi devices and expand your desired LVM.