Installing Active Directory on Windows Server 2012

Installing Active Directory on Windows Server 2012

This article will walk you through setting up the Active Directory Role on a Windows Server 2012. This article is intended to be used for those without an existing Active Directory Forest, it will not cover configuring a server to act as a Domain Controller for an existing Active Directory Forest.
Installing Active Directory

Open the Server Manager from the task bar.

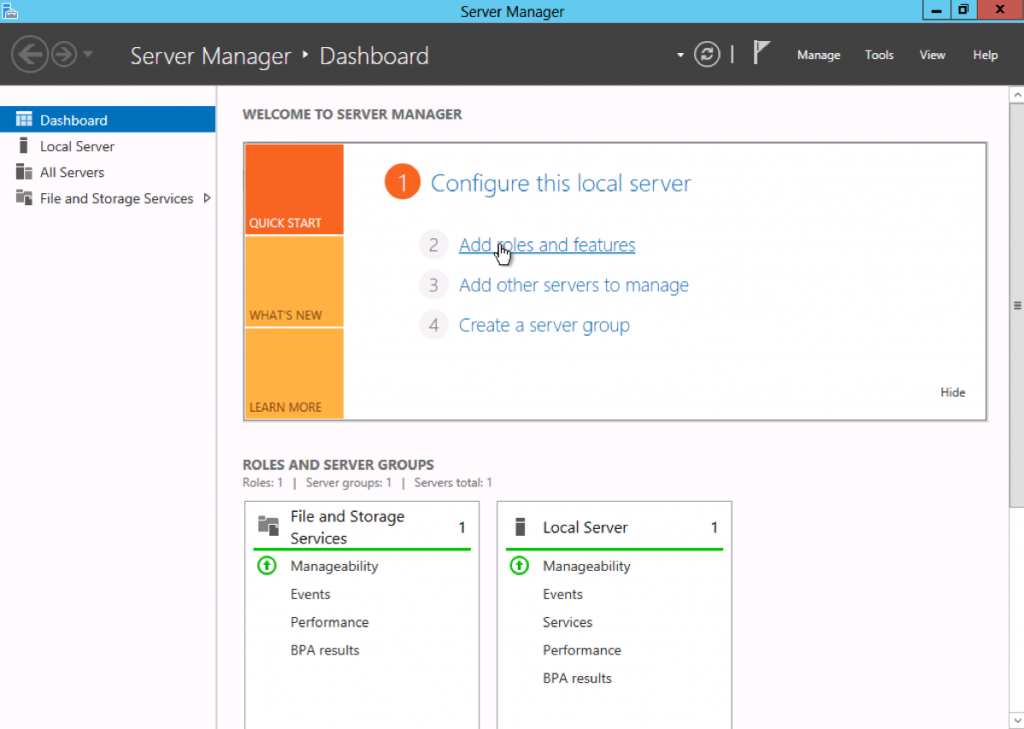
From the Server Manager Dashboard, select Add roles and features.

This will launch the Roles and Features Wizard allowing for modifications to be performed on the Windows Server 2012 instance.

1

1- Select Role-based or features-based installation from the Installation Type screen and click Next.
Note: Roles are the major feature sets of the server, such as IIS, and features provide additional functionality for a given role.

2

1-The current server is selected by default. Click Next to proceed to the Server Roles tab.

3

1-From the Server Roles page place a check mark in the box next to Active Directory Domain Services. A notice will appear explaining additional roles services or features are also required to install domain services, click Add Features.

Note: There are other options including, Certificate services, federation services, lightweight directory services and rights management. Domain Services is the glue that holds this all together and needs to be installed prior to these other services.

4

1-Review and select optional features to install during the AD DS installation by placing a check in the box next to any desired features; Once done click Next.

5

1-Review the information on the AD DS tab and click Next.

6

1-Review the installation and click Install.

Note: The installation progress will be displayed on the screen. Once installed the AD DS role will be displayed on the ‘Server Manager’ landing page.

7

Configuring Active Directory

Once the AD DS role is installed the server will need to be configured for your domain.

1 If you have not done so already, Open the Server Manager from the task bar.

2 Open the Notifications Pane by selecting the Notifications icon from the top of the Server Manager. From the notification regarding configuring AD DS click Promote this server to a domain controller.

8

1-From the Deployment Configuration tab select Add a new forest from the radial options menu. Insert your root domain name into the Root domain name field.

9

1-  Review and select a Domain and Forest functional level. Once selected fill in a DSRM password in the provided password fields. The DSRM password is used when booting the Domain Controller into recovery mode.

Note: The selection made here will have lasting effects to features and server domain controller eligibility. For further information on Domain/Forest functional levels see official Microsoft documentation.

10

1-Review the warning on the DNS Options tab and select Next.

11

1-Confirm or enter a NetBIOS name and click Next.

12

1-Configure the location of the SYSVOL, Log files, and Database folders and click Next.

13

1-Review the configuration options and click Next.

22

1 The system will check to ensure all necessary prerequisites are installed on the system prior to moving forward. If the system passes these checks you will proceed by clicking Install.

Note: The server will automatically be rebooted once the installation completes.

15

After the server is done rebooting, reconnect via RDP. Congratulations on successfully installing and configuring a Active Directory Domain Services on Windows Server 2012.

Continue Reading

Configuring Volume Shadow Copies (VSS) on Windows Server 2012 R2

Volume Shadows Copies (also known as Volume Snapshot Service or VSS) is a technology developed by Microsoft to take restorable snapshots of a volume.

On Windows Server 2012 // 2012 R2 it’s quite easy to set up and restore operations are pretty straightforward.

Note: Volume Shadow Copies allow to restore previous states of the entire volume, you can’t restore previous states of single files and/or folders.

Open the File Explorer and right-click on the volume where you want to enable Volume Shadow Copies. Select Configure Shadow Copies:

1

2

Microsoft suggests to use a dedicated drive to store Volume Shadow Copies in case of high-load. Click Yes:

3

A first snapshot will be generated. Default VSS settings work as following:

Volume Shadow Copies will be stored in the same volume
Volume Shadow Copies will take a maximum amount of 10% of the local disk space
The system reserves a minimum of 300MB of disk space for the shadow copies
The system schedules two shadow copies per day (7.00 AM and 12.00 PM)

To modify these settings click Settings:

4

The option panels are quite explicative:

5

6

To restore a previous snapshot just select it and click Revert:

7

Continue Reading

Scalability and availability of archives using the DFS – Windows 2008 R2

1

Scalability and availability of files using the DFS – Windows 2008 R2.


Scaling, consolidation, scalability, availability, dynamism and transparency are common challenges when dealing with files. Imagine you have multiple folders scattered across multiple servers. You would have to go to your user exactly which server is his folder and when a search was needed you would have to leave entering all servers. This decreases scalability, dynamism and transparency as to put more servers you need to possibly notify users that new files are on a different server.
The dynamism and transparency are compromised because if you need to take a folder on a server and put it in another, there would be the need to redo all mappings and also notify affected users. Imagine if you have N folders Z servers for each mapping you have to access the form \\ servidorZ \ Pastan
With DFS (Distributed File System) that can be resolved. This because it makes use of a feature called namespace, which is nothing more than create a name where contains links to folders on any server. So to access the N folders now you only have one namespace can access the form \\ namespace \ Filesystem \ graze for example.
How they are created only links, when you want to add a new server, just create a new link. If you want to change a folder from one server to another, only return to the link destination, and the users do not learn that this happened. In fact for users is so transparent that even though you have N servers they will see how just one.
Solved the scalability issues, transparency and dynamism, is the largest, availability. This is where you enter the DFS-R (Distributed File System Replication), DFS replication can not only keep several folders synchronized as to let them be accessed through the same link in the namespace, so that even if a server that hosts one of the copies will died, others are still accessed exactly the same files.
Replication is extremely shows efficient for two reasons:

  All replication can be scheduled and the bandwidth used for each time of day can be controlled
DFS-R uses a process called Compression remote differential in addition to sending only the differences, compact the replicated file for faster and more efficient shipping.

There are three replication topologies

RING – Bidirectional Replication ring
Full Mesh – All replicate to all
Hub and Spoke – All replicate to a single server “HUB”

I will be presenting to you a tutorial to create a DFS structure with file replication.

Consider the following example scenario: Your company wants a redundancy for your file server. Currently she can not invest in a more robust solution with storage and cluster, and thus provides just another server.

Solution: Use the DFS service to provide access through namespace and replication of files between servers.

What is DFS? DFS (Distributed File System) is a service that has as main objective to centralize shared folders and use replication for availability (Full Mesh topology) or centralization of files (Hub and Spoke topology).

For those who want more details about this service you can see at:

For the new DFS in Windows Server 2008 R2: Technet: What’s New in Distributed File System

It is important to remember that DFS does not replace a more complete high availability solution as Cluster let alone a backup routine. In addition, DFS is also widely used to facilitate the management of folders shared in large corporations.

Requirements: I created this tutorial using a lab VMs, but the process is the same for physical machines.

The VMS which were used:

– SVRDC1 (Domain Controller). – SVRFS1 (File Server in production). – SVRFS2 (disponilizado additional server). – CLIENT1 (client machine to perform the tests).

NOTE: The SVRFS1 and SVRFS2 servers must be part of SVRDC1 domain.

Installation: First, install the DFS service in SVRFS1 server:
1 – Go to Start> Run and type ServerManager.msc.
2 – In the Roles node click Add Roles.
3 – Click Next.
4 – Select Role Services File and click Next twice more.
5 – Check the boxes of the DFS service (Namespace and Replication) as the figure below.


2

6 – On the Create Namespace select the Create a namespace later option using the DFS Management snap-in Server Manager. 7 – Click Next and then to install.

Repeat steps 1 through 7 in SVRFS2 server.

Note: In the case of installation on a file server that already has the shares, the File Services role is already enabled, then in step two you need to select the Add Role Services option that just below the Add Roles.

Configuring DFS-N (DFS Namespace):

1 – In SVRFS1 server, open Start> Run and type Dfsmgmt.msc.

2 – With the open console, the Namespace node click the right mouse button and select New Namespace option.

3 – On the screen that appears, enter the first name server that will host the DFS namespace, in my case will be SVRFS1 and then click Next.

4 – Choose the name of your namespace, in my case I chose shares.

5 – On the next screen you must choose the type of Namespace, choose Domain-based type and check the Enable Windows Server 2008 Mode box is checked, then click Next and Create.

6 – After finishing the setting, select the namespace created and right select the Add Namespace Server option.

7 – In the box that appears enter the second server that will be used in my case will be SVRFS2 click OK.

Adding Folders in Namespace:

1 – Click again with the right mouse button on the namespace node and select the New Folder option.

NOTE: You will add the shares or subfolders of the shares that are available in DFS and will be replicated to the second server. It is important to remember that the shares should be already created and permissions (NTFS and Sharing) properly configured (on the second server should only have the shares created with the permissions of Sharing, the rest will be replicated by the DFS service).

2 – In the Name field enter the name of the Folder, counsel put the same name as the share that will be added to facilitate understanding.

3 – Click add and then Browse. Confirm that the Server field this with the desired server and click the Show Shared Folders button.

4 – Is listed all shares for the selected server, choose the desired share, and click OK twice.

Repeat the same process to add the share that the second server. It should look something like the image below:

3

Click OK and a box will appear asking whether to create a replication group for the file, choose Yes.


Configuring DFS-R (DFS Replication):


1 – The replication group wizard will open, click Next twice.
2 – On the Primary Member select the server that will give precedence to the initial replication (this is only used in the first replication, the rest is based on multi-master replication).
3 – In our case select the SVRFS1 production server. Click Next twice.
4 – In Replication Group Schedule and Bandwidth screen you can select a specific time for replication to occur and determine how much bandwidth is used. I will leave the default settings. Click Next and Create and wait for the end of creation.
The screen of your console should look like the image below (except empresa.corp to be the domain where the server part):

4

NOTE: The first replication can take 10 to 15 minutes to start, depending on the environment because the information must be replicated to the domain controller that has the PDC FSMO.

Making tests:

Replication: – To test the replication access the SVRFS1, navigate to the share that you added as folder Namespace and create a new folder or file, and then access the SVRFS2 server in the same way and see if the file is there.

Availability: – Access the client machine (with a user who will have permission to access the shares) and enter the Start> Run the path of the DFS (in my case will be empresa.corp \\ \ shares). – Browse the folder you created and create some files. – If you are doing a lab using VM Hyper-V you can remove the network interface or shut down one of the VMs if the servers are physical can only remove the network cable from one of the servers.

Try to navigate back in the folder, Windows Explorer will be locked for a while but then will return. – Turn the server and do the same with each other and try to access the folder again.
Continue Reading

How to Use Data Deduplication in Windows Server 2012 R2

One of the more useful features of Windows Server 2012 and Windows Server 2012 R2 is native data deduplication. Although deduplication features have existed in storage hardware for years, the release of Windows Server 2012 marks the first time that Microsoft has allowed deduplication to occur at the operating system level.

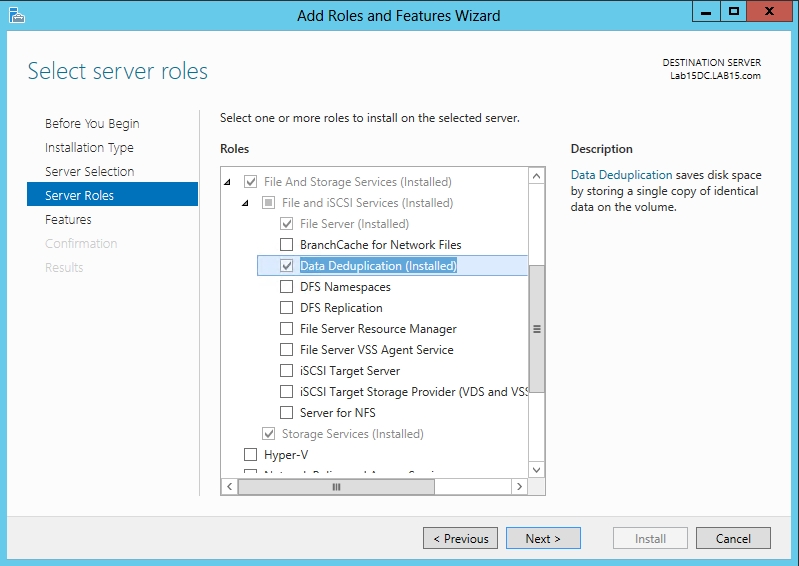
Before you can use the deduplication feature, you will have to install it. To do so, open Server Manager and then choose the Add Roles and Features command from the Manage menu. When the Add Roles and Features Wizard launches, navigate through the wizard until you reach the Add Roles screen. Expand the File and Storage Services role, and then expand the File and iSCSI Services container and select Data Deduplication, as shown in Figure 1. Click Next on the remaining screens and then click Install to install the necessary components. When the process completes, click Close.

Deduplication_Fig1

Deduplication is performed on a per-volume basis. To do duplicate a volume, open the Server Manager and select the Volumes container. Next, right click on a volume and choose the Configure Data Deduplication command from the resulting shortcut menu, as shown in Figure 2.

Deduplication_Fig2

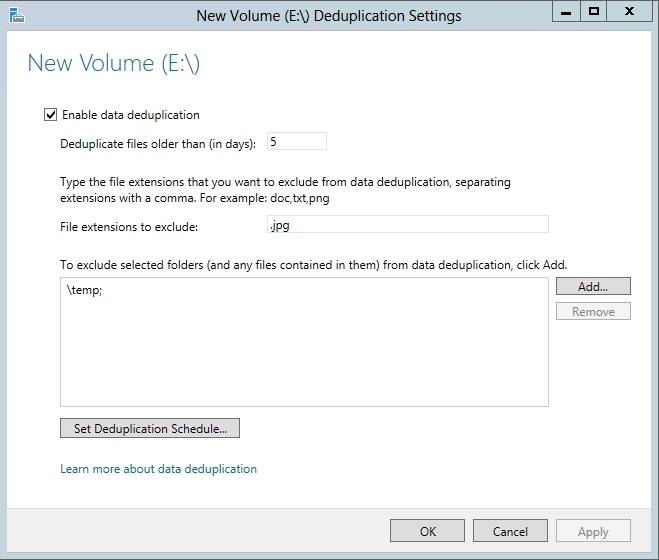
At this point the Deduplication Settings dialog box will appear, as shown in Figure 3. You can enable data deduplication by simply selecting the Enable Data Deduplication check box and clicking OK. However, there are a couple of other settings on this dialog box that are worth paying attention to.

Deduplication_Fig3

The first such setting is the Duplicate Files Older Than setting. The deduplication mechanism in Windows is post process. In other words, deduplication does not happen in real time. Instead, a scheduled process performs the deduplication at a later time. The reason why Microsoft gives you the option of waiting until a file is a few days old before it is be duplicated is because the deduplication process consumes system resources such as CPU cycles and disk I/O. You really don’t want to waste these resources on deduplicating temporary files. Making sure that a file is at least a few days old before it is deduplicated is a great way to avoid wasting system resources.

Another setting that is worth paying attention to is the File Extensions to Exclude setting. The basic idea behind this setting is that some types of files cannot be deduplicated because they are already compressed. This includes things like zip files, and compressed media files such as MP3 files. The File Extensions to Exclude setting lets you avoid wasting system resources by preventing Windows from trying to do duplicate files that most likely will not benefit from the deduplication process. Similarly, if you have folders containing compressed files you can exclude those folders from the deduplication process.

Finally, there is an option to set the deduplication schedule. You should configure the deduplication process to occur outside of peak hours of operation.

Of course this raises the question of the hardware resources that are required in order to perform data deduplication. The minimum supported configuration is a single processor system with 4 GB of RAM and a SATA hard disk. According to Microsoft, a deduplication job needs one CPU core and about 350 MB of RAM. Such a system could theoretically run a single deduplication job that would be capable of processing about 100 GB per hour. Higher-end systems can be duplicate multiple volumes simultaneously. The theoretical limit is that ninety volumes can be deduplicated simultaneously. In reality however, seventeen volumes at a time is a more realistic expectation from today’s hardware.

It is also worth noting that not every volume type can be deduplicated. Windows Server cannot deduplicate a system volume or a boot volume. Furthermore, the volume cannot reside on removable media and it must not be formatted as ReFS. Cluster shared volumes also cannot be deduplicated.

As I alluded to earlier, there are certain data types that can benefit from the deduplication process more than others. However, there are some types of data that should not be deduplicated. For example, you should not attempt to deduplicate a volume containing files that are constantly open or that change frequently. Similarly, Microsoft does not support deduplicating volumes containing Hyper-V virtual hard disks (for production VMs), although Windows Server 2012 R2 supports the deduplication of Hyper-V-based virtual desktops. You should also avoid deduplicating any volume containing files that are near 1 TB in size.

The biggest restriction with regard to data deduplication is that you cannot deduplicate volumes containing Exchange Server or SQL Server databases. If you attempt to do duplicate these volumes, there is a very real chance that you will corrupt the databases. Although not explicitly spelled out by Microsoft support policies, I recommend that you avoid deduplicating any volume containing a database. Many database applications expect to have control over the way the database pages are stored. Introducing deduplication when the database application expects to have full control over the underlying storage can result in corruption.

The Windows Server native deduplication feature does a great job of helping to conserve physical storage. Even so, it is important to properly plan for deduplication prior to implementing it because there are a number of situations in which the use of deduplication is not appropriate.

Continue Reading

Recuperando a senha do Administrador do Windows Server 2008 / R2

Aplica-se: Windows Vista /  Windows 7 / Windows Server 2008 / Windows Server 2008 R2

Neste tutorial iremos abordar um assunto muito polemico referente a recuperação de senha do Windows, podemos realizar uma busca no Bing ou Google iremos achar vários tutorias e ferramentas para realização da tarefa, queremos demonstrar de forma clara e fácil como podemos resolver este problema.

A forma segura que não altere a estrutura do sistema operacional e suas funcionalidades, estamos falando em realizar esta ação sem precisar daquelas mídias com aqueles sistema com milhares de distribuições e alterações, neste caso iremos utilizar a mídia do próprio sistema operacional em nosso exemplo: Windows Server 2008 R2

Em nosso exemplo estamos utilizando o Hyper-V R2 utilizando uma VM com Windows Server 2008 R2 e conforme a mensagens abaixo não possuímos a senha do administrador : Nome de usuário ou senha incorreta.

1

Então iremos realizar o Boot com a mídia do sistema.

2

Primeiramente temos as opções de Idiomas e formato do teclado.

3

Iniciando modo de recuperação da senha, devemos entrar no modo de Recuperação do Sistema.

4

Iremos selecionar a opção ( Prompt de Comando ).

5

Com o Prompt de Cmando aberto, iremos mudar o diretório para “D:” e navegar até a pastaD:\Windows\Sustem32

Obs.: em nosso exemplo a letra D: é referência onde o Windows foi instalado, contudo na maiorias das vezes fica localizado em C:

6

Agora vamos renomear o utilitário conhecido como Utilman, através do seguinte comando: “renutilman.exe utilman.bak

Agora vamos renomear o utilitário conhecido como Utilman, através do seguinte comando: “renutilman.exe utilman.bak

7

Processo com a mídia de instalação concluída, devemos reiniciar o computador.

9

Neste momento não iremos utilizar a mídia de instalação, devemos iniciar o sistema normalmente.

Com o sistema iniciado, iremos utilizar um combinação de teclas “Windows + U”, neste momento a ferramenta do Windows será inciada, contudo será o Prompt de Comando que iremos possuir total acesso.

10

Neste momento iremos realizar a alteração da senha, iremos alterar a senha do usuário como Administrador.

Iremos utilizar o comando “net user [nome do usuário administrador do domínio] [nova senha], em nosso exemplo: “Net user administrador Pass@word”

11

Basta fechar o utilitario e entrar com a nova senha da conta administrador.

12

Neste tutorial demonstramos como utilizar a propria midia do sistema operacional para recuperar a senha do Windows Server 2008 R2, no entando para garantir a segurança do sistema e recomendado retornar o processo e voltar a habilitar a ferramenta de utilman.exe. Ele é o gerenciador de utilitários do Windows e serve para garantir a acessibilidade a pessoas com deficiências visuais, auditivas, que estejam com problemas no teclado, etc. Ele é um aplicativo do sistema, legítimo e não convém desabilitá-lo.

Obrigado pela leitura e até a próxima publicação.

Continue Reading